Layouts and Pages
Creating Layouts and Pages in Next.js
1. Introduction or Motivation
Hey everyone! In this section, we're diving into a crucial aspect of web development: creating layouts and pages. Why is this important? Well, imagine building a website without any structure. It'd be like trying to find a specific book in a library with no shelves or organisation – a complete mess! Next.js provides a fantastic solution using a file-system-based routing system, making it incredibly easy to organise our web applications. Think of it as creating a well-organized library where every book (page) has its designated place, and shared sections (layouts) like the library's reception area or cafe are consistent across different sections. We'll use a blog website as our running example throughout this lesson. We want to be able to filter blog posts based on the properties of the blog post.
2. Lecture: Building Our Blog with Next.js Layouts and Pages
Let's start by understanding the fundamental building blocks: pages and layouts.
2.1 Pages: The Content of Our Blog
A page is simply the user interface displayed at a specific URL. It's the actual content of our blog posts, the "books" in our library analogy. In Next.js, creating a page is as easy as creating a file inside the app directory and exporting a React component.
Simple Example
Let's create our homepage (app/page.tsx):
export default function Page() {
  return <h1>Welcome to My Blog!</h1>;
}
This simple component renders "Welcome to My Blog!" when a user visits the root URL (/).
Advanced Example
Now, let's create a page for all blog posts (app/blog/page.tsx):
import { getPosts } from '@/lib/posts'
import { Post } from '@/ui/post'

export default async function Page() {
  const posts = await getPosts()

  return (
    <ul>
      {posts.map((post) => (
        <Post key={post.id} post={post} />
      ))}
    </ul>
  )
}
This page fetches blog post data (we'll assume getPosts is a function that retrieves this data) and renders a list of Postcomponents, each representing a single blog post.
2.2 Layouts: The Shared Structure of Our Blog
A layout is UI shared across multiple pages. Think of it as the consistent header, footer, or sidebar of our blog. Layouts help maintain a consistent look and feel and prevent code duplication. In Next.js, we create a layout by exporting a React component from a layout.tsx file.
Simple Example
Let's create a root layout (app/layout.tsx):
export default function RootLayout({
  children,
}: {
  children: React.ReactNode
}) {
  return (
    <html lang="en">
      <body>
        <header>My Blog Header</header>
        <main>{children}</main>
        <footer>My Blog Footer</footer>
      </body>
    </html>
  );
}
This layout provides the basic HTML structure, a header, a main content area (where our pages will be rendered), and a footer. The children prop is crucial; it's where Next.js injects the content of the current page.
- Advanced Example: Let's add a layout specifically for our blog section (
app/blog/layout.tsx):
TypeScript
export default function BlogLayout({
  children,
}: {
  children: React.ReactNode
}) {
  return (
    <section>
      <h2>Blog Posts</h2>
      {children}
    </section>
  );
}
This layout adds a title ("Blog Posts") above the actual blog post content. Now, when a user visits /blog, they'll see the root layout (header, footer) and the blog layout (title).
2.3 Nested Routes: Organizing Our Blog Content
As our blog grows, we might want to organize posts into categories or have individual pages for each post. This is where nested routes come in. In Next.js, we use folders to create nested routes.
- Simple Example: To create a page for individual blog posts (e.g.,
/blog/my-first-post), we create a folder[slug]insideapp/blog/and add apage.tsxfile:
TypeScript
// app/blog/[slug]/page.tsx
export default function PostPage() {
  return <h1>Individual Blog Post</h1>;
}
The [slug] is a dynamic route segment. It means Next.js will create a page for every possible value of slug (e.g., "my-first-post", "another-post").
- Advanced Example: Let's display the actual content.
TypeScript
// app/blog/[slug]/page.tsx
import { getPostBySlug } from '@/lib/posts';

export default async function PostPage({ params }: { params: { slug: string } }) {
  const post = await getPostBySlug(params.slug);
  return (
      <div>
          <h1>{post.title}</h1>
          <p>{post.content}</p>
      </div>
  );
}
We fetch the specific post based on the slug and display its title and content.
2.4 Linking Between Pages: Navigating Our Blog
Finally, we need a way to navigate between pages. Next.js provides the <Link> component for this.
- Simple Example: In our
Postcomponent (app/ui/post.tsx):
TypeScript
import Link from 'next/link';

export default function Post({ post }) {
  return (
    <li>
      <Link href={`/blog/${post.slug}`}>{post.title}</Link>
    </li>
  );
}
This creates a link to the individual blog post page.
- Advanced Example: Let's imagine we want to filter our blog posts by category. We can create a dynamic route like
/blog/category/[categoryName]and use the router to access the category.
TypeScript
// app/blog/category/[categoryName]/page.tsx
import { useRouter } from 'next/router';
import { getPostsByCategory } from '@/lib/posts';

export default async function CategoryPage() {
    const router = useRouter();
    const { categoryName } = router.query;
    const posts = await getPostsByCategory(categoryName);
    return (
        <ul>
            {posts.map((post) => (<Post key={post.id} post={post} />))}
        </ul>
    );
}
3. Conclusion
Today, we learned how to create layouts and pages in Next.js using its file-system routing. We explored pages, layouts, nested routes, and linking between pages. Remember, layouts provide shared UI, while pages display specific content. Nested routes allow for complex URL structures, and the <Link> component enables smooth navigation. By structuring our blog with layouts and pages, we ensure a well-organized, user-friendly, and maintainable website. Understanding these concepts is fundamental to building any Next.js application.
Slides

Hey everyone! In this section, we're diving into a crucial aspect of web development: creating layouts and pages.
Today we will learn how to create layouts and pages in NextJS using its file-system routing. This is a very important concept for building any NextJS application.

Think of a library without shelves. It would be a mess. NextJS file-system routing helps us to organise our web application in a structured way. All you need to do is create a file in a specific folder to create a new page or API route!
We will start building a simple blog website throughout this lesson. Let's go!
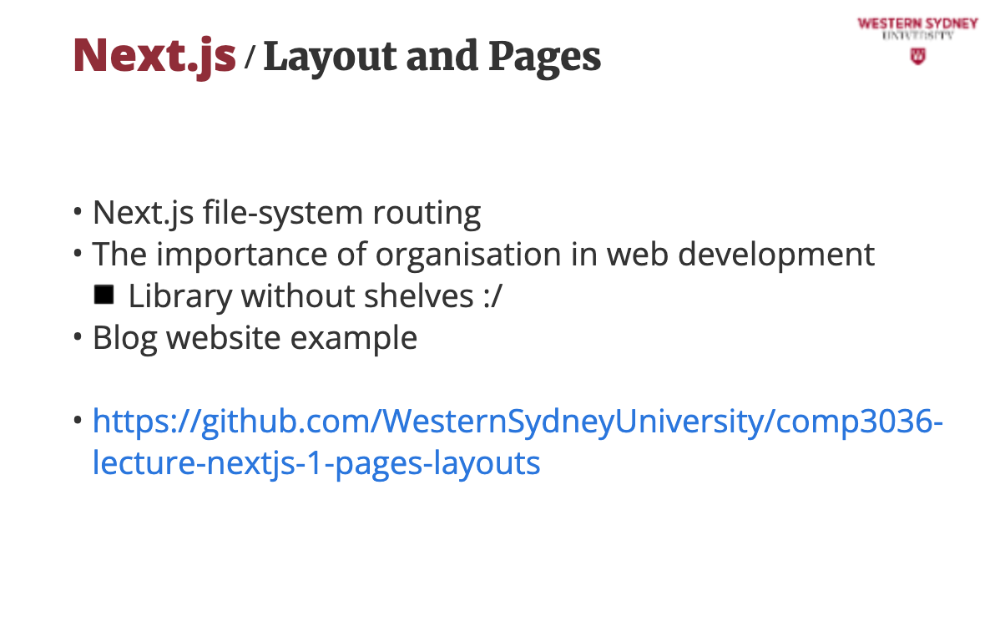
During in-person lectures, we will use the companion code from Github to show you live demos. Please clone this if you want to follow along.
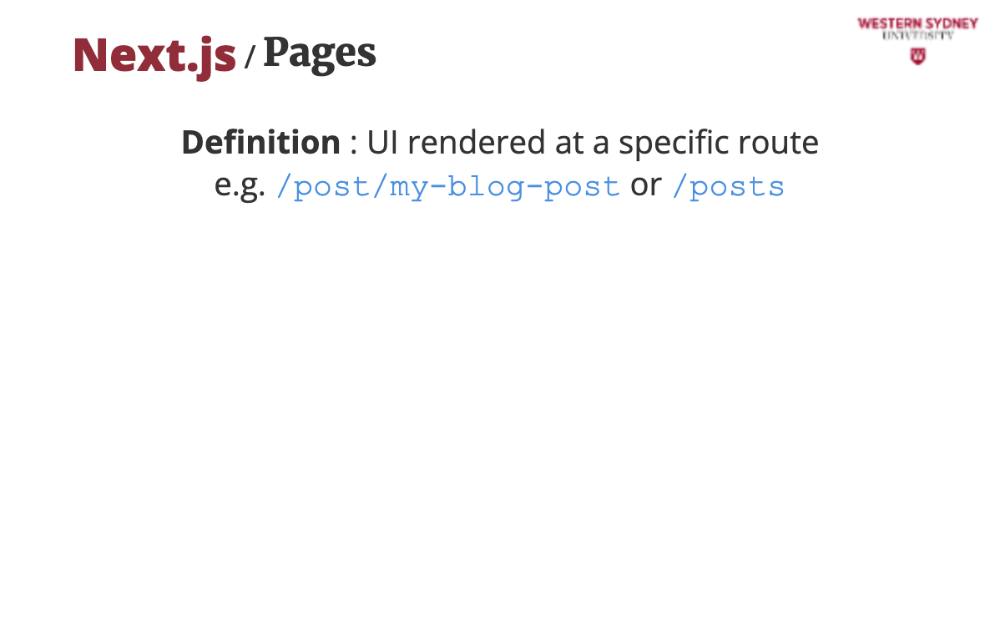
A page is the content the user sees when they visit a specific URL. It's the "book" on a particular shelf or address in our library analogy.
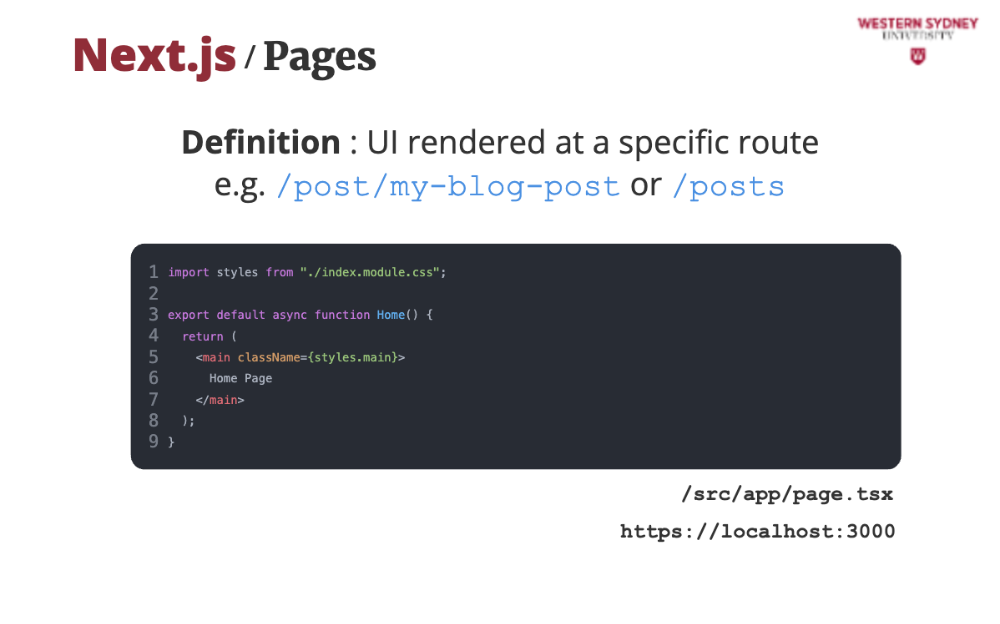
To modify the home page, we modify the file named "page tsx" inside the app directory. How do we create a new route to display the list of available blog posts? Let's examine how file-based routing works.
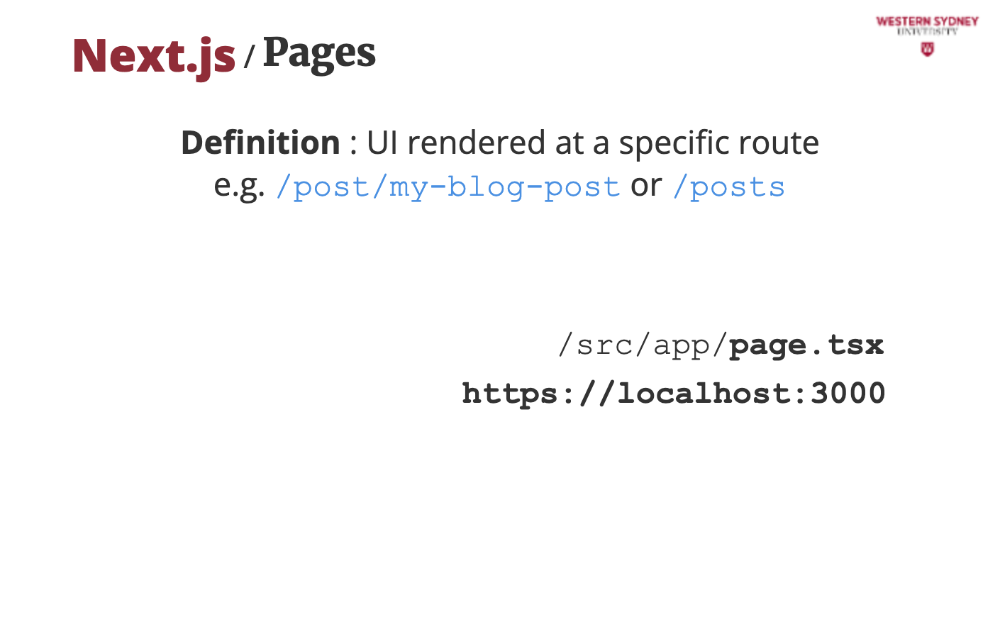
The app folder in src/app is the root of the router. The page tsx file in this folder renders the home page.
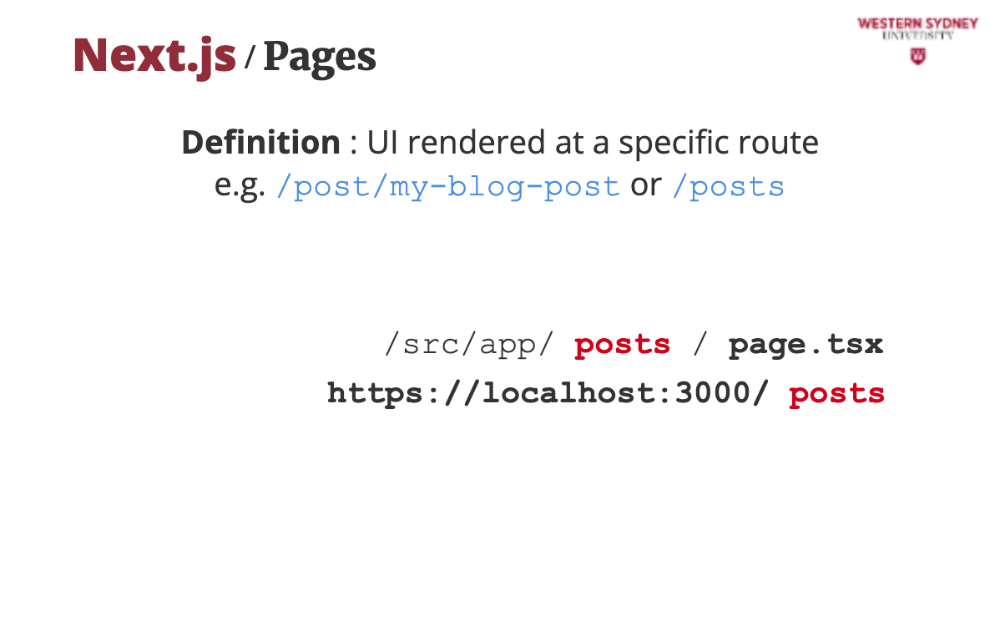
If we create a subdirectory posts and place a brand new page file there, we will be able to access it in browser at URL /posts
With file-based routing we can create complex websites with deep structures of URLs. But that's not all.
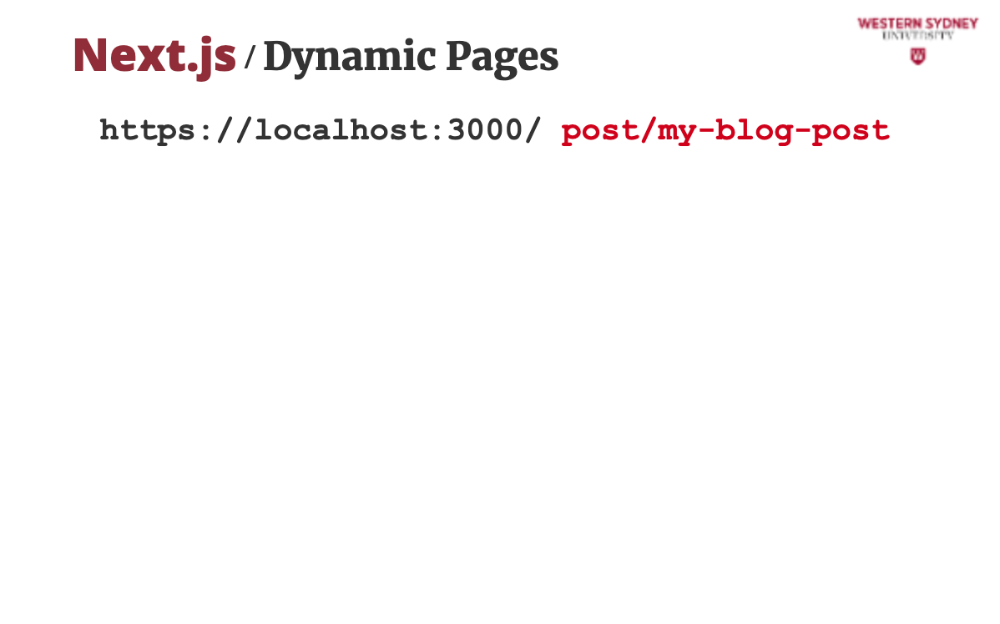
Imagine you wish to show different blog posts, which you want to identify by their ID in URL. The application has to be able to extract the ID from the url and load the appropriate post. These are called dynamic pages.
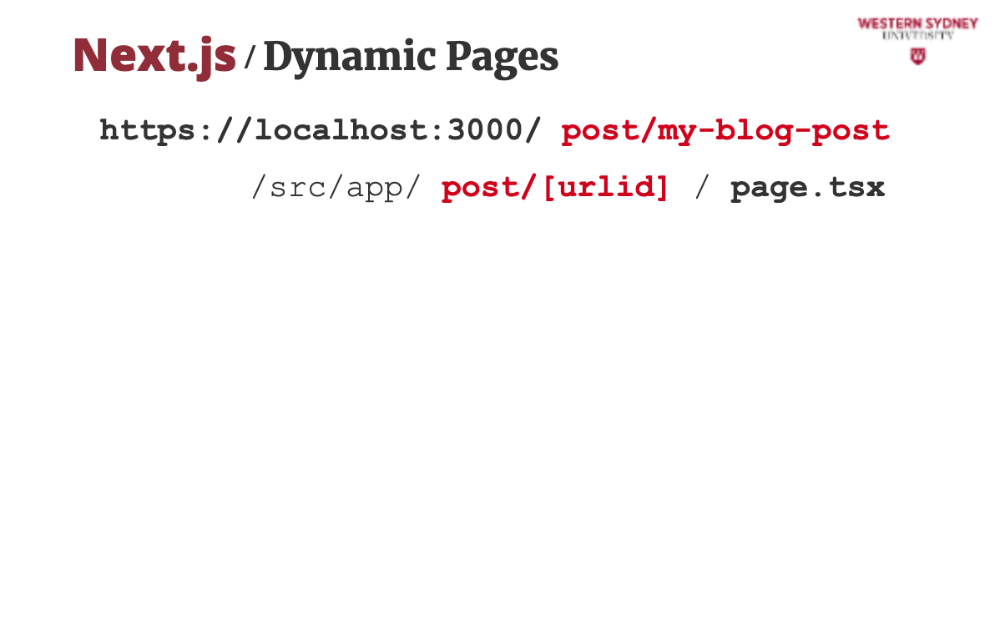
With NextJS, we identify dynamic segments of the URL using the square brackets, with the name of that dynamic segment between the brackets.
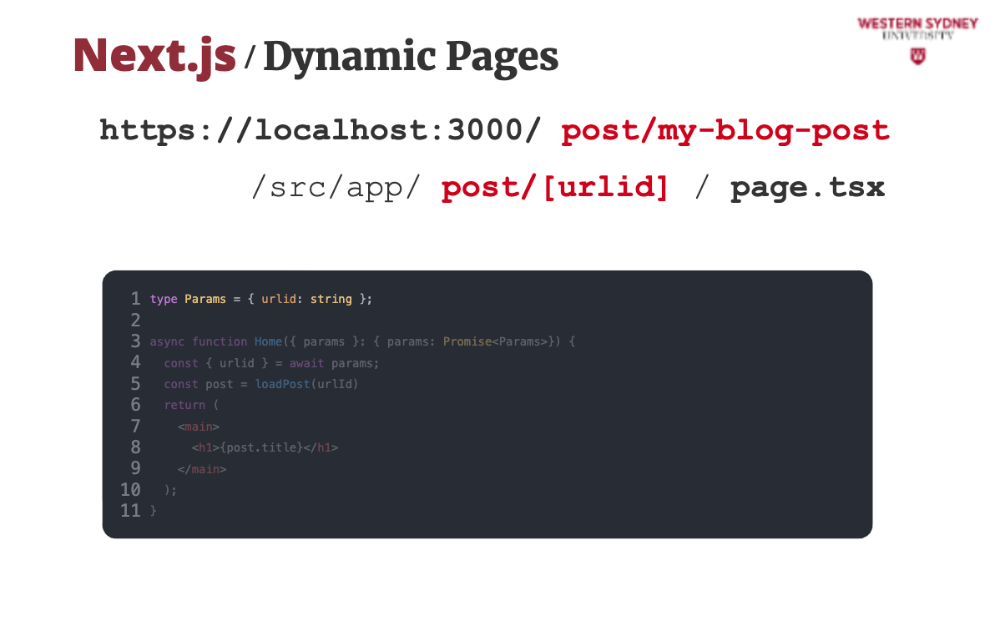
Then, we define the type of the params in the page file ...
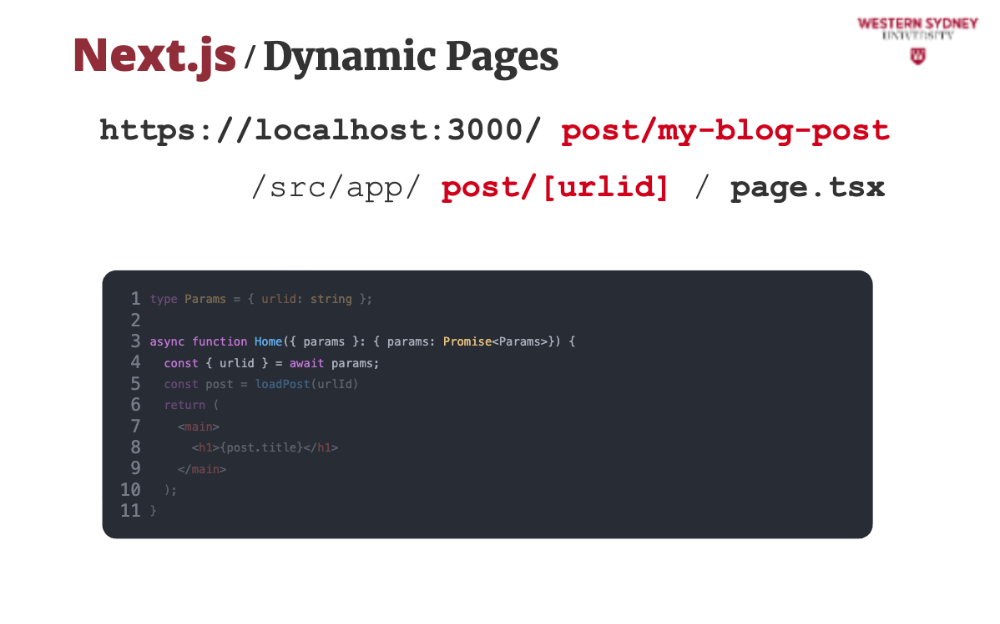
... where we can extract the params from the props of the page, provided by NextJS.
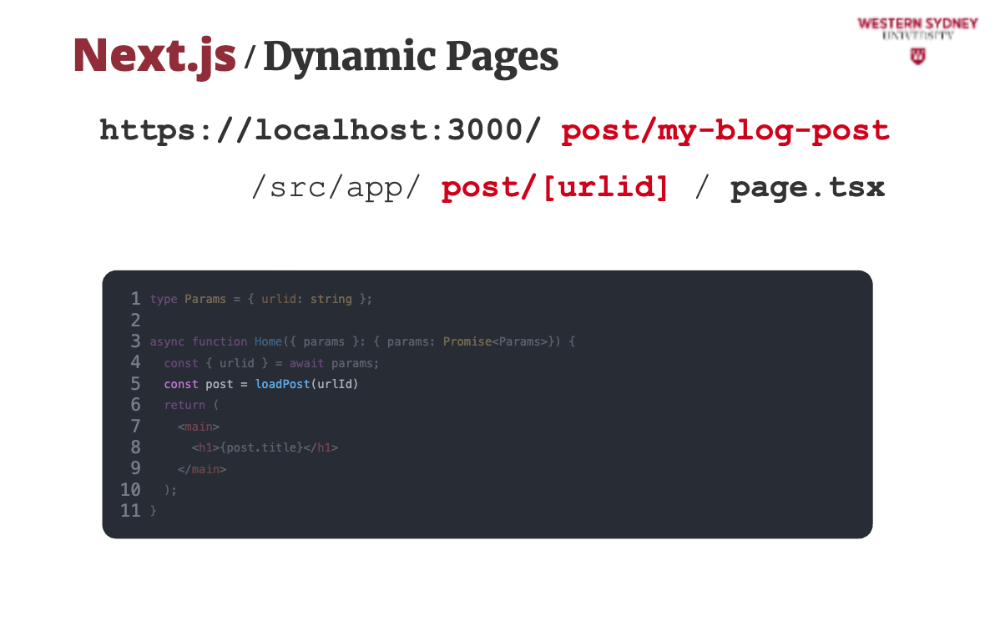
Last, we can use the extracted urlid param to load the desired blog post
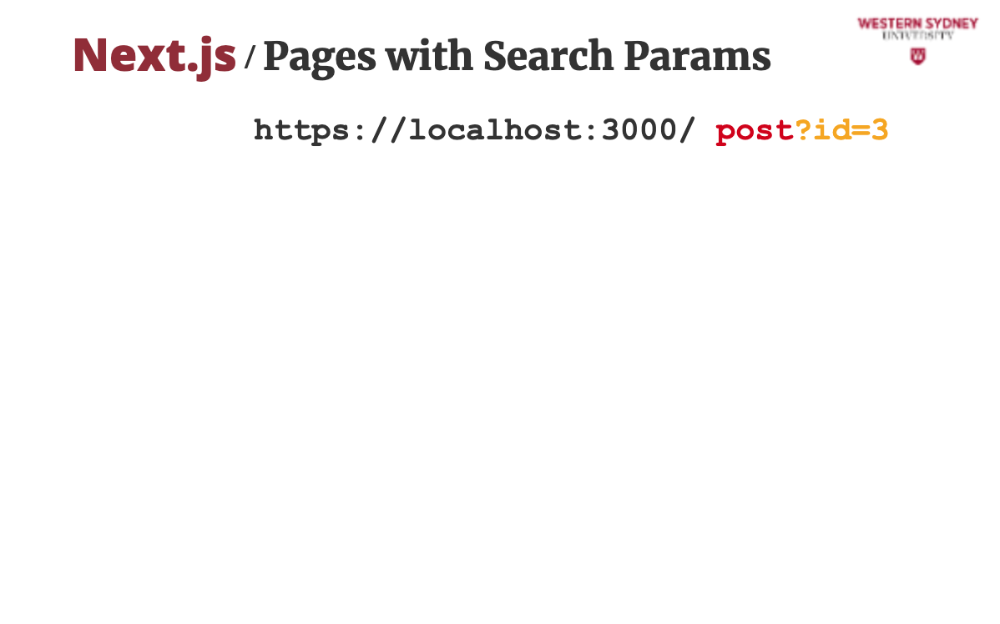
The other option for storing data in the URL is through query parameters, which we call in NextJS search parameters. In our case, we use the search param id, defining the id of the blog post we wish to show.
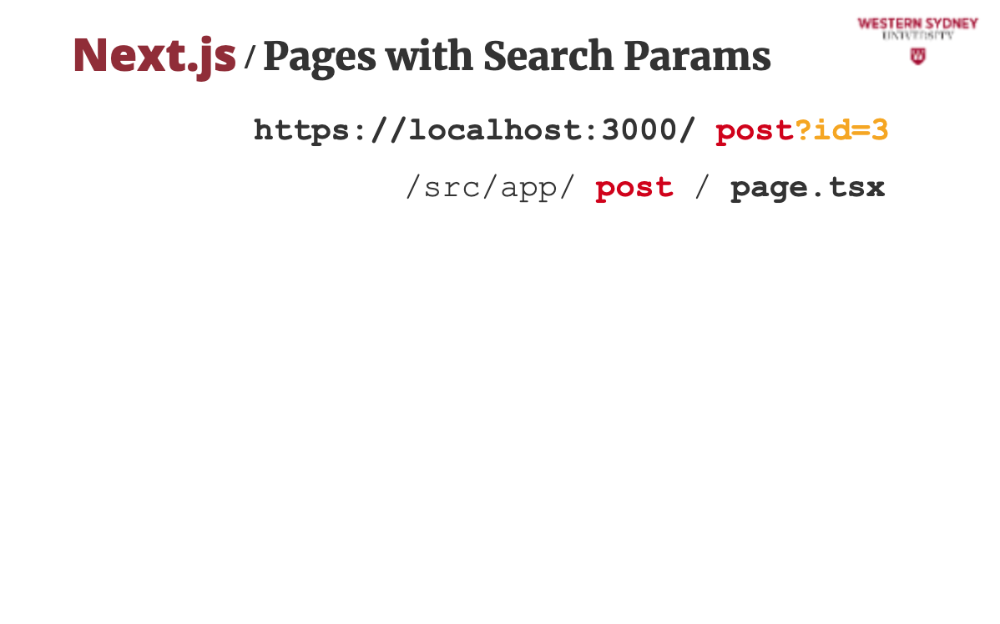
Search parameters do not define the path of the file, only the route segments and dynamic segment. Therefore, in this case, the page will be stored in the /post directory under your router root directory.
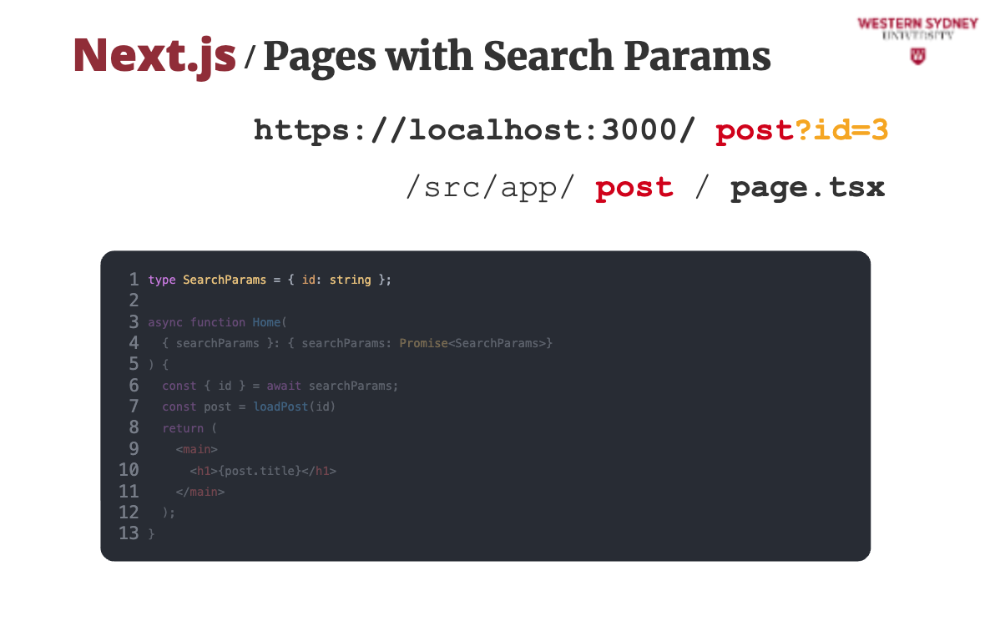
To use search params in your page, you first define the expected type.

Then, you can extract search parameters from the props of the page. Same as the parameters, this is an asynchronous operation. This approach works only on server and later on we will show you how to access both params and search params on client.
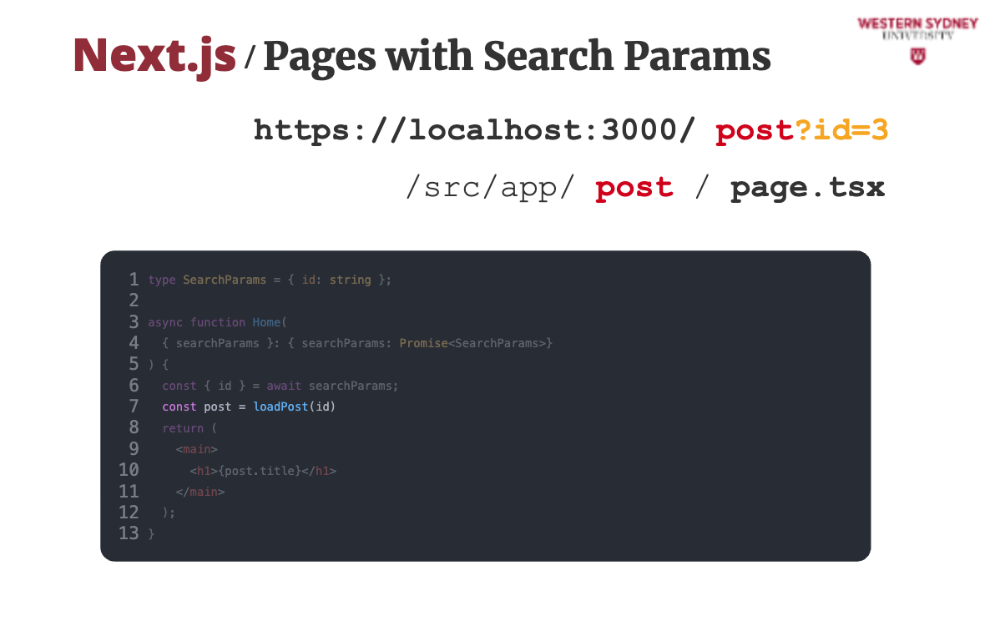
With the id extracted from search params, you can now use it to retrieve your post.
Now we know how to create different routes and show different content, but how do we properly link these routes?
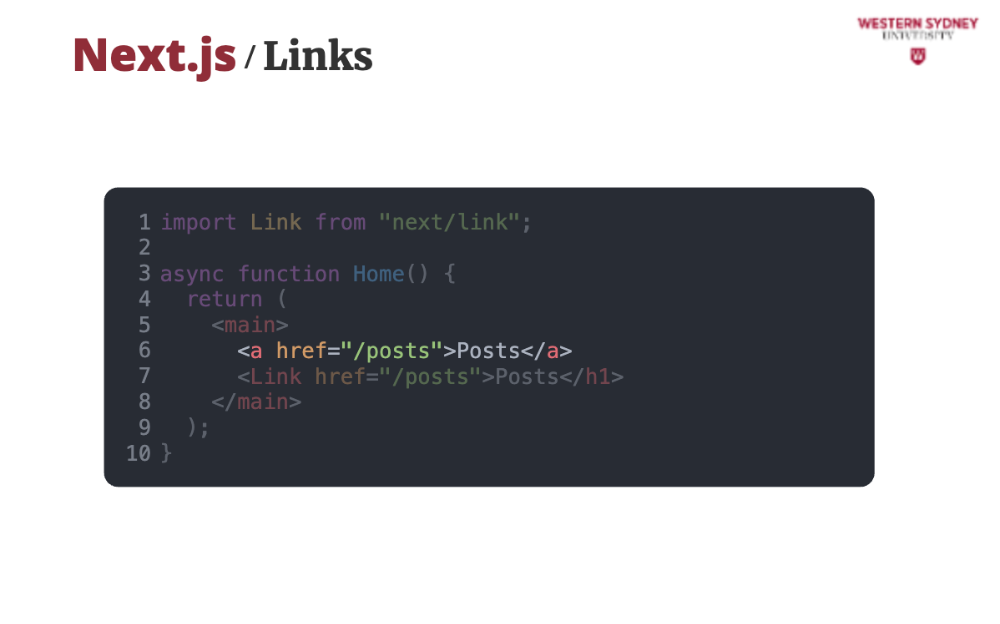
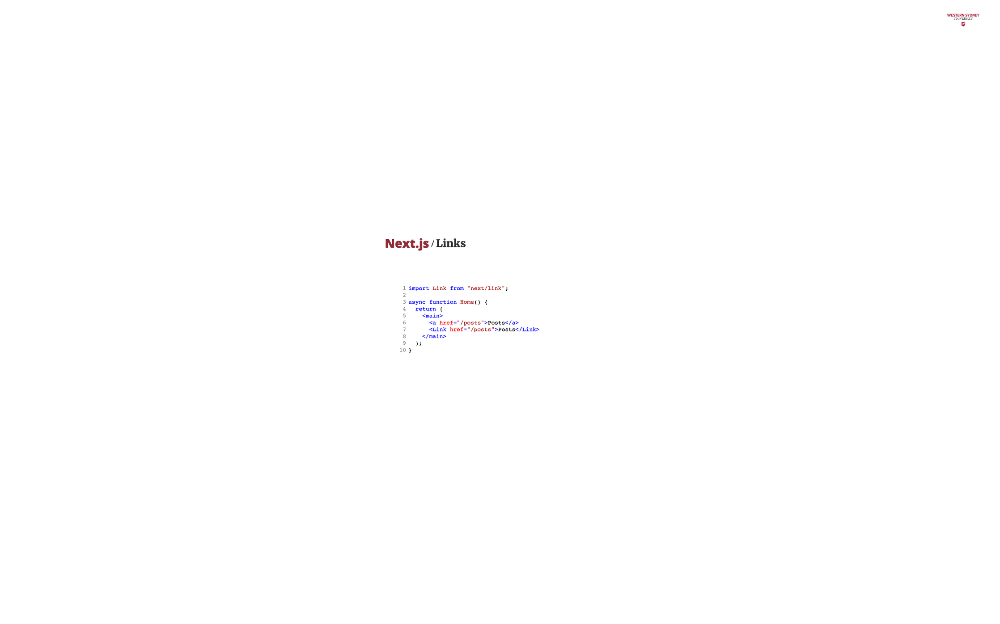
Traditionally, we use the anchor element to point to different pages. This is perfectly possible in NExtJS, but it comes with a full page reload, unnecessarily re-loading all the resources that are already loaded.
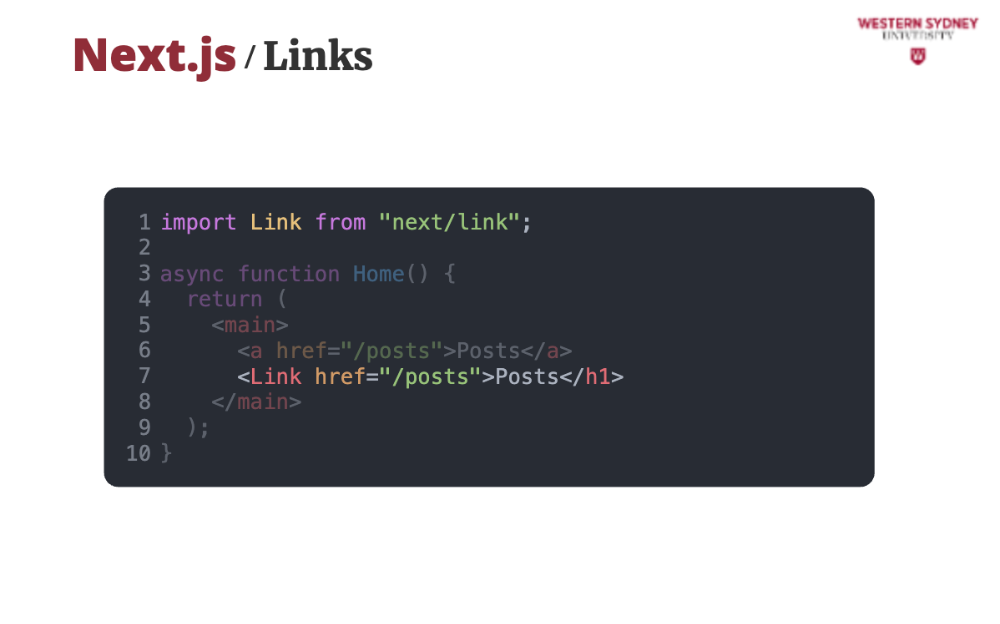
Instead, NextJS provides the Link component that works like a standard anchor element, but for all links pointing to the same application, it only loads the new route without the full page reload. Try it out!
A layout is the consistent header, footer, or sidebar of our blog. It helps maintain a consistent look and feel and prevents code duplication.
A layout is the consistent header, footer, or sidebar of our blog. It helps maintain a consistent look and feel and prevents code duplication.
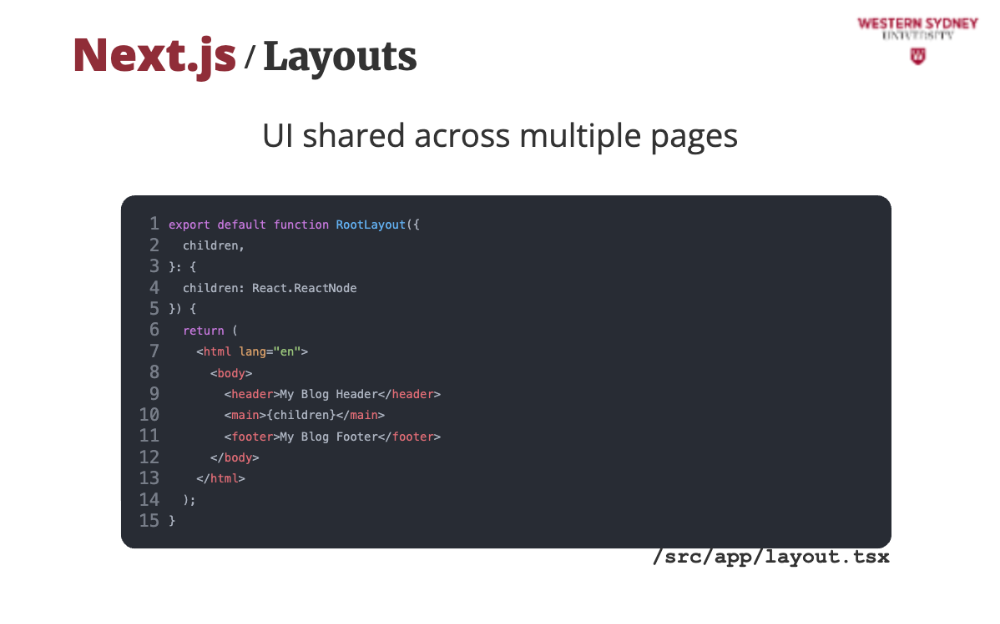
We create a layout by exporting a React component from a layout tsx file. The component should accept a children prop, which is where Next.js injects the current page's content. The layout only applies for all the pages stored in the same directory and below!
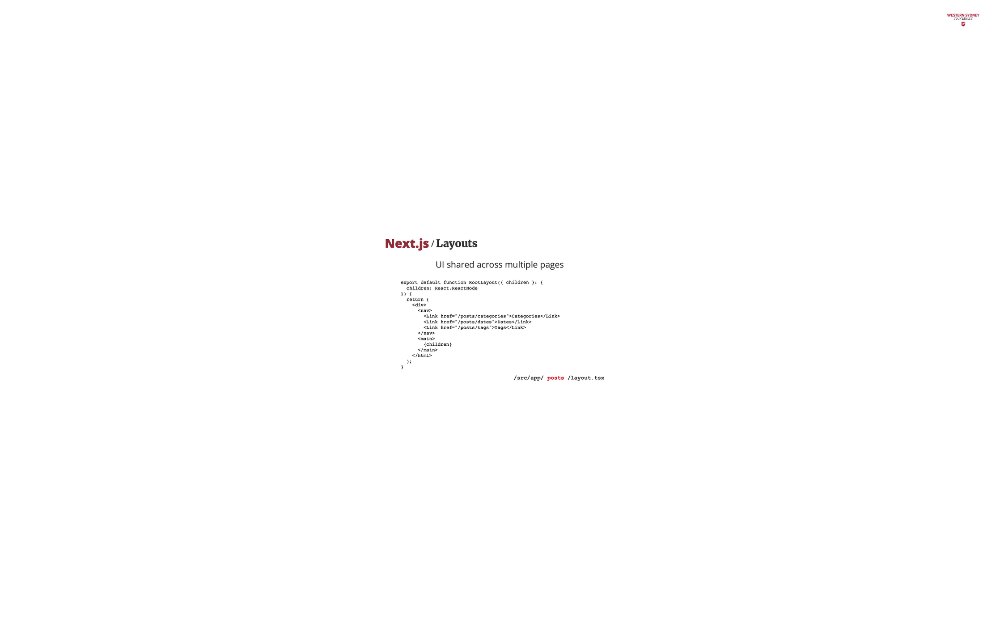
Respecting the folder structure, you can apply nested layout for all pages stored in the /posts directory.