Component Testing with React Testing Library
Integration Testing and Component Testing with Vitest and React Testing Library
Picture our blogging app built with Next.js, TypeScript, and React 19: users browse posts by tag, admins edit them, and everything’s humming along—until a component fails to load data or a button does nothing. Testing individual pieces isn’t enough; we need to ensure they work alone and together. Today, we’ll master component testing and integration testing with Vitest and React Testing Library, set them up in our project, and tackle React 19’s async components using our blogging app as the guinea pig.
You might think, “I’ll just eyeball it in the browser,” but that misses sneaky bugs—like an async fetch failing silently. Or maybe, “Setup sounds hard.” Surprise: it’s straightforward, and with Vitest’s speed and React Testing Library’s user-first approach, we’ll catch issues fast—spying and mocking included!
Section 1: Setting Up Vitest and React Testing Library
Before we test, let’s get our tools ready in our Next.js project. Vitest is our test runner, and React Testing Library helps us test components like users see them.
Step-by-Step Setup
- Install Dependencies
Run this in your Next.js project:
npm install --save-dev vitest @vitejs/plugin-react @testing-library/react @testing-library/jest-dom jsdom- Why:
vitest: Fast test runner with TypeScript support.@vitejs/plugin-react: Enables React in Vitest.@testing-library/react: Renders and queries React components.@testing-library/jest-dom: Adds handy assertions (e.g.,toBeInTheDocument).jsdom: Simulates a browser environment for tests.
- Configure Vitest
Create
vitest.config.tsin the project root:import { defineConfig } from "vitest/config"; import react from "@vitejs/plugin-react"; export default defineConfig({ plugins: [react()], test: { environment: "jsdom", // Simulates browser for React globals: true, // Allows `describe`, `it` without imports setupFiles: "./tests/setup.ts", // Custom setup file }, });- Explanation: This tells Vitest to use React and jsdom, and enables global test functions for cleaner code.
- Setup File
Create
tests/setup.ts:import "@testing-library/jest-dom";- Why: Extends Vitest with Jest-DOM matchers (e.g.,
toBeDefinedbecomestoBeInTheDocument).
- Update
<strong>package.json</strong>Add test scripts:
"scripts": { "test": "vitest run", "test:watch": "vitest" }- Explanation:
testruns all tests once;test:watchruns them interactively.
- TypeScript Config
Ensure
tsconfig.jsonincludes:{ "compilerOptions": { "types": ["vitest/globals", "@testing-library/jest-dom"] } }- Why: Adds type definitions for Vitest and Jest-DOM.
Verify It Works
Create a dummy test file,
tests/example.test.tsx:import { describe, it, expect } from "vitest"; describe("Setup Check", () => { it("works", () => { expect(true).toBe(true); }); });- Run
npm test. If “1 passed” shows, you’re set!
Blogging App Context
- Our app lives in
pages/,components/, andutils/. Tests go intests/or next to files (e.g.,components/PostPreview.test.tsx).
Section 2: Component Testing – Testing the Building Blocks
Component testing ensures individual React components work in isolation—like a single post preview in our blogging app.
Why It Matters
- Misconception: “If it renders, it’s good.” Wrong! A component might look fine but break with real props or async data.
- React 19’s async components (e.g., with Suspense) need special testing for loading and resolved states.
How It Works
Let’s test a PostPreview component.
Simple Example
// components/PostPreview.tsx
import { formatDate } from "../utils/date";

interface PostPreviewProps { title: string; date: Date; }
export function PostPreview({ title, date }: PostPreviewProps) {
  return (
    <div>
      <h2>{title}</h2>
      <p>{formatDate(date)}</p>
    </div>
  );
}

// utils/date.ts
export function formatDate(date: Date): string {
  return date.toLocaleDateString("en-US", { month: "long", day: "numeric", year: "numeric" });
}

// tests/PostPreview.test.tsx
import { render, screen } from "@testing-library/react";
import { PostPreview } from "../components/PostPreview";

describe("PostPreview", () => {
  it("renders title and formatted date", () => {
    render(<PostPreview title="My First Post" date={new Date("2025-04-07")} />);
    expect(screen.getByText("My First Post")).toBeInTheDocument();
    expect(screen.getByText("April 7, 2025")).toBeInTheDocument();
  });
});- Explanation: We pass props and check output with
screen.getByText. Vitest runs this in jsdom, simulating a browser. - How It Works: Fast (milliseconds), no external calls—just pure component logic.
Advanced Example: Async Component with React 19
React 19 improves async rendering. Let’s test an async PostContent component:
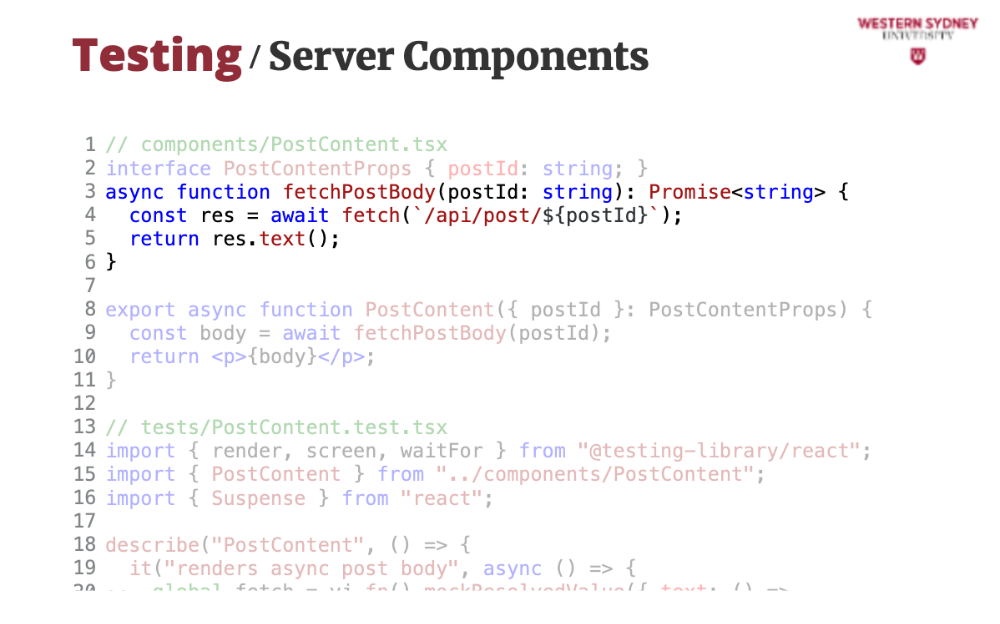
// components/PostContent.tsx
import { Suspense } from "react";

interface PostContentProps { postId: string; }
async function fetchPostBody(postId: string): Promise<string> {
  const res = await fetch(`/api/post/${postId}`);
  return res.text();
}

export async function PostContent({ postId }: PostContentProps) {
  const body = await fetchPostBody(postId);
  return <p>{body}</p>;
}

// tests/PostContent.test.tsx
import { render, screen, waitFor } from "@testing-library/react";
import { PostContent } from "../components/PostContent";
import { Suspense } from "react";

describe("PostContent", () => {
  it("renders fetched post body with Suspense", async () => {
    global.fetch = vi.fn().mockResolvedValue({ text: () => Promise.resolve("Hello, world!") } as any);
    render(
      <Suspense fallback={<p>Loading...</p>}>
        <PostContent postId="1" />
      </Suspense>
    );
    expect(screen.getByText("Loading...")).toBeInTheDocument();
    await waitFor(() => expect(screen.getByText("Hello, world!")).toBeInTheDocument());
  });
});- Explanation: We mock
fetchwith Vitest’svi.fn(), test the loading state, and usewaitForfor the resolved state. - How It Works:
Suspensehandles async rendering, a React 19 perk, and we verify both phases.
Pros and Cons
- Pros: Quick, isolates UI bugs, perfect for React 19 async testing.
- Cons: Misses interactions with other components or real APIs.
Section 3: Integration Testing – Connecting the Dots
Integration testing checks how components work together—like fetching posts and displaying them in our blogging app.
Surprise Factor
- Misconception: “Component tests are enough.” Nope! A component might pass alone but fail when fetching data or updating state.
- Async flows in React 19 (e.g., API calls) need integration tests to catch timing issues.
How It Works
Let’s test PostList with PostPreview.
Simple Integration Example
// components/PostList.tsx
import { useEffect, useState } from "react";
import { PostPreview } from "./PostPreview";

interface Post { title: string; date: Date; }
export function PostList() {
  const [posts, setPosts] = useState<Post[]>([]);
  useEffect(() => {
    fetch("/api/posts")
      .then((res) => res.json())
      .then((data) => setPosts(data.map((p: any) => ({ ...p, date: new Date(p.date) }))));
  }, []);
  return (
    <div>
      {posts.map((post) => (
        <PostPreview key={post.title} title={post.title} date={post.date} />
      ))}
    </div>
  );
}

// tests/PostList.test.tsx
import { render, screen } from "@testing-library/react";
import { PostList } from "../components/PostList";

describe("PostList", () => {
  it("fetches and renders multiple posts", async () => {
    global.fetch = vi.fn().mockResolvedValue({
      json: () => Promise.resolve([
        { title: "Post 1", date: "2025-04-07" },
        { title: "Post 2", date: "2025-04-08" },
      ]),
    } as any);
    render(<PostList />);
    expect(await screen.findByText("Post 1")).toBeInTheDocument();
    expect(await screen.findByText("April 7, 2025")).toBeInTheDocument();
    expect(await screen.findByText("Post 2")).toBeInTheDocument();
  });
});
- Explanation: Tests fetching and rendering together.
findByTextwaits for async updates. - How It Works: Slower than component tests, but ensures data flows to child components.
Advanced Example: Spying and Mocking with Filters
// components/PostList.tsx
import { useEffect, useState } from "react";
import { PostPreview } from "./PostPreview";
interface Post { title: string; date: Date; tag: string; }
export function PostList() {
const [posts, setPosts] = useState<Post[]>([]);
const [tag, setTag] = useState<string | null>(null);
useEffect(() => {
const url = tag ? `/api/posts?tag=${tag}` : "/api/posts";
fetch(url)
.then((res) => res.json())
.then((data) => setPosts(data.map((p: any) => ({ ...p, date: new Date(p.date) }))));
}, [tag]);
return (
<div>
<button onClick={() => setTag("tech")}>Filter Tech</button>
{posts.map((post) => (
<PostPreview key={post.title} title={post.title} date={post.date} />
))}
</div>
);
}
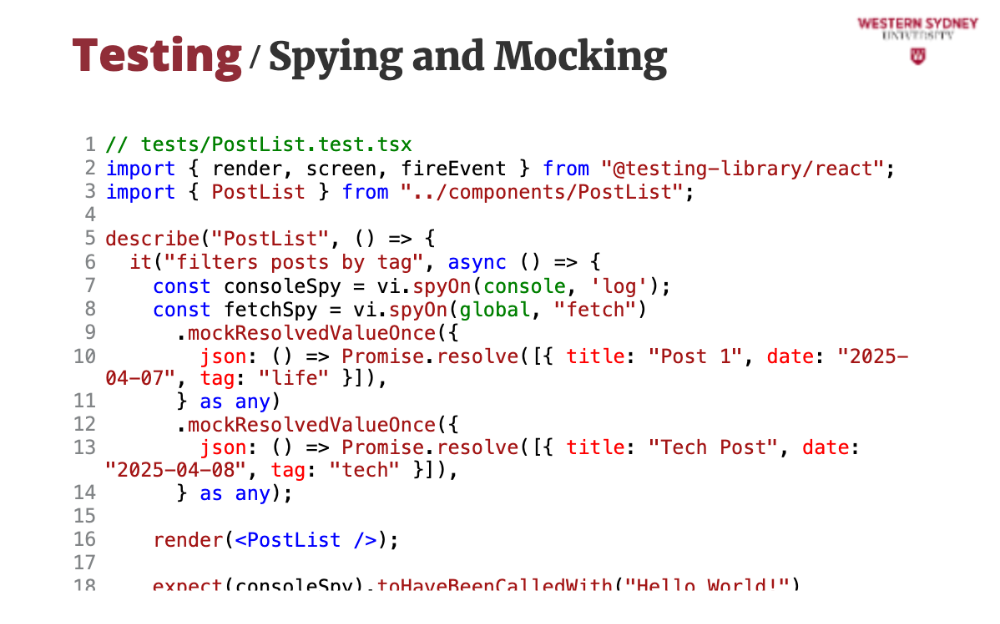
// tests/PostList.test.tsx
import { render, screen, fireEvent } from "@testing-library/react";
import { PostList } from "../components/PostList";
describe("PostList", () => {
it("filters posts by tag when button clicked", async () => {
const fetchSpy = vi.spyOn(global, "fetch")
.mockResolvedValueOnce({
json: () => Promise.resolve([{ title: "Post 1", date: "2025-04-07", tag: "life" }]),
} as any)
.mockResolvedValueOnce({
json: () => Promise.resolve([{ title: "Tech Post", date: "2025-04-08", tag: "tech" }]),
} as any);
render(<PostList />);
expect(await screen.findByText("Post 1")).toBeInTheDocument();
fireEvent.click(screen.getByText("Filter Tech"));
expect(await screen.findByText("Tech Post")).toBeInTheDocument();
expect(screen.queryByText("Post 1")).toBeNull();
expect(fetchSpy).toHaveBeenCalledWith("/api/posts?tag=tech");
});
});
- Spying:
fetchSpytracks calls and confirms the filtered URL. - Mocking: Two mock responses simulate initial and filtered fetches.
- Explanation: Tests state updates, refetching, and re-rendering—true integration!
Pros and Cons
- Pros: Catches interaction bugs, tests async flows.
- Cons: Slower, more complex to debug than component tests.
Section 4: Spying and Mocking – Mastering Control
Spying and mocking let us fake behavior and inspect calls, crucial for integration tests.
Spying
- What: Tracks function calls (e.g.,
fetchSpychecks URLs). - How:
vi.spyOn(global, "fetch")monitors without altering behavior unless mocked. - Use: Verify interactions (e.g., button click triggers correct fetch).
Mocking
- What: Fakes implementations.
- Tools:
vi.fn(): Custom mock function.vi.spyOn().mockResolvedValue(): Mocks async responses.
- Example: Mocking
fetchfor controlled test data.
We'll cover spying and mocking in the next lecture!
Conclusion
With Vitest and React Testing Library set up, we’ve armed our blogging app with powerful testing:
- Setup: Install deps, configure
vitest.config.ts, and you’re ready to test in Next.js. - Component Testing: Tests
PostPreviewand asyncPostContent—fast, isolated, React 19-ready. - Integration Testing: Tests
PostListwithPostPreview—ensures flows work. - Spying/Mocking: Controls tests, verifies behavior.
Key Takeaways
- Component tests for UI pieces, integration for interactions.
- Use
waitForandSuspensefor React 19 async components. - Spy with
vi.spyOn, mock withvi.fnormockResolvedValue. - Setup is simple—start testing today!
Best Practices
- Test user-facing output, not internals.
- Mock external APIs, not internal logic.
- Use
afterEach(() => vi.restoreAllMocks())to reset mocks.
Pitfalls to Avoid
- Don’t skip setup—types and jsdom are key.
- Don’t over-test internals—focus on what users see.
- Don’t forget async—React 19 demands it.
Our blogging app’s front-end is now testable and reliable—let’s keep building!
Slides

Get ready to supercharge your testing skills! In our blogging app, we’ll master component and integration testing with Vitest and React Testing Library. We will dive into React 19’s async components, learn spying and mocking, and set it all up in NextJS. Let’s make our app bulletproof—bugs beware!
In our blogging app, users browse posts, admins edit them. A single bug—like a broken button—can ruin it! Component testing ensures each piece works alone.

Integration tests check how pieces connect, like fetching posts and showing them. No more "it works alone but not together" surprises!
In this lecture, we’ll use Vitest, React Testing Library, and React 19’s async powers.
Check out the description of this lecture for detailed instructions on which packages you need to install and how to set it up. But, you will start by adding Vitest, React Testing Library, and jsdom to your Next.js project for fast, browser-like tests.
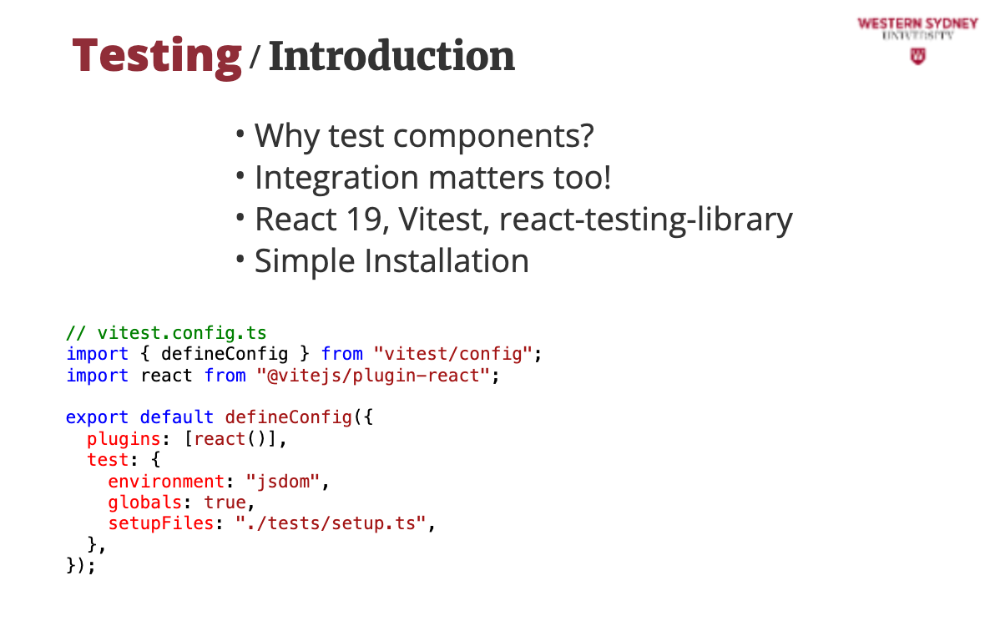
Then, a simple config file such as the one below sets up React and TypeScript, making tests clean and type-safe. With a setup file and scripts, you’ll be testing our blogging app in no time.
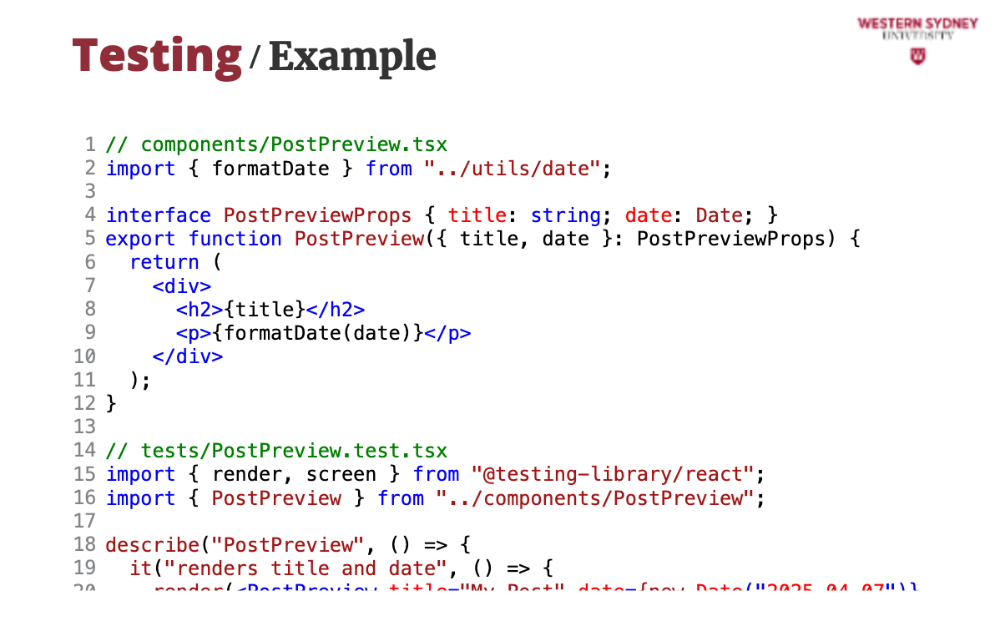
Component tests usually check a single piece or component, like our PostPreview component, to ensure it renders the right information for users. With React 19’s async components, we can also test loading and resolved states for dynamic posts. Let's explore.
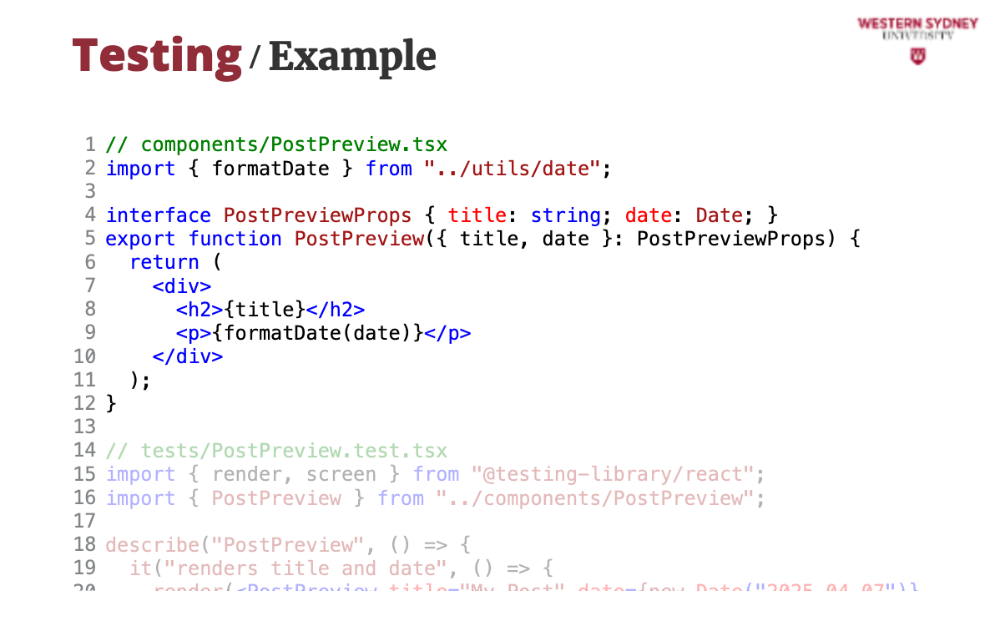
We will be testing this component, which shows basic information about a blog post.
First, we need to import the necessary functionality from the testing library package, such as the render function that renders our rect component and screen, which allows us to access elements of the rendered component.

Then, we import the component we are testing.
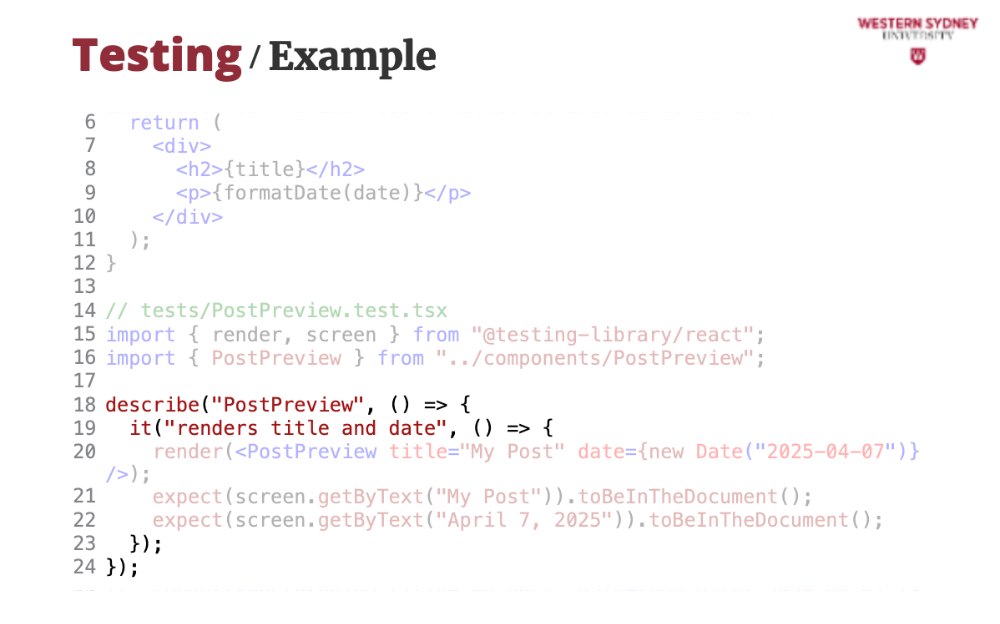
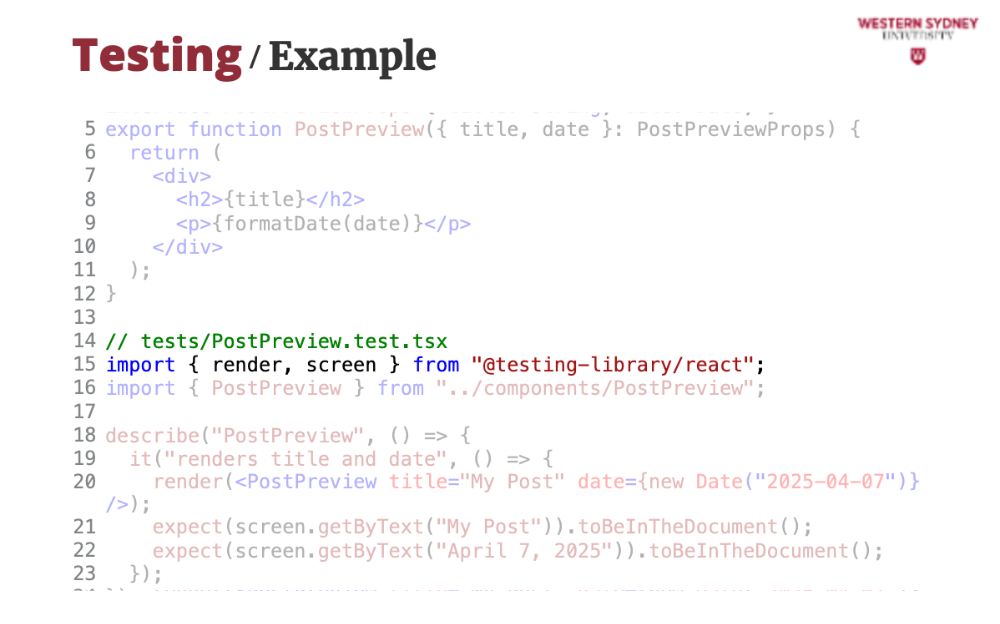
Component tests follow the standard test-driven development notation with describes and its.
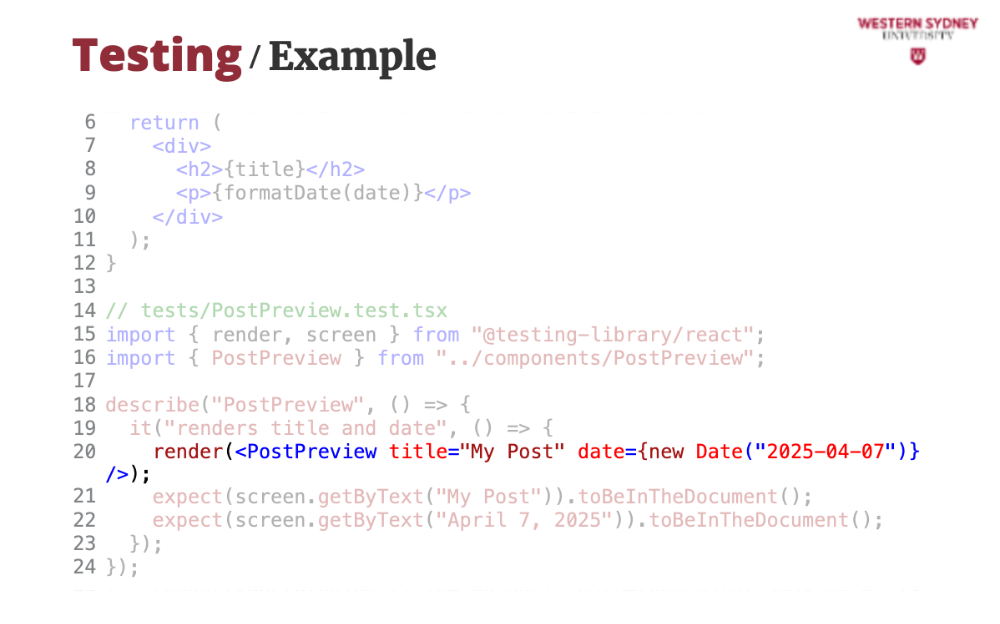
In the test body, we will render the component using the render function.
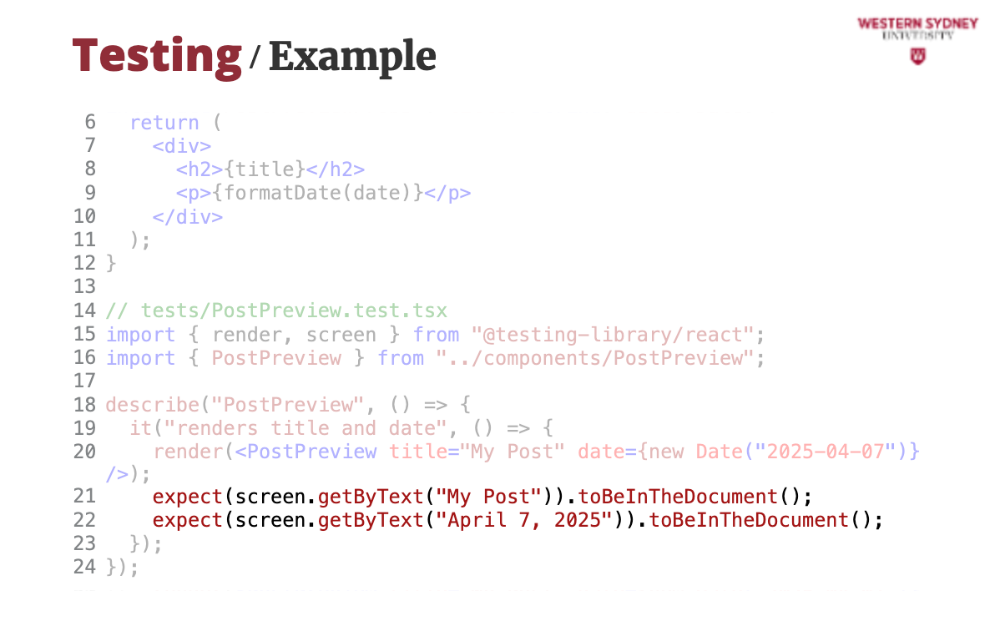
Then, we can use the screen to access rendered elements and use Vitest's assertion to test their presence or properties. Simple as!
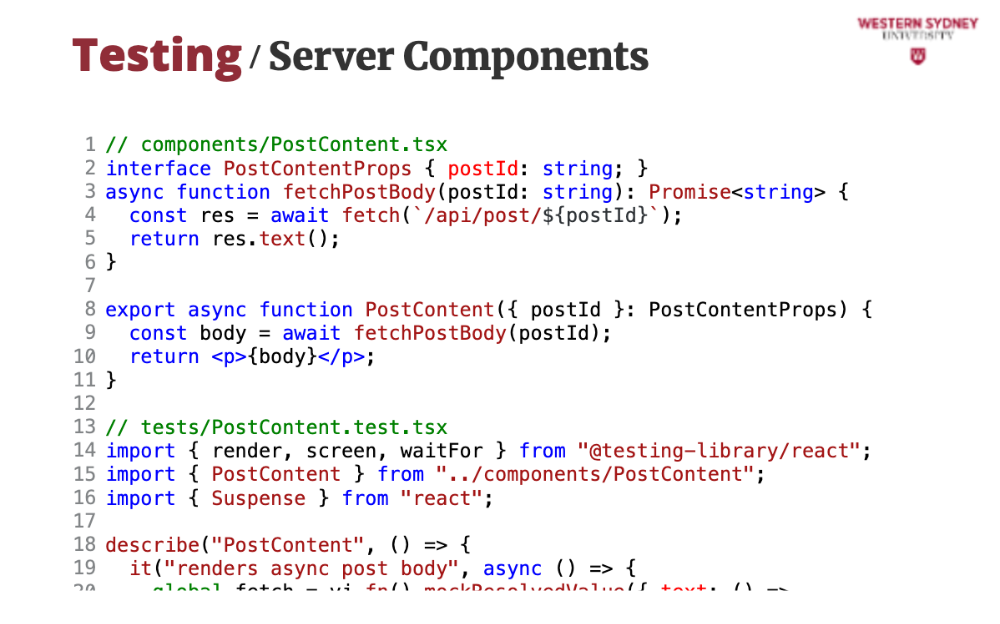
When testing server components, which are asynchronous, we need to take a slightly different approach.
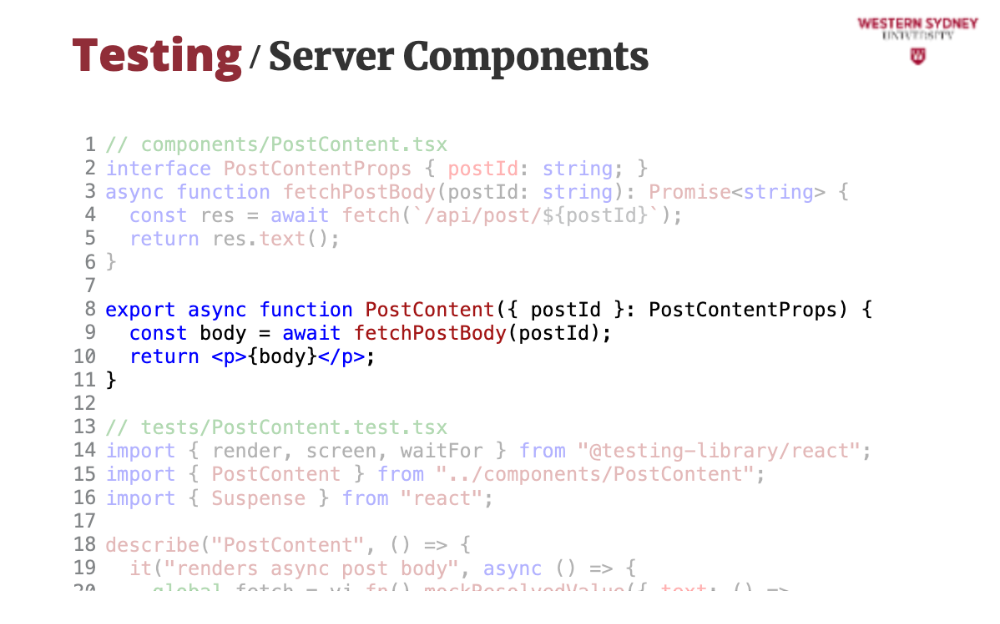
The PostContent component fetches data from the backend and renders the result. It is asynchronous, let's test it!
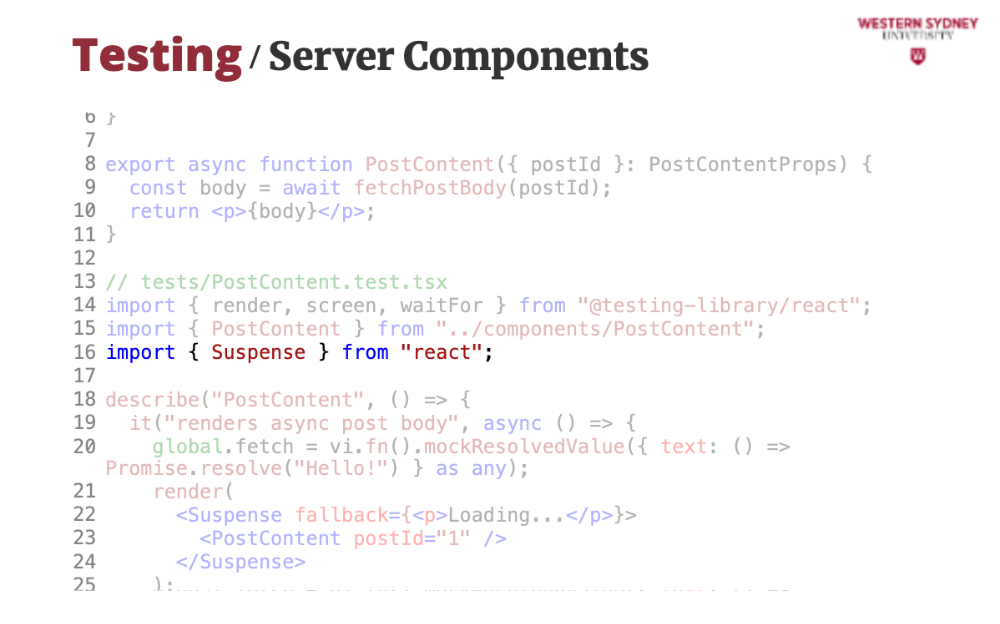
We will need help from the Suspense element from React to test the async component. Suspense renders a fallback UI while the asynchronous component is still loading. It renders the component once it is finished loading.
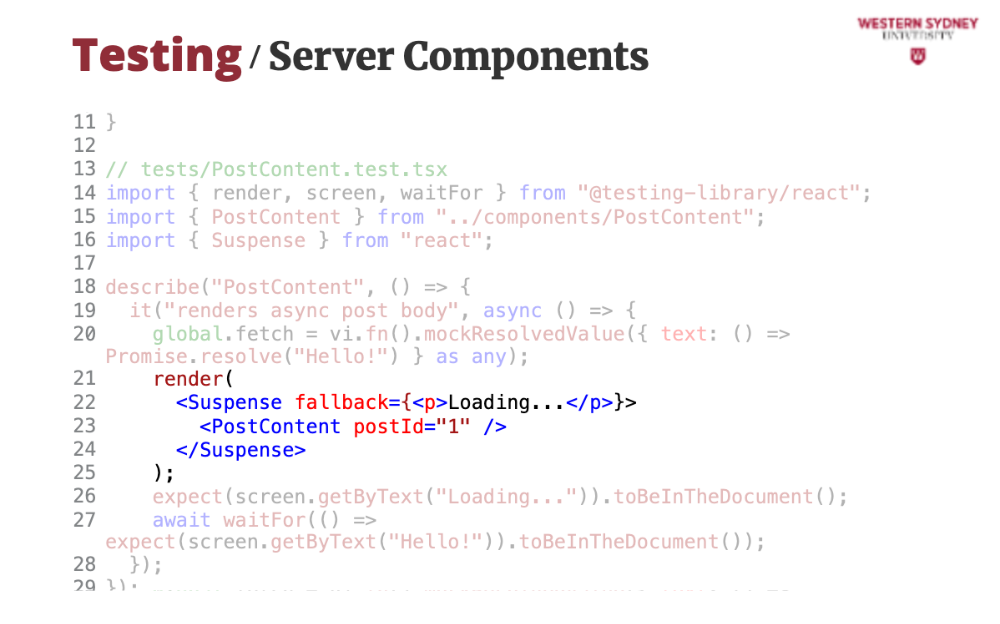
Now, when we render our async component, we will wrap it with the Suspense element and provide fallback UI.
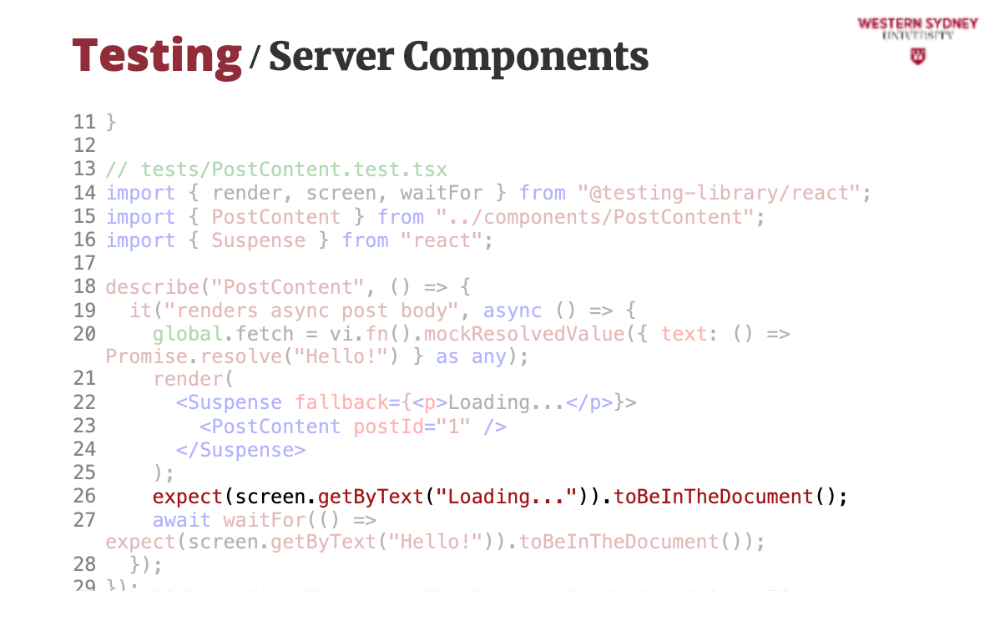
Then, we test that the fallback UI kicks in, waiting for the async component to finish rendering.
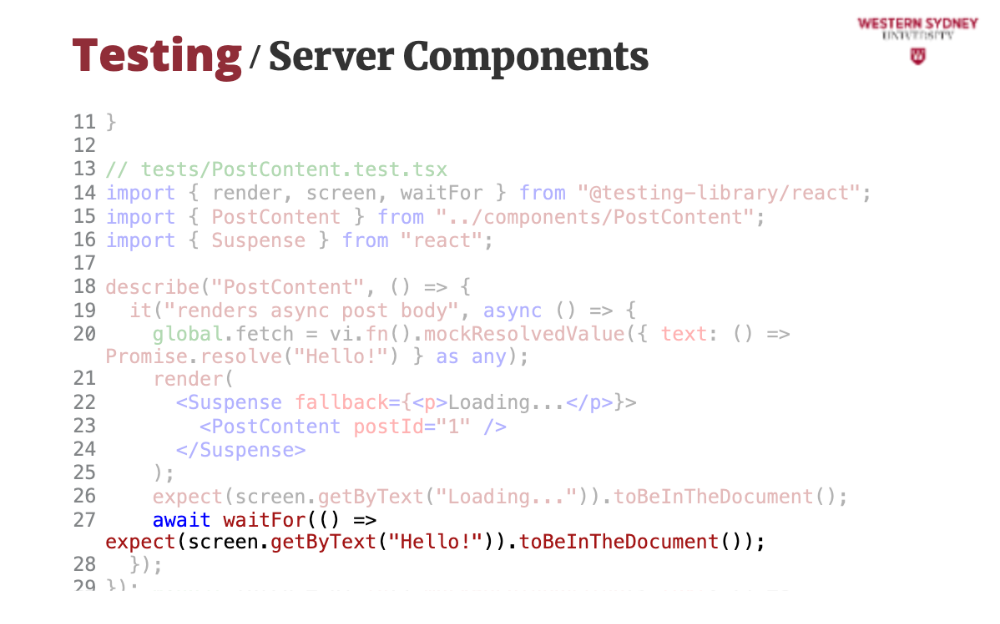
Last, we will use the waitFor function to check whether the component renders the required content in time. If this does not happen within a pre-defined timeout, the test will fail.
But the component is loading data from a live endpoint, which is not running during integration testing.
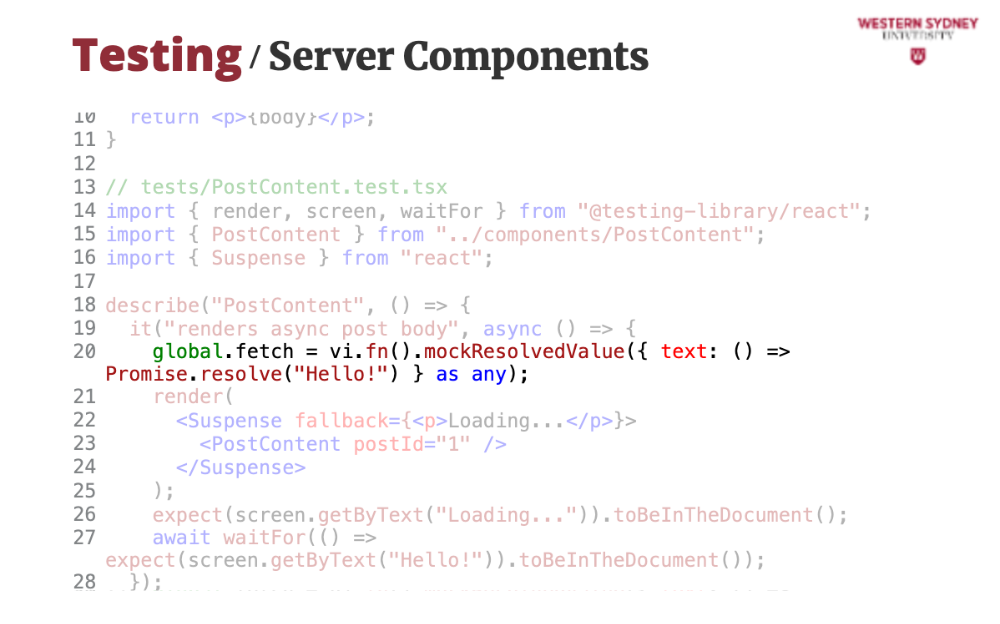
Thus, the last piece of the puzzle is to mock this API call and return some fake data.
Let's talk about spying and mocking a bit more. Spying tracks what functions do, like checking if a button triggers the right fetch. Mocking fakes APIs or utilities, letting us test edge cases fast.
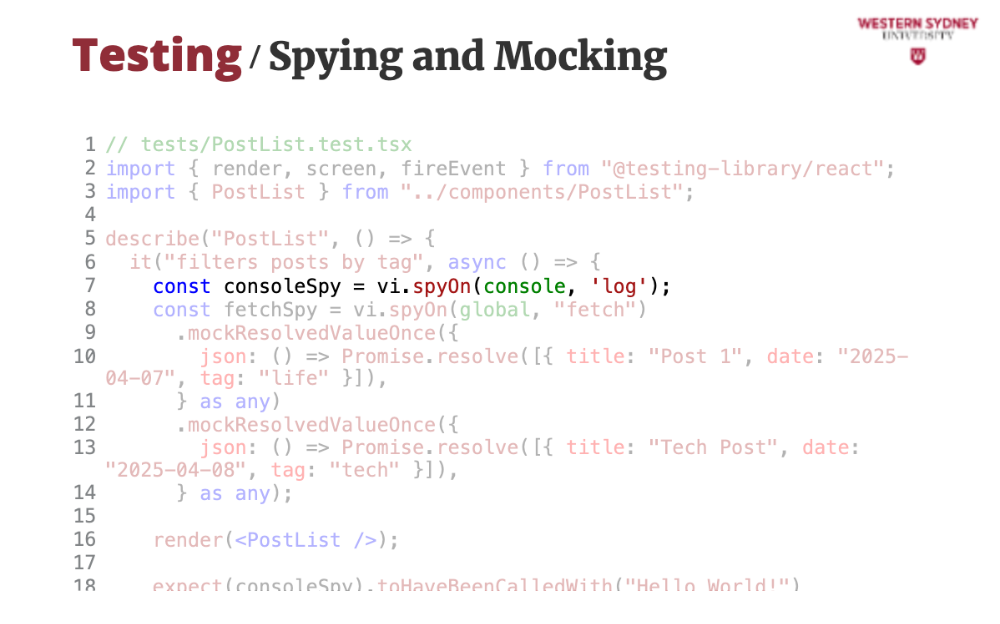
Here, we set up a spy that will be monitoring all calls of the console log function.
On this line, we will test whether the console log was called with the text Hello World! There are many other assertions that you can use with spies; please check out the documentation.
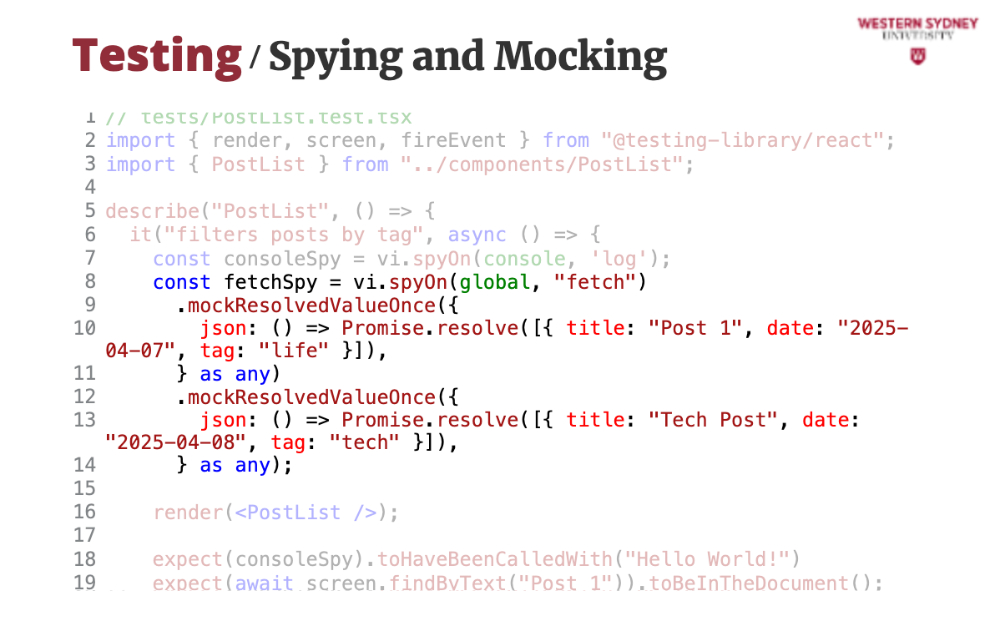
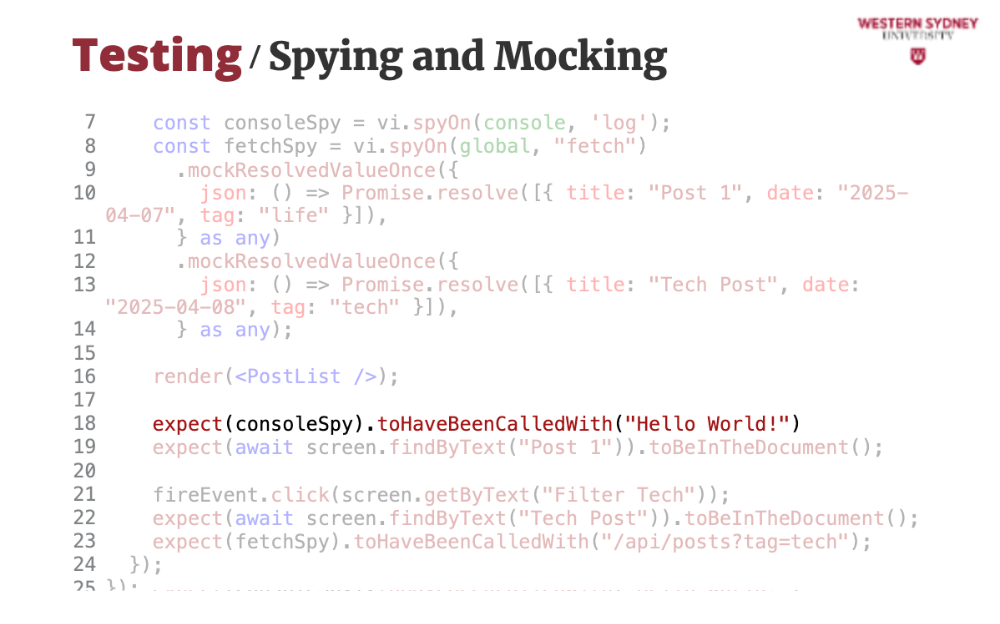
Here, we set up a spy that will return the "Post 1" on the first call of the fetch function and then the "Tech Post" when fetch is called the second time. With this mock we completely overrode what fetch does and are in full control of its execution.
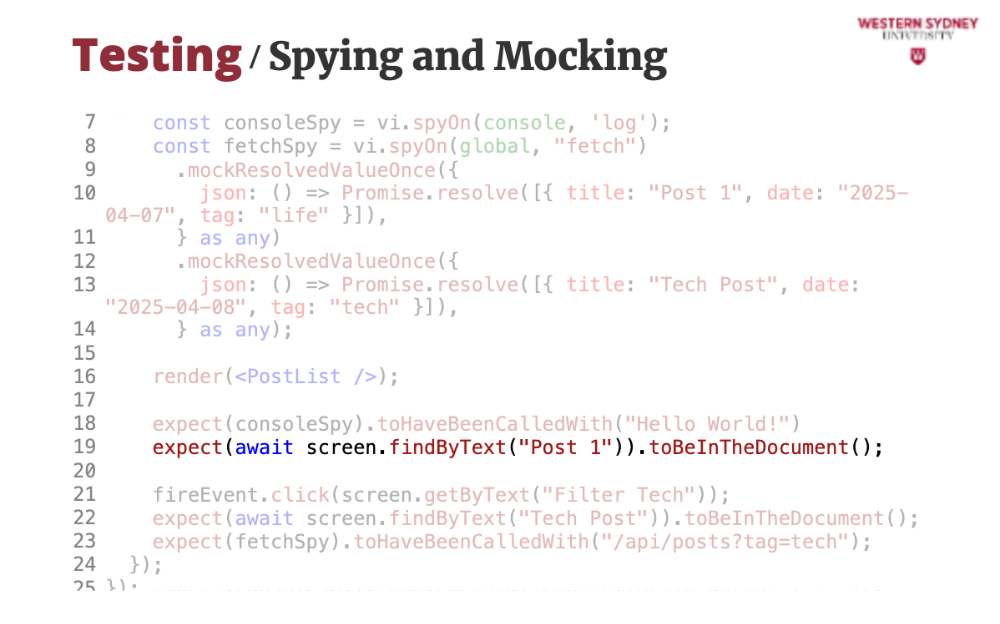
Thus, we can check that initially the PostList component will render only the "Post 1".

But on the second call, simulating search it will show the "Tech Post" blog post.
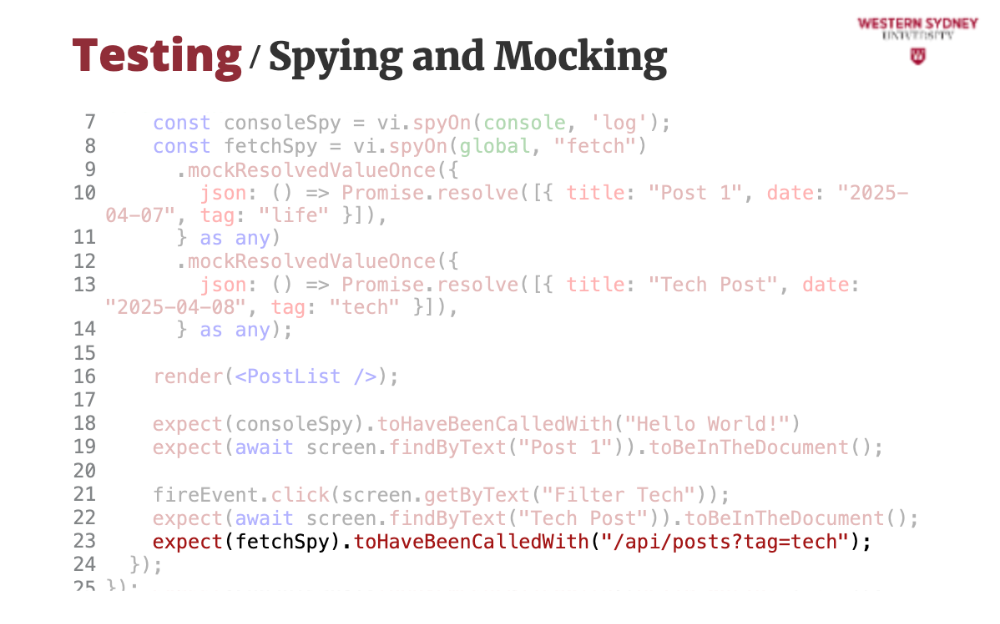
We will also check whether the component called the correct API endpoint, which functionality we have mocked. Combining the spying and mocking we tested whether the application calls the correct API and mocking the return value we omitted the need to that API to run, increasing the speed of testing.
Testing is important and easy to set up. In our case, we install Vitest, configure jsdom, and test in Nextjs. You can opt to use Playwright, which has its own automated setup as well.
Regardless of the technology you choose, it is important to test your components both in isolated unit tests and in integration tests when they become part of a more complex component.
Testing is especially crucial when you enable user interactions, as you lose some control. Ensure that all edge cases are addressed. Additionally, verify that the behaviour of your reactive components is functioning correctly.
If data flows between your components, test it! This is often the primary cause of bugs, where integration between components fails.
We did not discuss this in the lecture, but coverage is important. It is often unnecessary for your test to cover 100% of your code, but it should be close to 100!
When working with integration tests, it's essential to maintain a level of isolation without executing costly remote queries. This is why spying and mocking are crucial. We will discuss them in detail in the next lecture.