Authentication Approaches
Lecture: Understanding Authentication in Full Stack Development
Motivation: Why Authentication Matters
Picture this: you’ve built a cool app called Blogs. Users can browse posts, filter them by tags like "travel" or "coding," and admins can write or edit posts. But what if someone pretends to be an admin and deletes everything? Or sneaks into a user’s private drafts? Authentication is the key—it’s like a bouncer at a club, checking IDs to let the right people in.
Authentication verifies "who’s who" in our app. It’s crucial for protecting data, controlling access, and making sure users trust us. Today, we’ll explore different ways to handle authentication in Blogs using Next.js and TypeScript. We’ll start with the basics, then dive into tokens, OAuth, and even SAML—stuff you’ll see in real apps. Plus, we’ll compare how secure each method is.
A common myth? "Passwords alone are enough." Nope—hackers love weak passwords. Another one: "Only admins need authentication." Wrong—every user needs it for a personalised experience. Let’s get started!
Section 1: Cookie-Based Authentication
Let’s start with a classic approach: cookie-based authentication. In our Blogs app, when a user signs up, we store their email and a hashed password in a database like PostgreSQL. But the real magic happens with cookies—they’re how we keep users logged in without asking for their password every time.
How It Works
- A user, say Alice, logs into Blogs with her email and password.
- Our Next.js API route checks the database: does her email exist? Does the hashed password match?
- If it’s a match, the server creates a session ID, stores it in a cookie, and sends it to Alice’s browser.
- For every future request (like viewing posts), her browser sends the cookie back to the server, which checks the session ID to confirm it’s Alice.
Example: User Login
Alice logs in to Blogs to check her drafts:
- She enters
alice@example.comandsupersecret. - The server hashes
supersecretwith bcrypt, verifies it, generates a session ID (e.g.,sess_12345) and stores it in a database or any key-value storage to know which user belongs to this session. - This ID is tucked into a cookie (e.g.,
session=sess_12345) and sent to her browser. - When Alice clicks “My Drafts,” her browser sends the cookie, and the server says, “Yep, it’s Alice!”
Going Deeper: Cookies 101
- What Are Cookies?: Tiny bits of data (like
session=sess_12345) stored in the browser. Think of them as a backstage pass for Blogs. - How They Travel: Cookies ride along in HTTP headers. When Alice requests a page, her browser automatically attaches the cookie to the request (e.g.,
Cookie: session=sess_12345). The server responds, and the dance continues. - Storing Cookies:
- Browser Side: The browser keeps cookies until they expire (e.g., 1 day or 1 month) or are deleted.
- Server Side: The session ID links to a session record in memory (fast but lost on restart) or a database (persistent but slower). For Blogs, we’d use a database to keep sessions alive across server restarts.
- Security Measures:
- Hashing Passwords: We never store
supersecretplain—it’s hashed (e.g.,$2b$10$...) so leaks don’t expose it. - Secure Flag: Cookies are marked
Secure, so they only travel over HTTPS, not plain HTTP, preventing eavesdropping. - HttpOnly Flag: This stops JavaScript from accessing the cookie (e.g., via
document.cookie), blocking XSS (cross-site scripting) attacks. - SameSite Flag: Set to
StrictorLax, this limits cookies to our domain (Blogs), stopping CSRF (cross-site request forgery) where fake sites trick Alice into sending requests. - Expiration: Short-lived sessions (e.g., 24 hours) force re-login if the cookie’s stolen.
- Session Rotation: After login, generate a new session ID to limit damage if the old one’s intercepted.
- Hashing Passwords: We never store
Pros and Cons
- Advantages: Simple to implement, familiar to users (login once, stay in), and flexible with Next.js API routes.
- Disadvantages: Relies on server storage (memory or database), and cookies can be hijacked if security flags are skipped.
Security in Action
Imagine Alice’s cookie gets stolen because we forgot HTTPS. A hacker could send requests as her—scary! But with HTTPS, HttpOnly, and SameSite, that cookie’s locked down. For Blogs, we’d set it up like this:
- Cookie:
session=sess_12345; Secure; HttpOnly; SameSite=Strict - Server: Checks the session ID in PostgreSQL, tied to Alice’s user ID.
Section 2: Token-Based Authentication with JWT
Now, let’s scale Blogs up. What if users want to log in from their phones, which do not support cookies? JSON Web Tokens (JWT) are a slick, token-based solution.
How It Works
- Alice logs in with her email and password.
- The server verifies her, then creates a JWT (e.g.,
{ "userId": 1, "role": "user" }), signs it, and sends it back. - Alice sends this token with every request (e.g.,
Authorization: Bearer <token>). - The server checks the signature and lets her in.
Example: Filtering Posts
Alice filters Blogs posts by "coding." Her JWT proves she’s userId: 1, so the server sends her the right posts.
Explaining the Session/Refresh Token Workflow
Let’s dive into a powerful twist on token-based authentication: using session tokens and refresh tokens together. In our Blogs app, this approach helps us keep users like Alice logged in securely, even across devices, while minimizing risks if something goes wrong. Here’s how it works, why it’s safer, and where everything lives.
The Workflow: Step-by-Step
Imagine Alice wants to log into Blogs to write a post. Here’s what happens with session and refresh tokens:
- Login:
- Alice enters alice@example.com and supersecret on the Blogs login page.
- Our Next.js API route verifies her credentials against the database (hashed password, of course!).
- The server generates two tokens:
- Session Token: A short-lived JSON Web Token (JWT), expiring in, say, 15 minutes. It might look like { "userId": 1, "role": "user", "exp": 15min }.
- Refresh Token: A longer-lived token (e.g., valid for 7 days), not a JWT—just a random, secure string (e.g., rf_abc123xyz).
- Both tokens are sent to Alice’s browser.
- Using the Session Token:
- Alice sends the session token with every request (e.g., Authorization: Bearer <session-token>).
- The server verifies the token’s signature and expiration. If it’s valid, she can filter posts or edit drafts.
- After 15 minutes, the session token expires—it’s useless now.
- Refreshing the Session:
- When the session token expires, Alice doesn’t need to log in again. Instead, her browser sends the refresh token to a special API endpoint (e.g., /api/refresh).
- The server checks:
- Is the refresh token valid? (Matches what’s stored—more on that later.)
- Has it expired? (Still within 7 days.)
- If it’s good, the server issues a new session token (another 15-minute JWT) and sends it back. Alice keeps going without interruption.
- Logout or Revocation:
- If Alice logs out, the refresh token is deleted from the server’s storage.
- If the refresh token expires (after 7 days), she’ll need to log in again with her email and password.
Example: Alice Edits a Post
- Day 1, 10:00 AM: Alice logs in, gets a session token (expires 10:15 AM) and a refresh token (expires in 7 days).
- 10:10 AM: She edits a post—session token works fine.
- 10:16 AM: Session token expires. Blogs sends the refresh token to /api/refresh, gets a new session token (expires 10:31 AM), and she keeps editing.
- Day 3: Still using the same refresh token, she gets new session tokens as needed—smooth sailing!
How It Improves Security
This workflow is a big upgrade over a single, long-lived JWT. Here’s why:
- Short-Lived Session Tokens:
- Session tokens expire fast (e.g., 15 minutes). If a hacker steals one, they’ve got a tiny window to use it—way less time to cause trouble compared to a JWT that lasts days or weeks.
- Refresh Token Control:
- Refresh tokens don’t get sent with every request (unlike a single JWT). They’re only used for refreshing, reducing exposure to theft.
- If a refresh token is stolen, we can revoke it on the server by deleting it from storage. With a single JWT, revocation is harder—you’re stuck waiting for it to expire.
- Layered Protection:
- Even if a session token is intercepted, it’s useless after 15 minutes. The hacker would need the refresh token too—and that’s harder to steal (more on storage below).
- Compare this to cookie-based auth: a stolen session cookie could be used until it expires or the server restarts. Here, we limit the damage.
- Graceful Recovery:
- If Alice suspects something’s fishy (e.g., odd activity), she logs out. The refresh token is killed, and the hacker’s out—even if they grabbed a session token mid-use.
Where Are These Tokens Stored?
Storage is key to keeping this secure. Here’s the breakdown:
- Session Token:
- Stored: In the browser, typically in memory (e.g., a JavaScript variable) or localStorage (less secure).
- Why: It’s short-lived and sent with every request, so it needs to be handy.
- Best Practice: Use memory over localStorage to avoid XSS attacks (where JavaScript steals it). In Blogs, we’d store it in a React state variable.
- Refresh Token:
- Stored: In an HTTP-only cookie on the browser and in a database (e.g., PostgreSQL) on the server.
- Why HTTP-only: This flag stops JavaScript from accessing the cookie, blocking XSS. The cookie travels securely to /api/refresh when needed.
- Server Storage: We save the refresh token (e.g., rf_abc123xyz) tied to Alice’s user ID. This lets us verify or revoke it later.
- Example Cookie: refresh_token=rf_abc123xyz; HttpOnly; Secure; SameSite=Strict.
- Why Not Both in Cookies?: Session tokens change too often (every 15 minutes)—cookies aren’t ideal for that. Refresh tokens are stable, so a cookie works great.
How Are They Requested?
Here’s how Blogs handles the token dance:
- Initial Login:
- Alice submits her credentials to /api/login.
- Response: { sessionToken: "eyJhbG...", refreshToken: "rf_abc123xyz" } (session token in body, refresh token in a cookie).
- Normal Requests:
- Alice fetches posts with GET /api/posts, including Authorization: Bearer <session-token> in the header.
- Server verifies and responds.
- Refresh Request:
- Session token expires. Blogs sends a POST to /api/refresh with the refresh token in the cookie (automatically attached by the browser).
- Server checks the database, returns a new { sessionToken: "eyJhbG..." }.
- Blogs updates the in-memory session token and keeps going.
- Logout:
- Alice hits /api/logout. The server deletes rf_abc123xyz from the database, and the cookie is cleared.
Going Deeper
- JWT Structure: Header (algorithm), Payload (data), Signature (proof). Like
header.payload.signature. - Stateless: No server storage—everything’s in the token.
- Refresh Flow: Refresh tokens are stored in an HTTP-only cookie or database. If stolen, we can revoke them.
Pros and Cons
- Advantages: Scalable, works across devices, refresh tokens add flexibility.
- Disadvantages: Stolen tokens are a risk until they expire. Refresh tokens need careful handling.
Section 3: OAuth - Logging In with Google
What if Alice hates passwords? With OAuth, she can log into Blogs using her Google account.
How It Works
- Alice clicks "Login with Google" on Blogs.
- She’s sent to Google, logs in, and approves Blogs.
- Google sends an access token (and maybe an ID token) to our app.
- Our server verifies it with Google, grabs her email, and logs her in.
Example: Admin Access
Alice, an admin, logs in via Google. Her token proves she’s alice@gmail.com, and Blogs gives her admin rights to edit posts.
Going Deeper
- Flow: Redirects from Blogs to Google, then back with a token.
- Scopes: We ask for permissions (e.g., "email"). Google tells us what Alice allows.
- Next.js: Libraries like
next-authmake this a breeze.
Pros and Cons
- Advantages: No passwords to store, leverages Google’s security.
- Disadvantages: Depends on Google—if they’re down, our login is too.
Section 4: SAML - Enterprise Authentication
Imagine Blogs is used by a company wanting single sign-on (SSO). SAML (Security Assertion Markup Language) steps in.
How It Works
- Alice tries to access Blogs.
- She’s redirected to her company’s Identity Provider (IdP), like Okta.
- She logs in there, and the IdP sends a signed SAML assertion (XML) to Blogs.
- Blogs verifies it and logs her in.
Example: Company Blogs
Alice, a company admin, logs in via SAML. The assertion says role: "admin", so she edits company posts.
Going Deeper
- Components: IdP (company system) and Service Provider (Blogs).
- Assertions: Signed XML with user details.
- SSO: One login for all company apps.
Pros and Cons
- Advantages: Secure, centralized, perfect for businesses.
- Disadvantages: Setup is complex—overkill for small apps.
Section 5: Security Comparison
Let’s break down how secure each method is for Blogs:
- Database-Driven:
- Strength: Hashed passwords are tough to crack if done right (e.g., bcrypt with high rounds).
- Weakness: Vulnerable to SQL injection if poorly coded. Session hijacking possible if cookies aren’t secure (e.g., no HTTPS).
- Risk Level: Medium—depends on implementation.
- JWT (with Refresh Tokens):
- Strength: Signed tokens prevent tampering. Refresh tokens limit damage from theft (short-lived session tokens).
- Weakness: Stolen tokens work until expiry. No built-in revocation unless you track refresh tokens.
- Risk Level: Medium-low—secure if tokens are short-lived and HTTPS is used.
- OAuth:
- Strength: Relies on Google’s top-tier security (e.g., 2FA). No local passwords to steal.
- Weakness: Single point of failure (Google). Token theft still a risk if not secured.
- Risk Level: Low—outsourcing to a trusted provider boosts safety.
- SAML:
- Strength: Enterprise-grade encryption and signing. SSO reduces login fatigue (fewer weak passwords).
- Weakness: Complex setup risks misconfiguration. IdP is a critical dependency.
- Risk Level: Low—very secure if implemented correctly.
Key Insight: No method is "perfect." Security depends on how you use it—think HTTPS, strong hashing, and careful token management.
Conclusion: Key Takeaways
Here’s what we’ve learned about authentication in Blogs:
- Database: Simple, but password-heavy and session-dependent.
- JWT: Scalable with refresh tokens, though token theft is a concern.
- OAuth: User-friendly via Google, relying on third-party security.
- SAML: Enterprise-ready, complex but powerful.
Best Practices: Hash passwords, use HTTPS, keep tokens short-lived, and match the method to your app’s needs. Pitfalls: Avoid plain-text passwords, unencrypted traffic, or skipping refresh token revocation.
Next time you log into an app—or build one—think about how it’s keeping you safe. You’ve got the tools to make Blogs secure and awesome!
Slides

Let's talk about different ways you can authenticate users of your application and deliver personalised experiences.
What is authentication?
Authentication is like a bouncer at a club—it checks who’s allowed into our Blogs app. It ensures Alice can see her drafts or edit posts as an admin, keeping imposters out!
Without it, hackers could trash Blogs posts or peek at private drafts. It builds trust—users feel safe, and we protect their stuff.
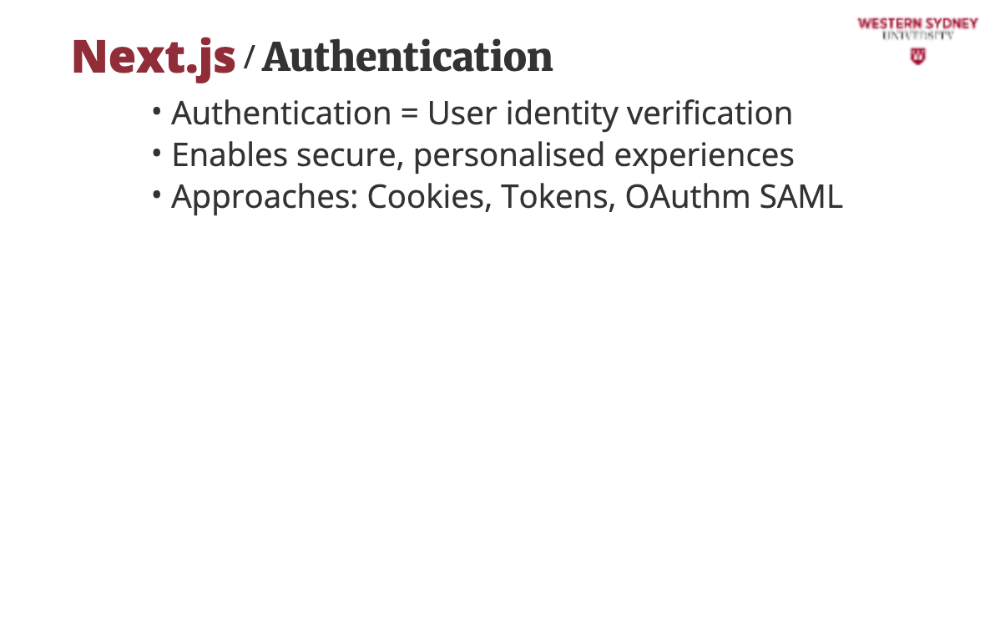
We’ll use Next.js App Router to add four authentication methods to Blogs: cookies, JWTs, OAuth, and SAML. You’ll see how they work and why they’re cool.
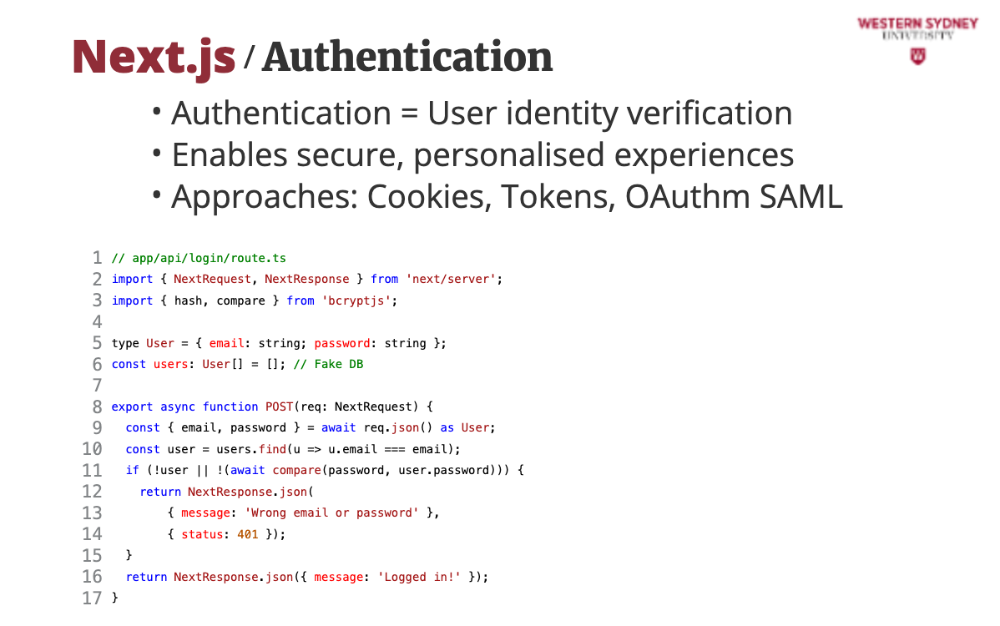
This is a basic login API for Blogs using App Router. Alice logs in, and we check her credentials—later, we’ll secure it!
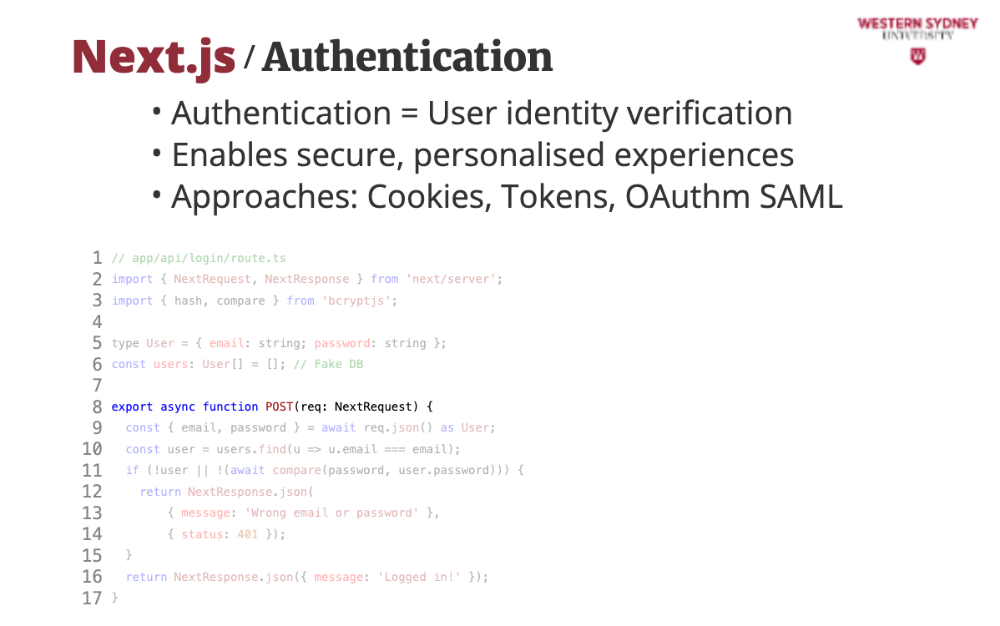
This code implements a NextJS REST route that accepts a post request.
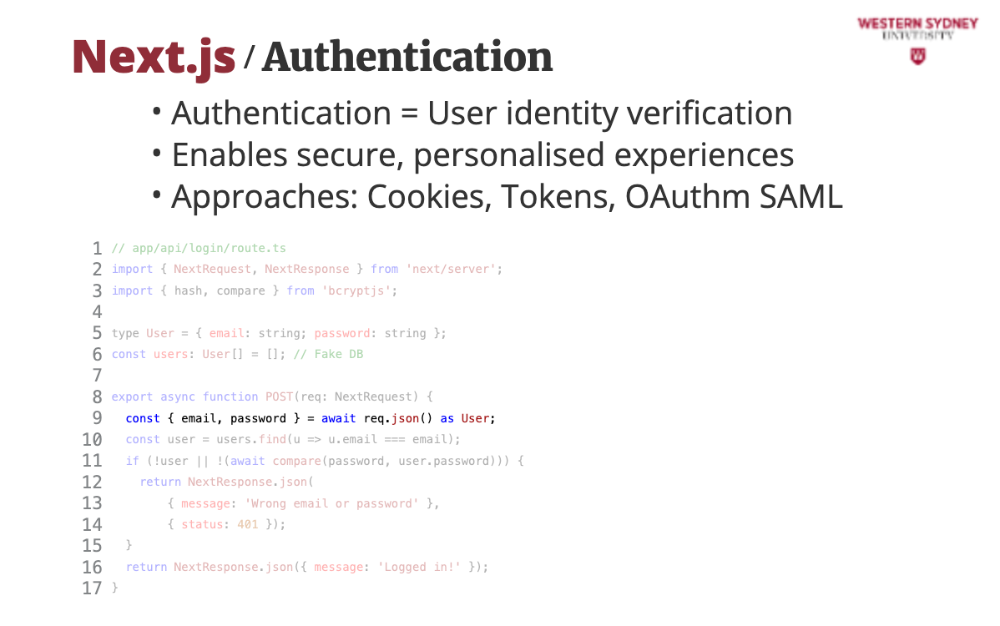
We grab Alice’s details from her login form provided as an object of POST request body
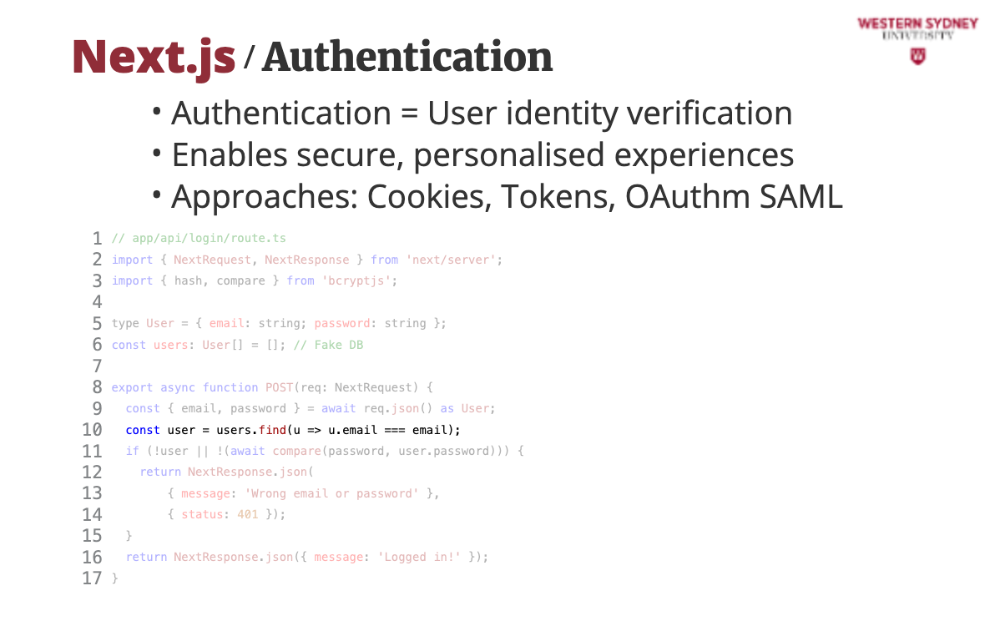
We check if Alice exists in the database
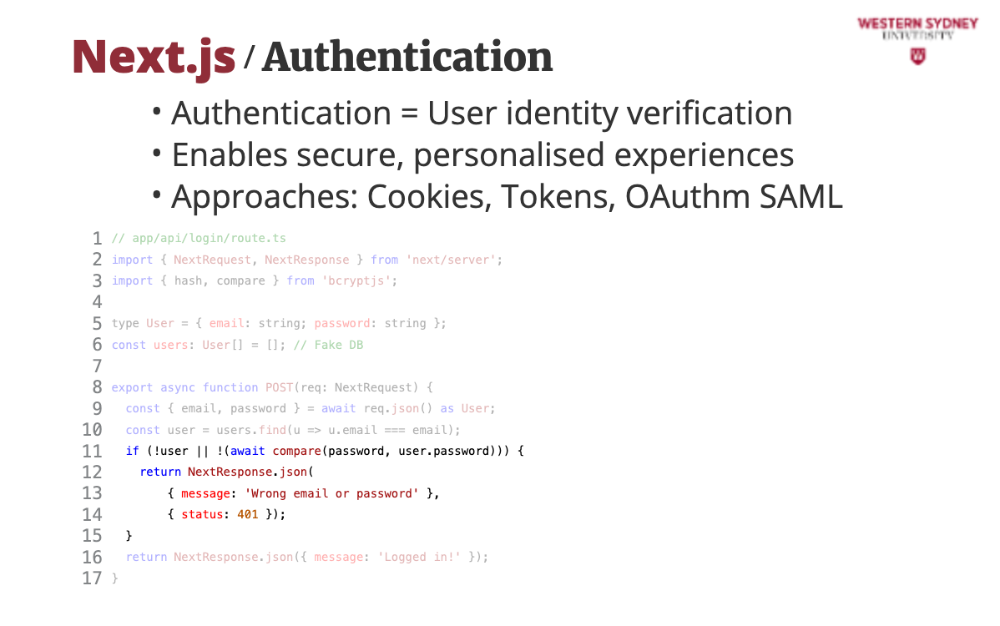
If Alice does not exists or her password does not match, we return an error message and status 401, representing unauthorised request.
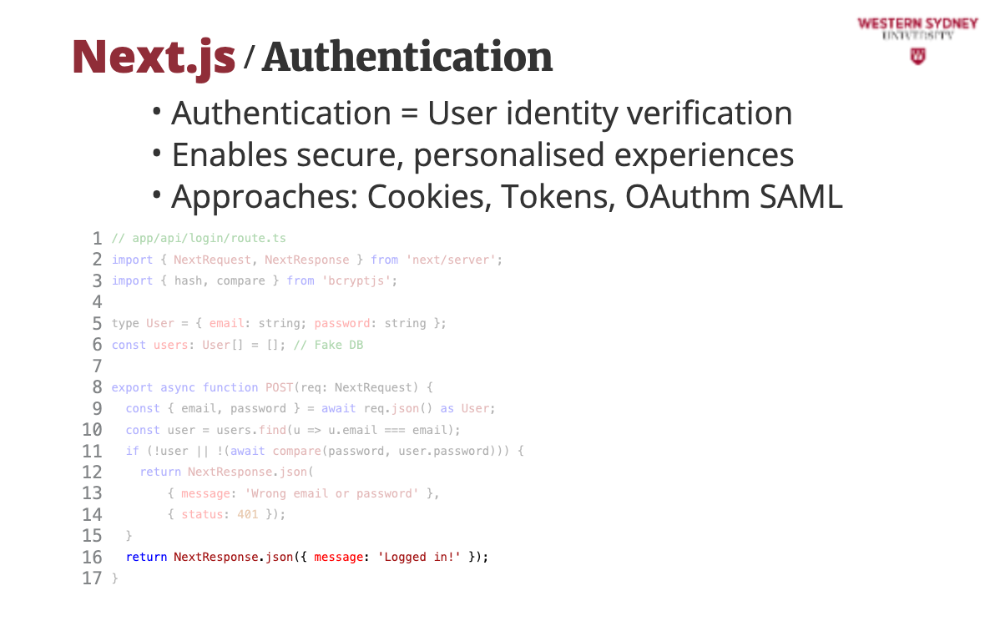
If Alice is found, we return a positive message, which automatically return status 200.
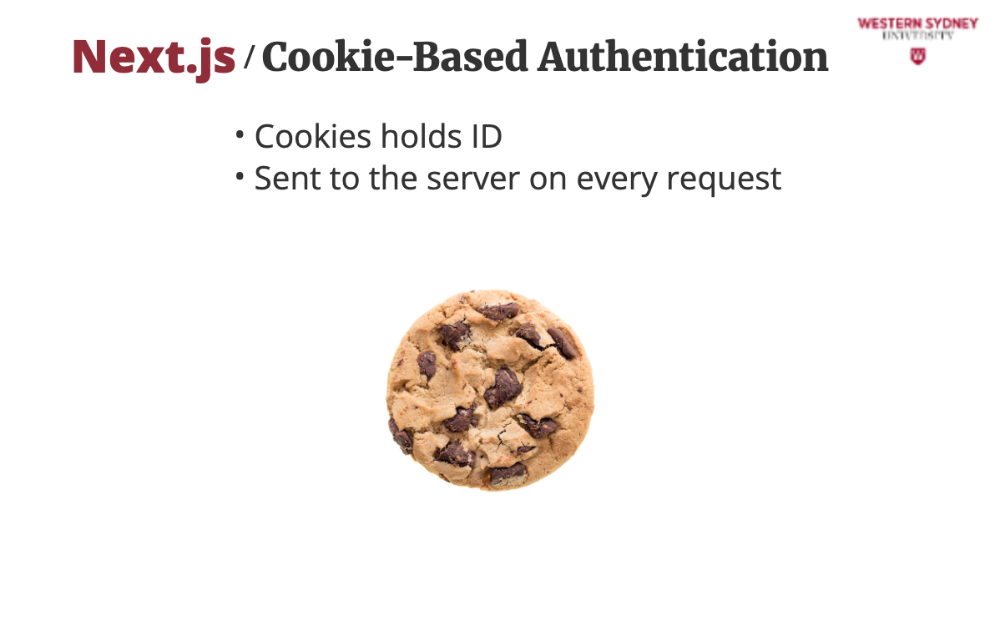
In the previous slide, we showed how to authenticate a user in your application. But how can we maintain the authenticated session so that the user does not have to write a username and password with every request? We can use cookies! Cookies help maintain authenticated session by storing an identifier of the session. Let's break it down!
Alice logs into Blogs, and the server gives her a cookie, for example, containing the session ID or user ID—like a VIP wristband.
Her browser sends it back every time she browses.

We store the session ID in a Secure and HttpOnly cookie, so hackers can’t grab it. Simple and solid for Blogs! Next time, Alice clicks “My Drafts,” and her cookie proves it’s her—no re-login needed.

This is an example of cookie-based authentication endpoint.
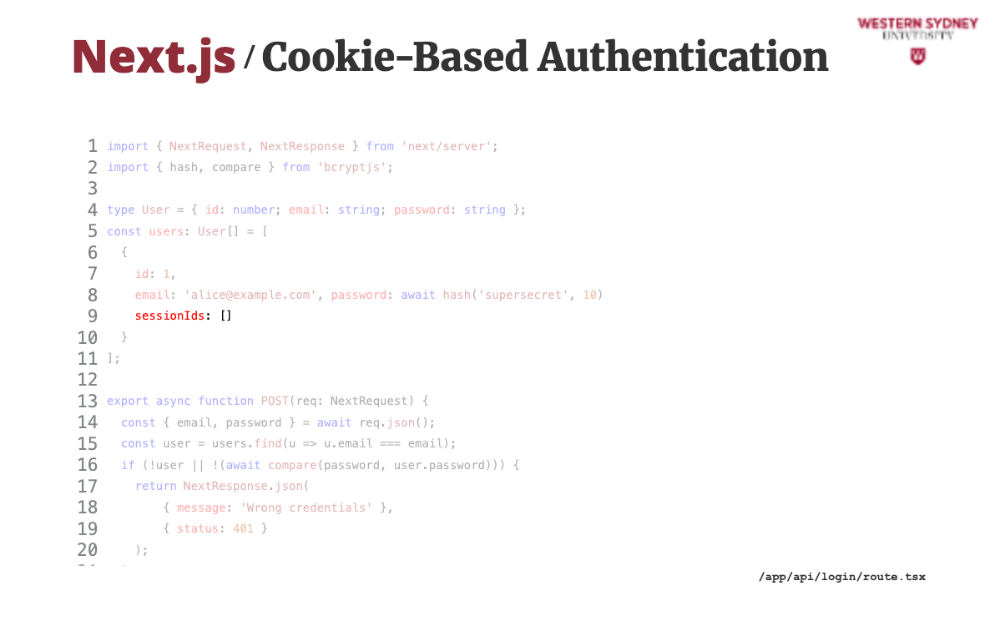
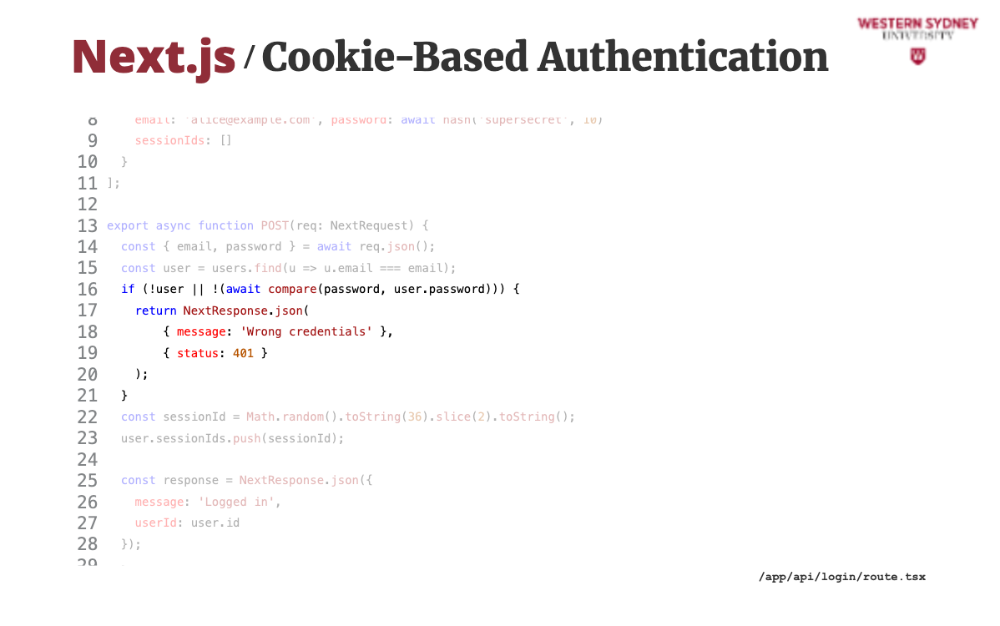
This time, we will keep a record of all session IDs that the user has initiated.
Similarly to our previous example, if the user is not authenticated, we return an error message and an error code.
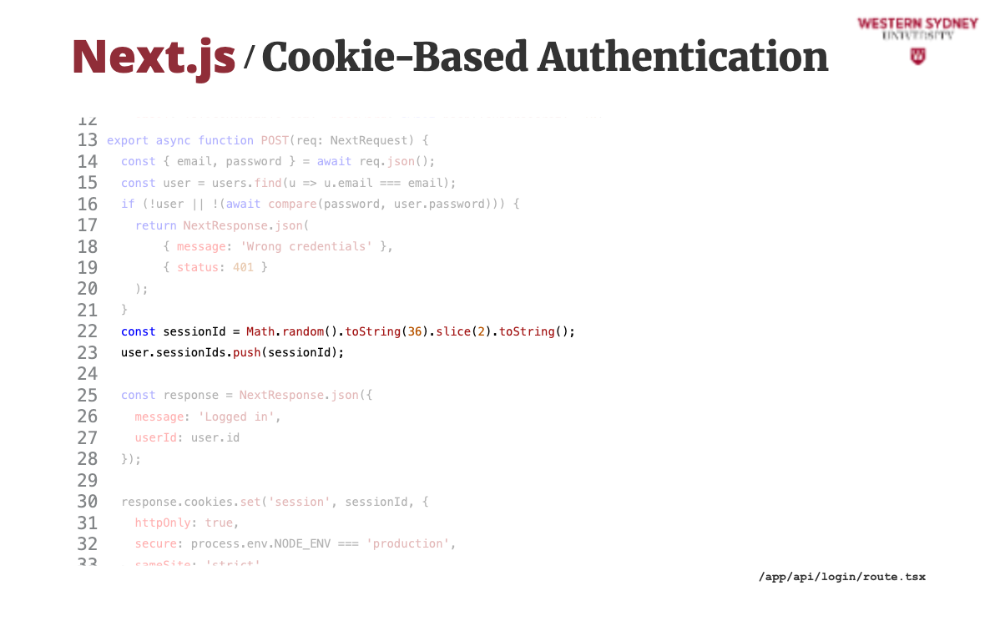
But, if the user authenticates, we generate a new session ID as some random string and store it in user's active session ID's.
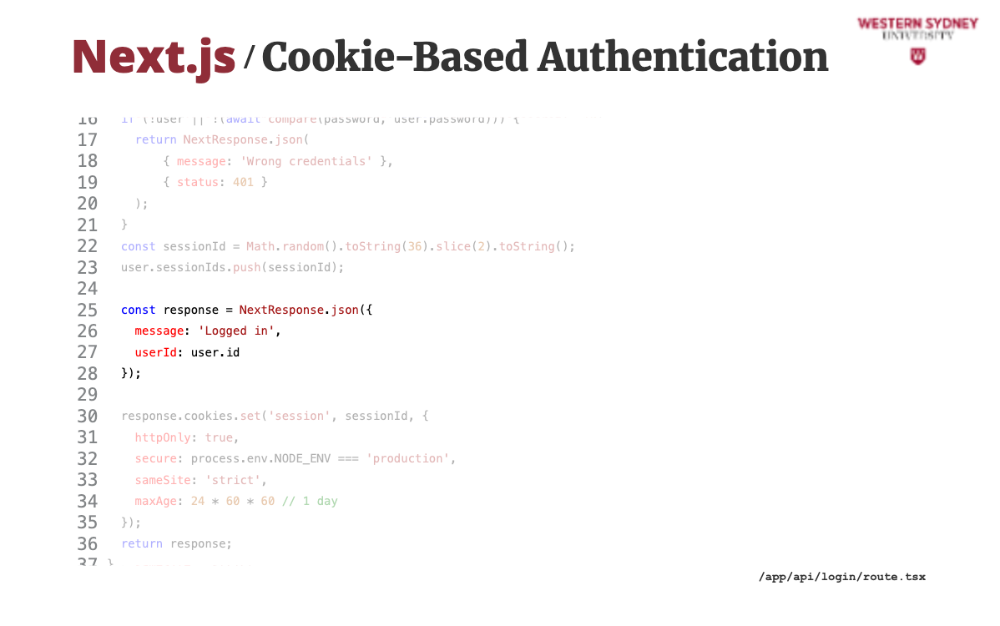
We prepare the response with the return message.
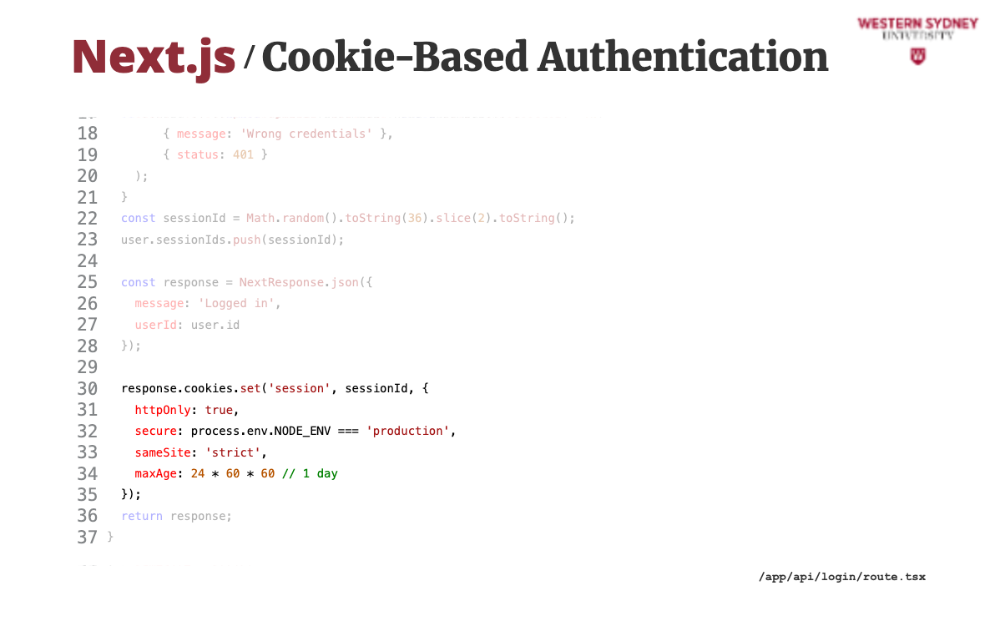
Then, we add the session cookie to the response, providing this created session ID. Check how we set the secure and HTTP only properties.
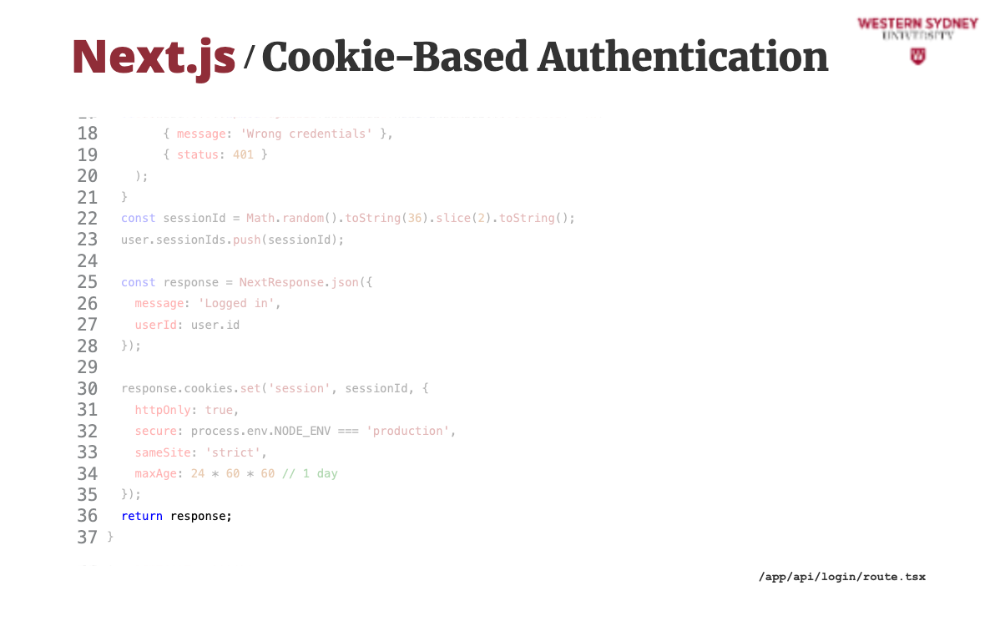
Last, we return this response that will automatically set the client side cookie.
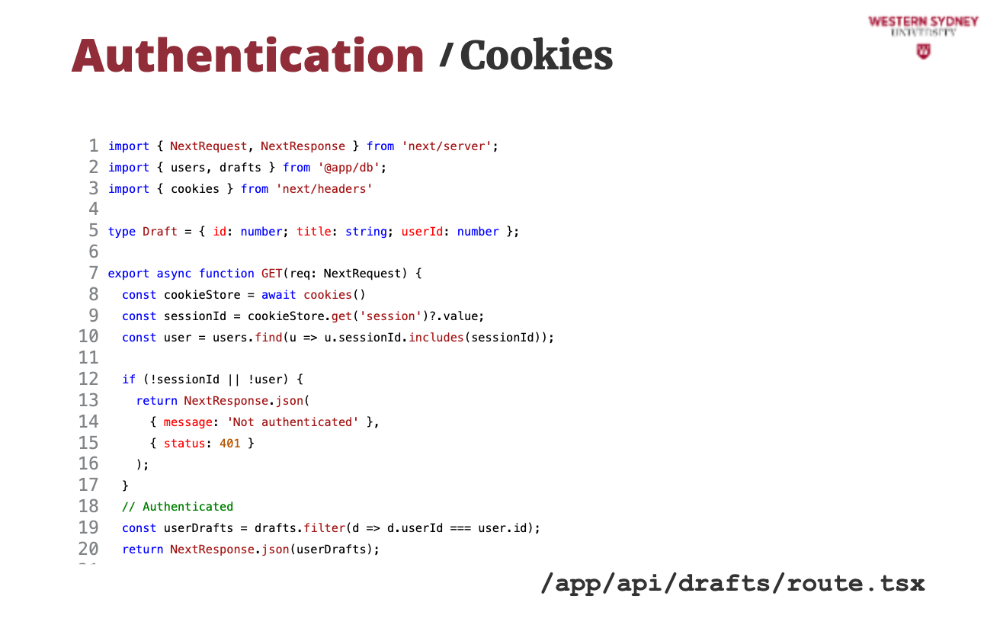
Let's take a look how we can use cookies to authenticate a session,
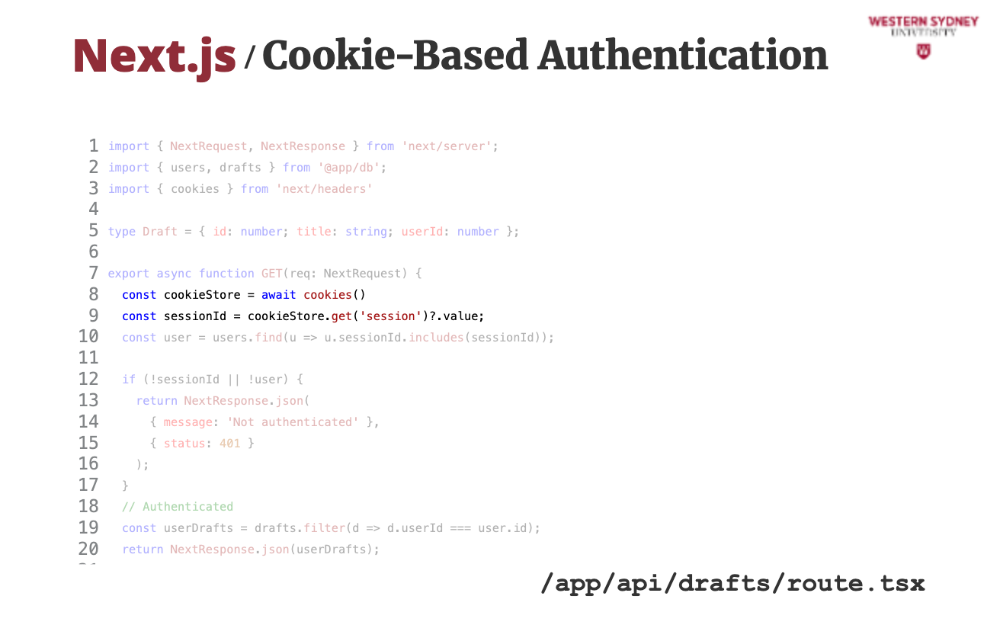
First, we read the sessionId from the cookie store
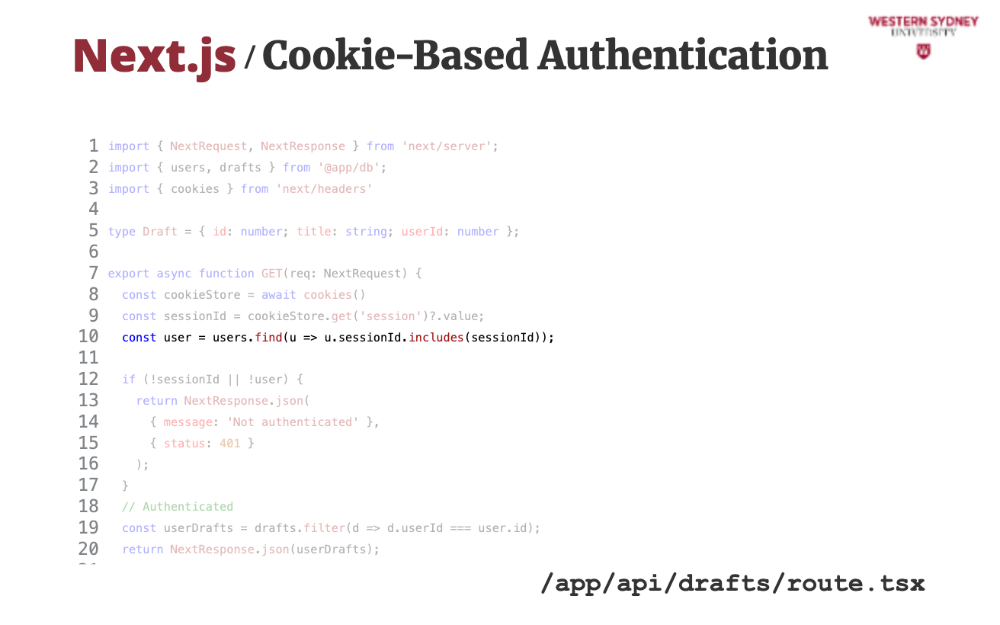
Then, we try to find a user who initiated a session with the provided sessionId. You need to generate session IDs that are complex enough so that users cannot guess them!

If the sessionId is not provided or user with that sessionId does not exists, we return an error.
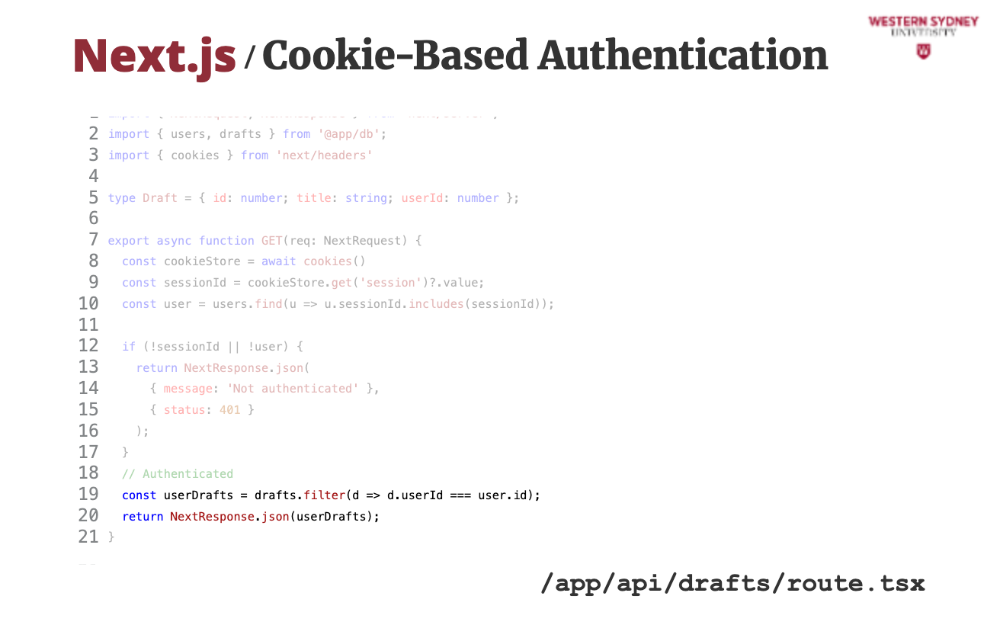
Otherwise, we are in the authenticated zone, where we know which user is interacting with the route, returning only their drafts.
While cookies are the usual preference in the authentication of web applications, you may run into issues when securing mobile applications or heightened security applications that do not allow for the use of cookies. This is where JSON web tokens come into play.
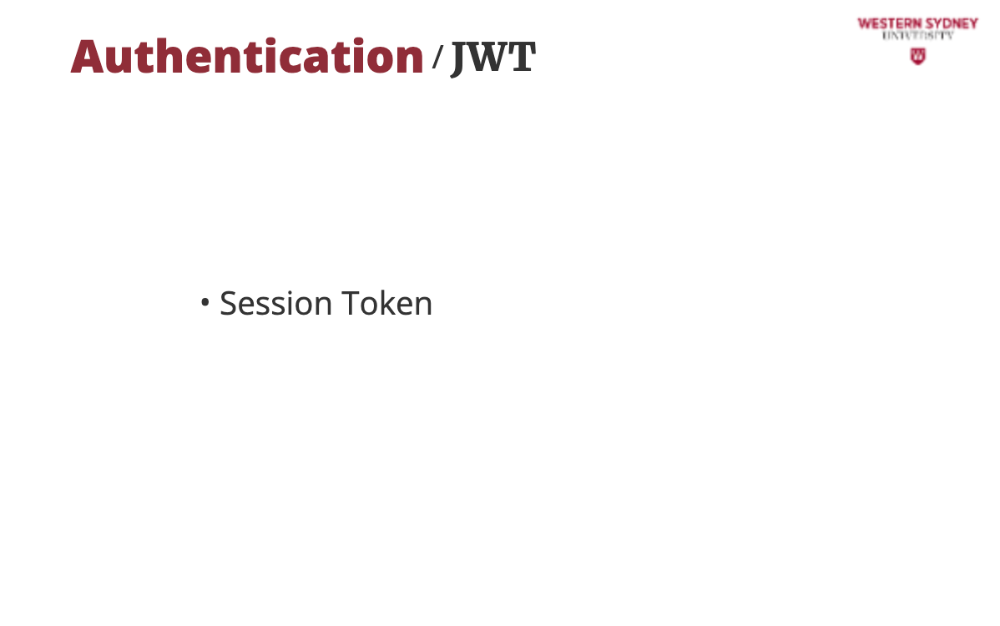
With JWT we tend to use two different types of tokens. A session token is a short-lived token, often stored in a local storage that expires in a matter of minutes, and it is added to every authenticated request to confirm users identity.
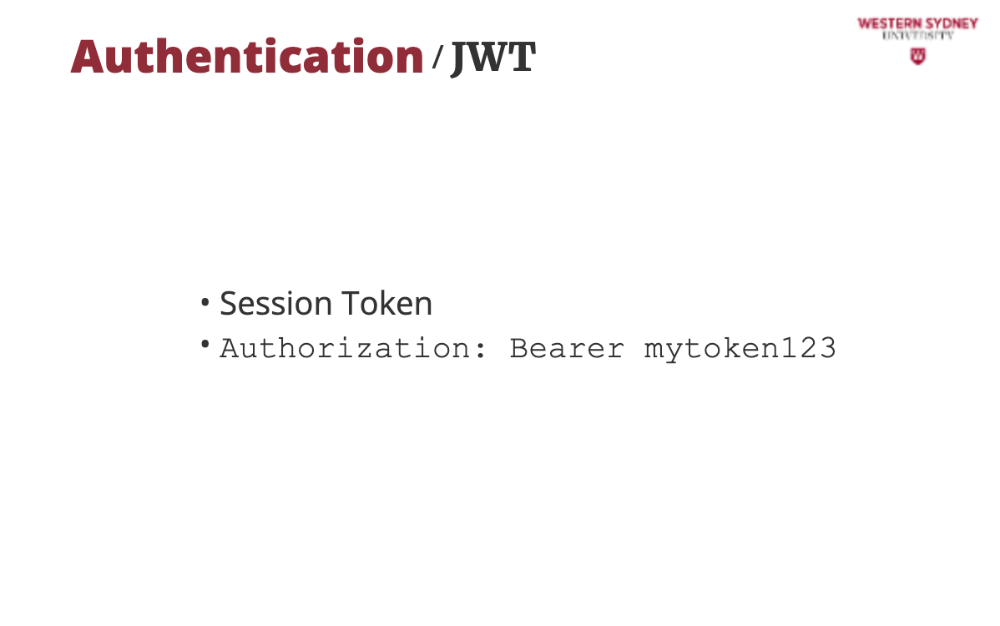
The token is usually provided as an Authorisation header, bearing the token value. The lifetime of a session token is limited in case an attacker steals this token its use will be limited.
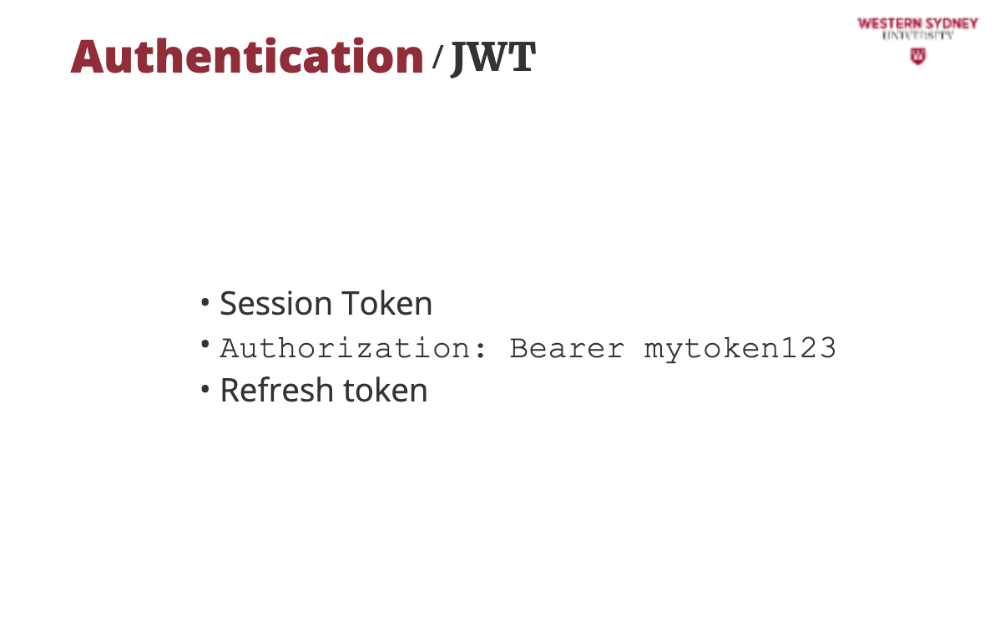
Refresh tokens are used to obtain new session tokens when old ones expire. They are stored more securely in either an http-only cookie or keychain.
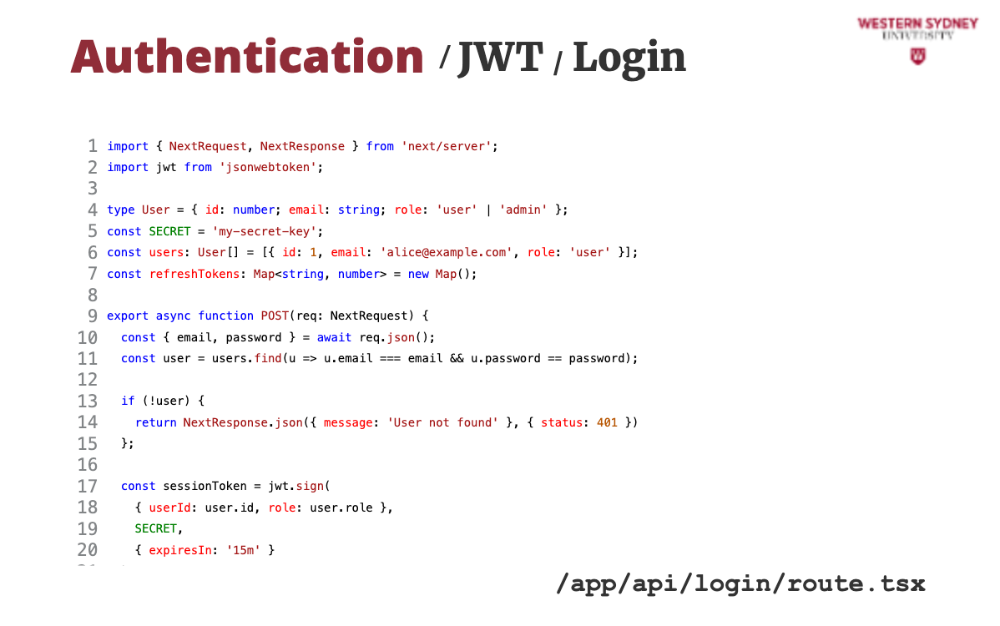
Let's break down an example of how we can use JWT tokens to secure our application
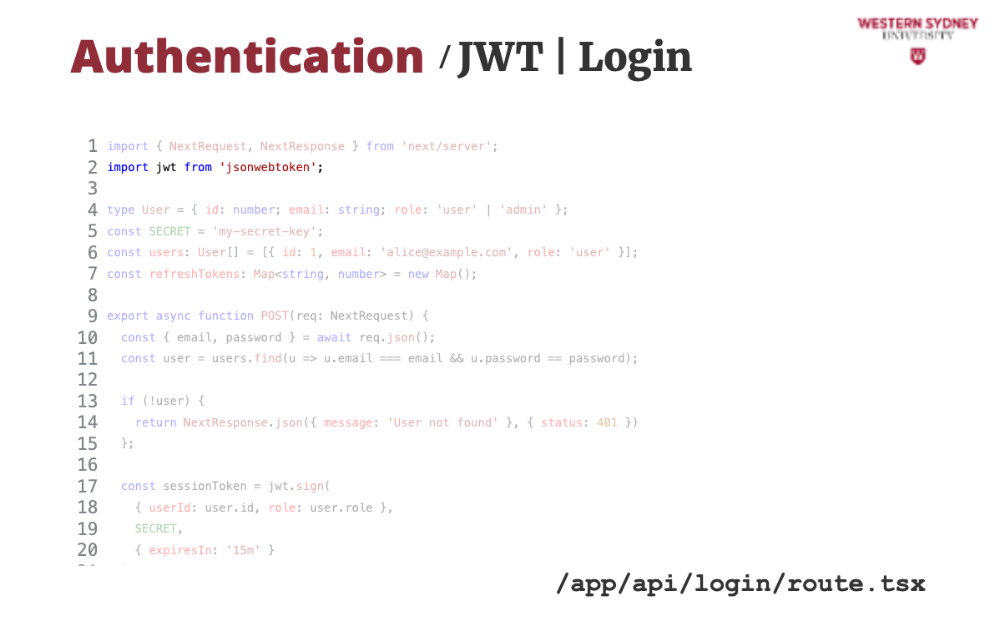
We will use the popular jsonwebtoken package to handle the JWT tokens.
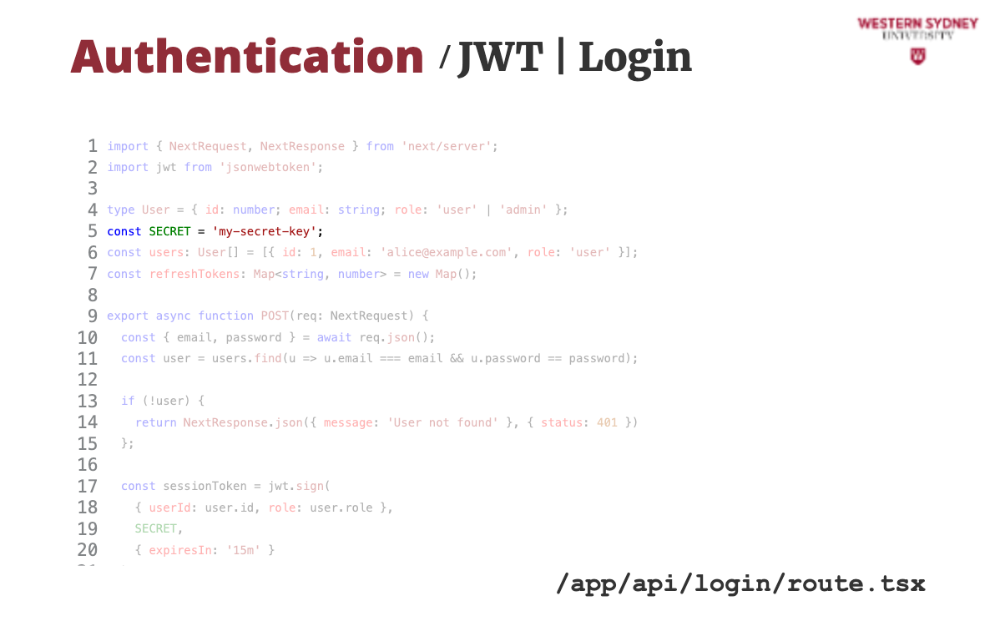
First, with JWT we need a strong secret that we will use to sign our application tokens. This time, we provided it directly in the code, but this is not secure as your secret would be stored in the repository. Please use environment variables instead.
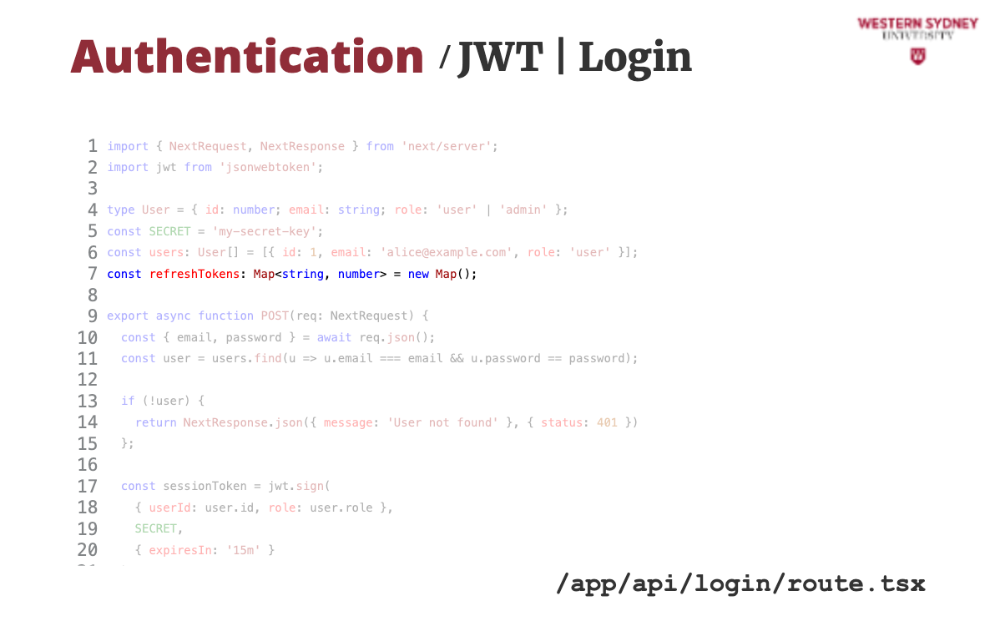
We will also store the list of refresh tokens in the memory. Normally, you would store them in a persistent store, such as a database.
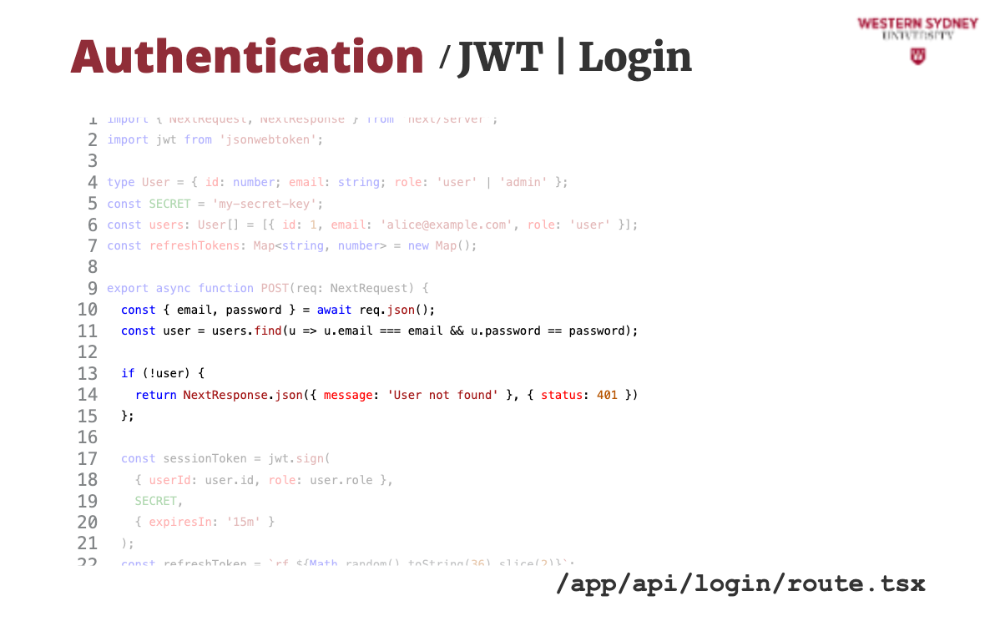
Similar to our previous examples, we find the user with the provided username and password and return an error if the user does not exist.
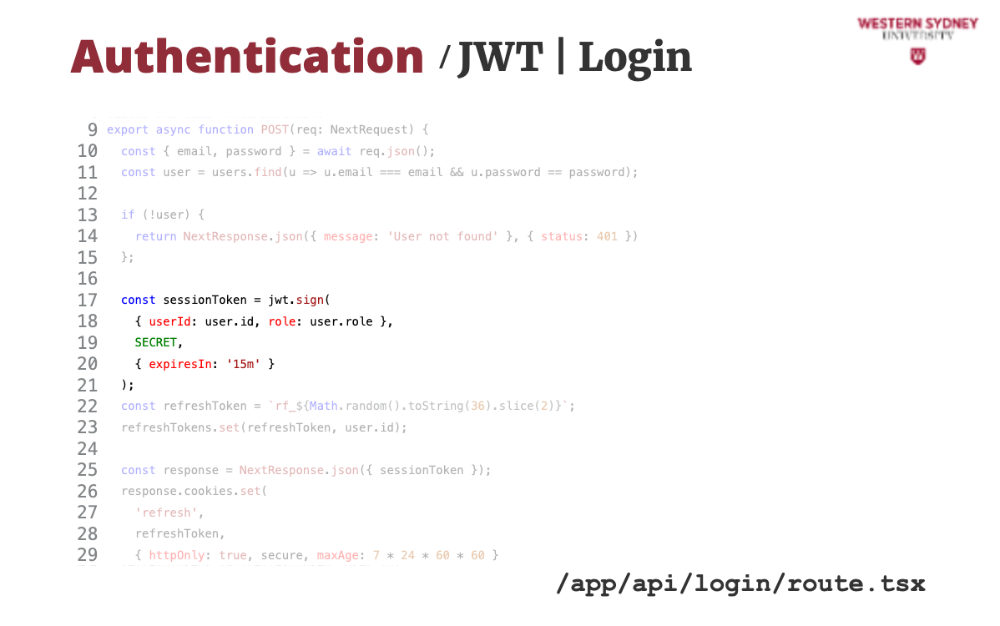
If the user exists, we create and sign a new session token with 15 minute validity
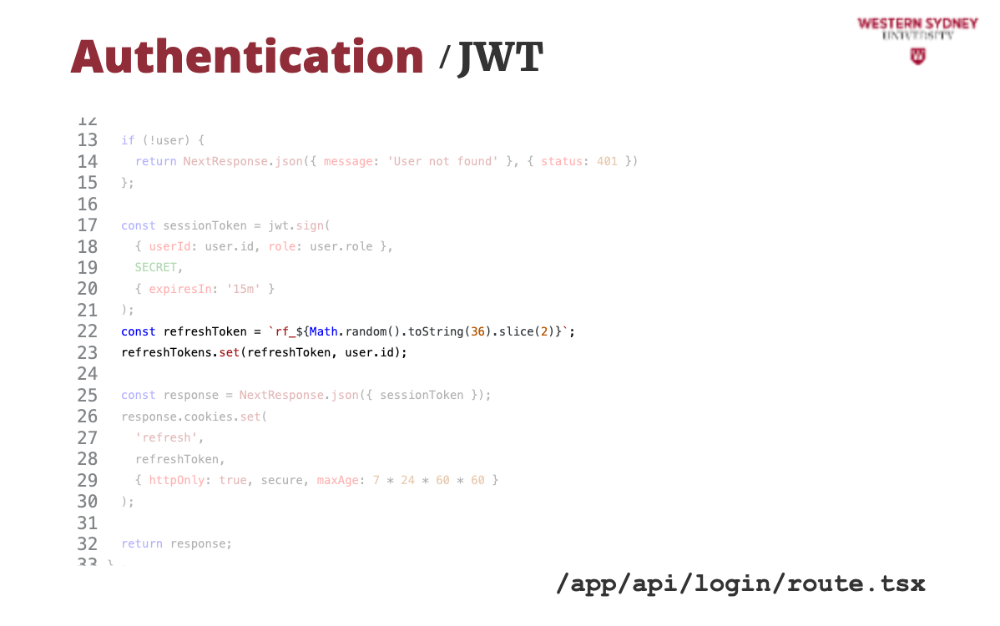
Also, we create and store the refresh token
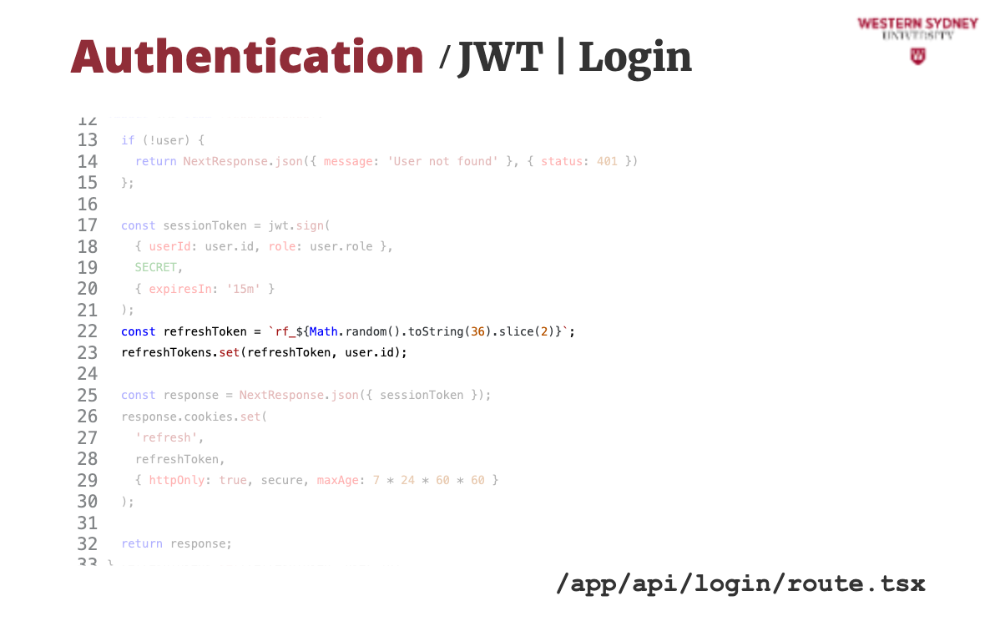
Last, we prepare a response, where we return the value of the session token.
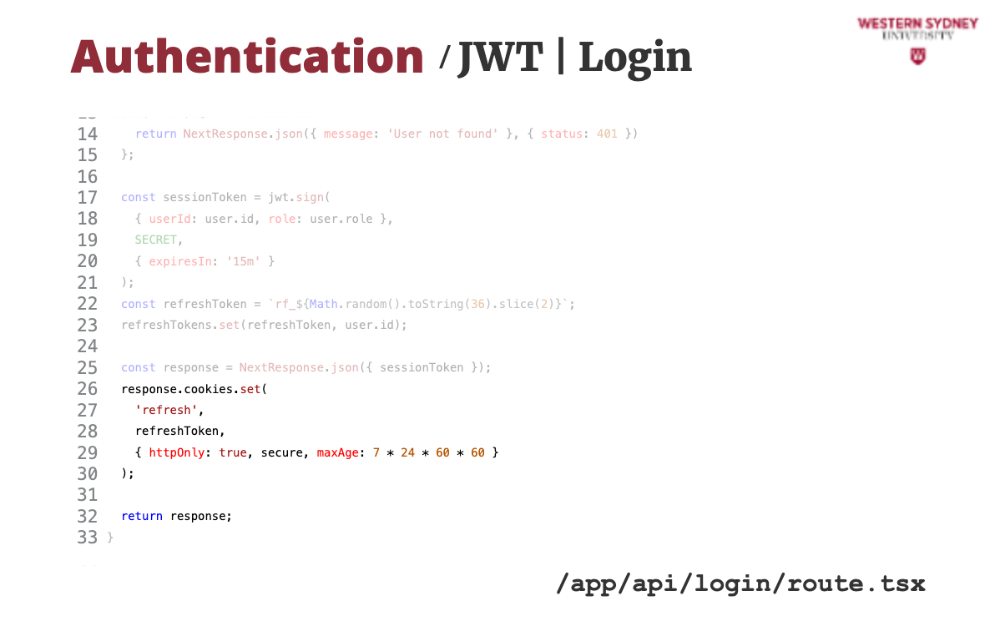
We also set the cookie with the refresh token value. Now, the response is ready to be delivered to the user with the session and refresh token ready to be used.
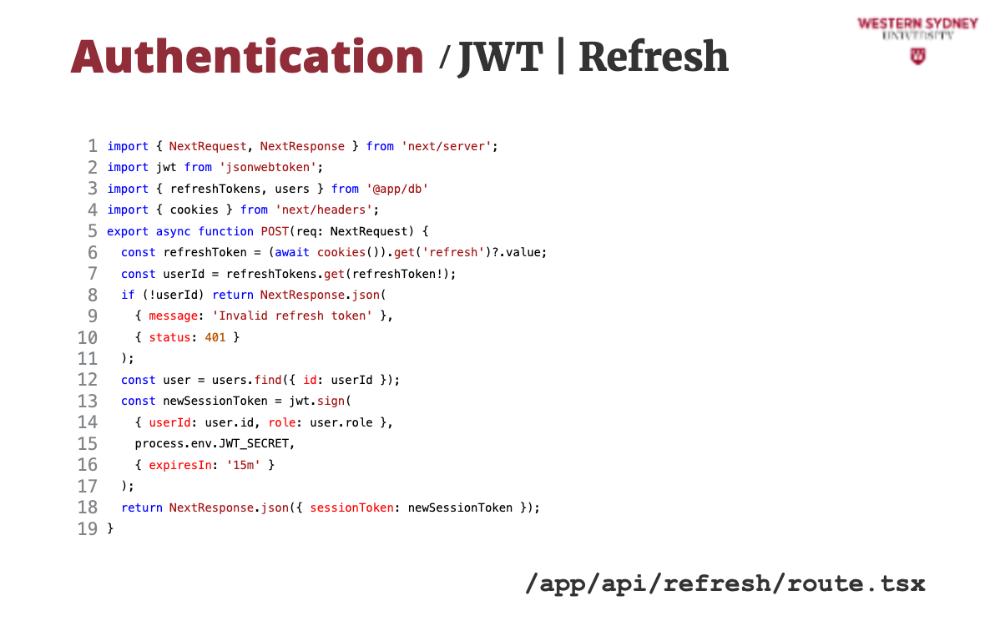
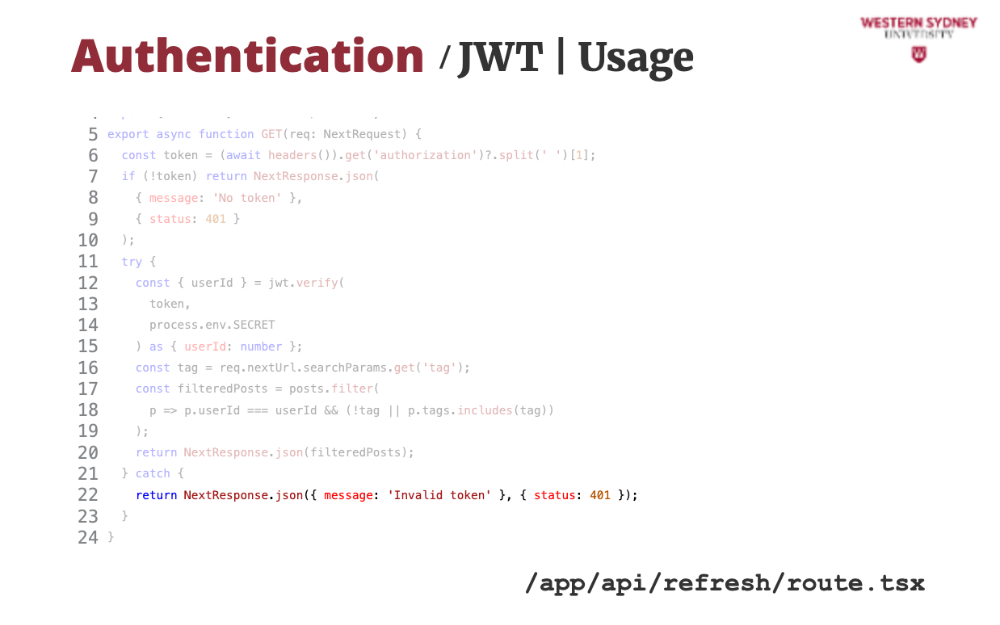
Let's take a look at how we can issue a new session token based on the old expired token.
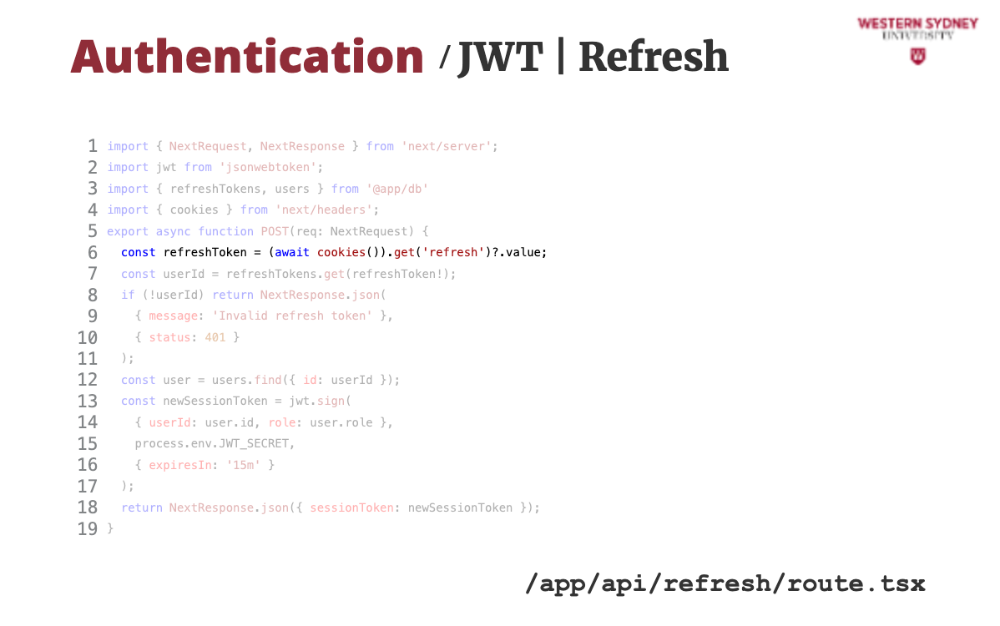
First, we grab the refresh token from the cookie.
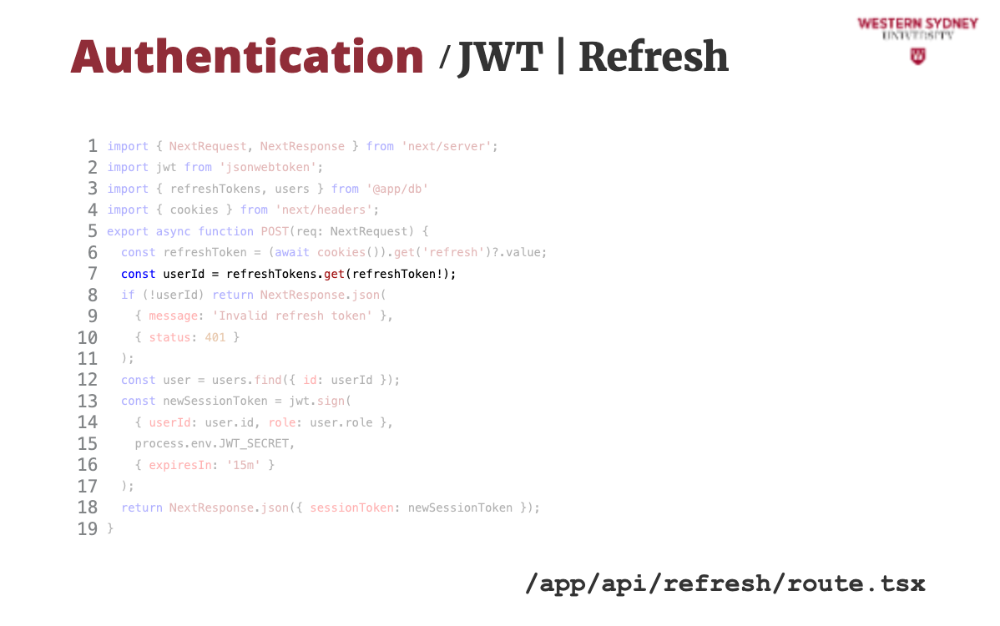
Then, we find the user that has this refresh token. This time, we assume that the session tokens are stored in a dictionary, mapped by refreshToken.
If the token or user does not exist we issue an error.
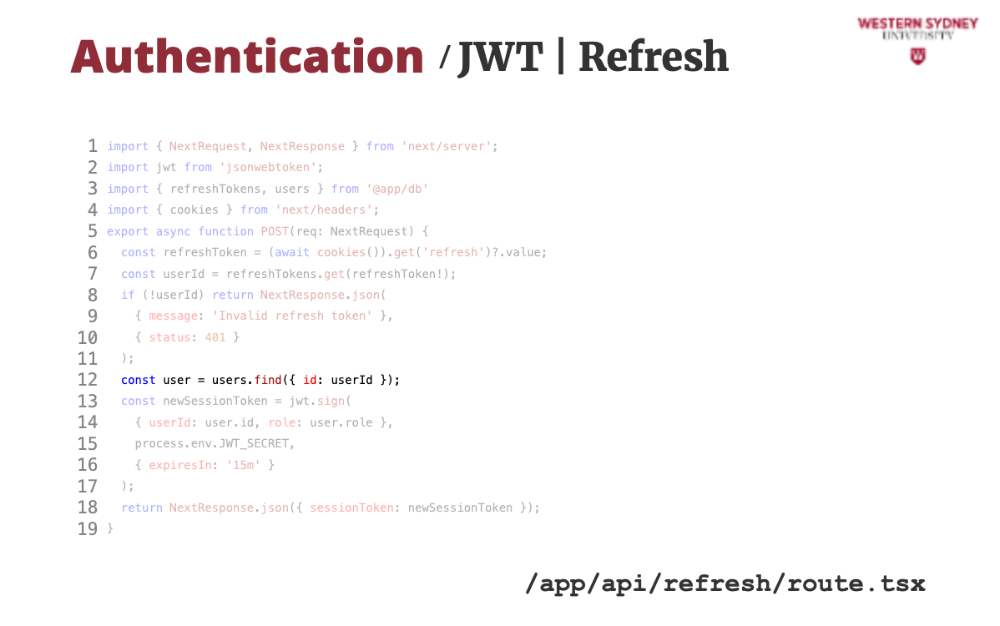
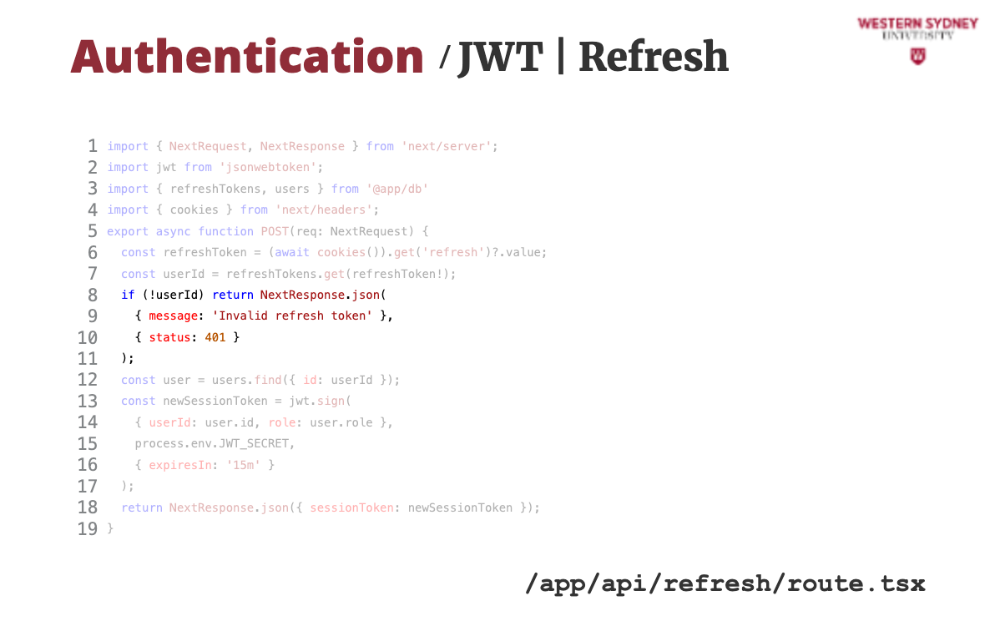
Next, we grab user info from the database ...
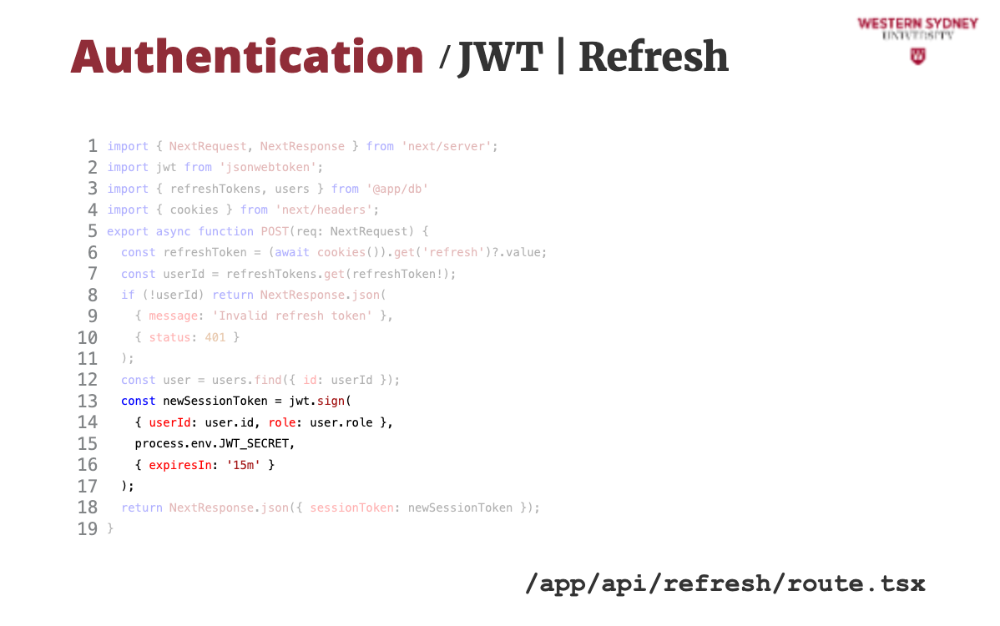
... and use it to issue a new session token with 15-minute validity.
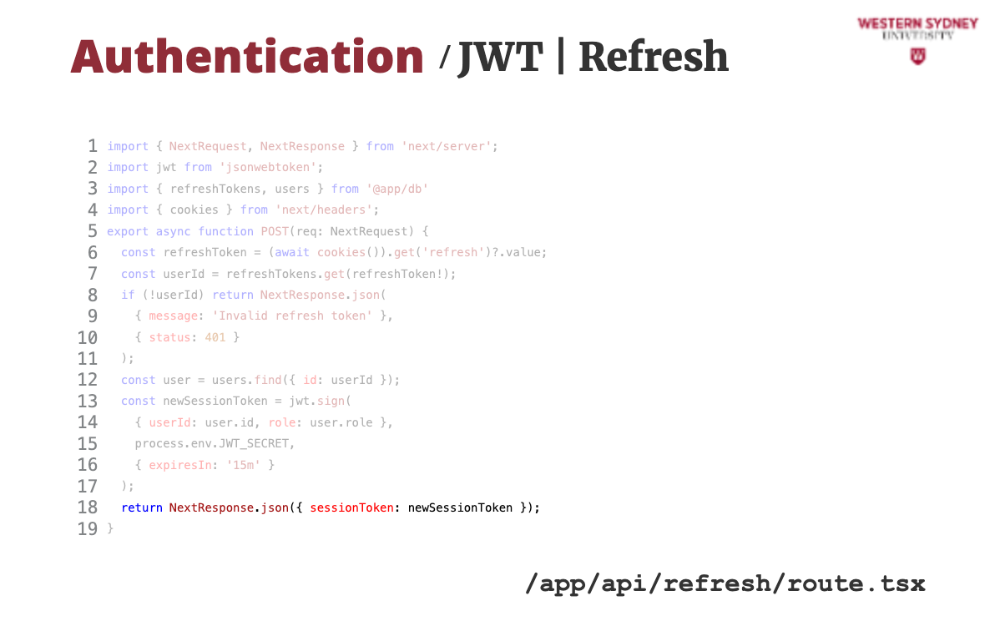
... which we return back to the client,
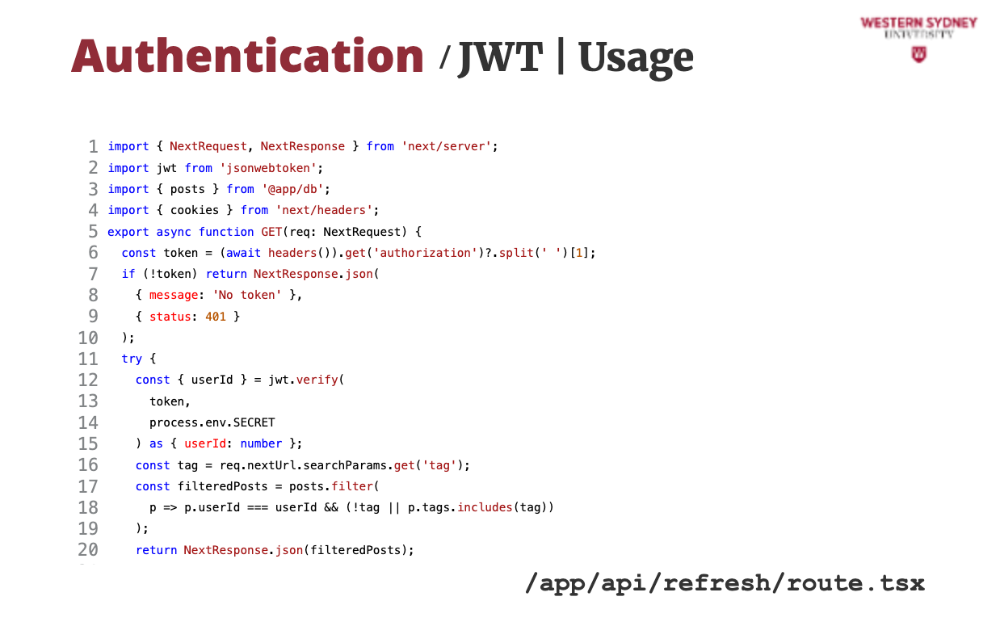
Let's take a look at how we can use session tokens to authenticate requests.
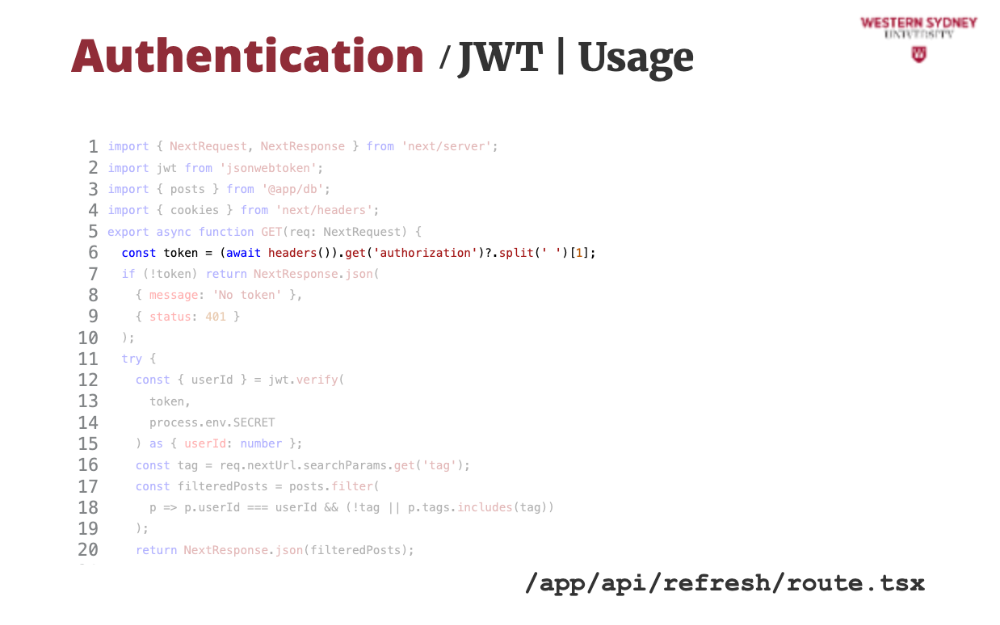
First, we read the authorisation value from the request header.
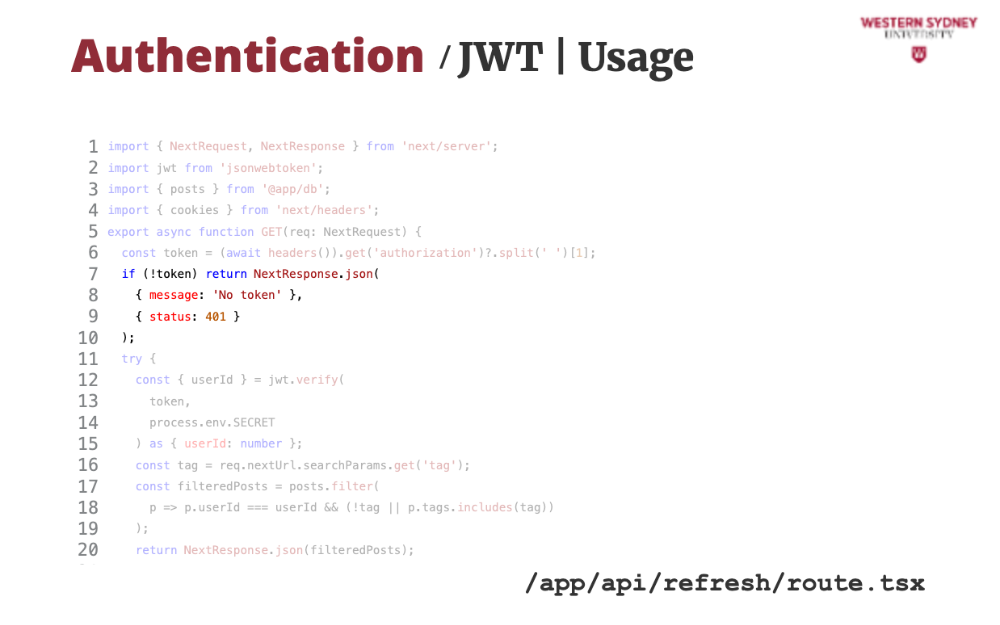
If the authorisation header is missing, we issue an error.
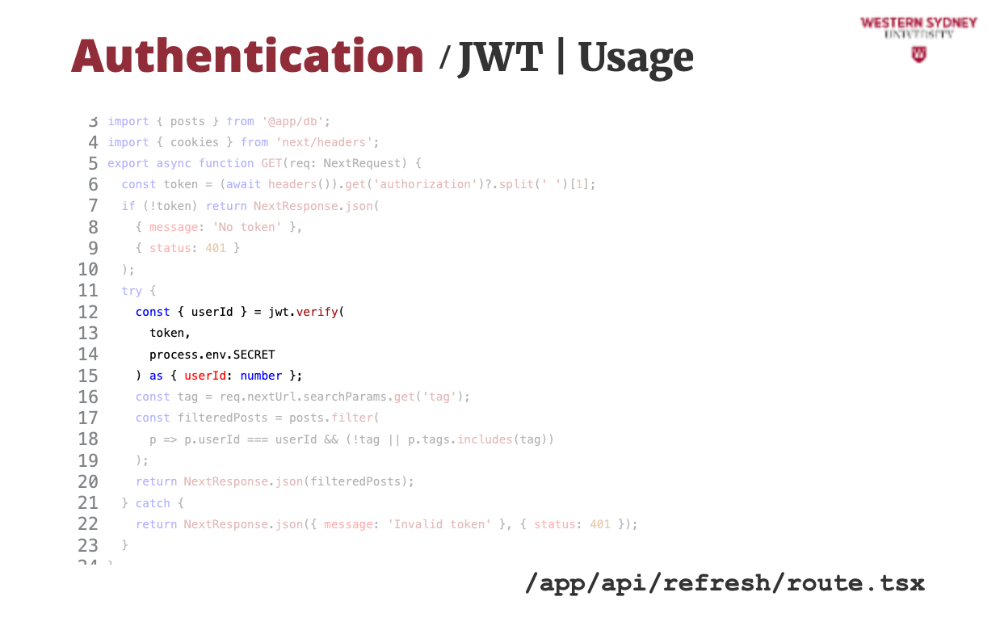
If the token has been provided in the header, we verify it using the provided secret.
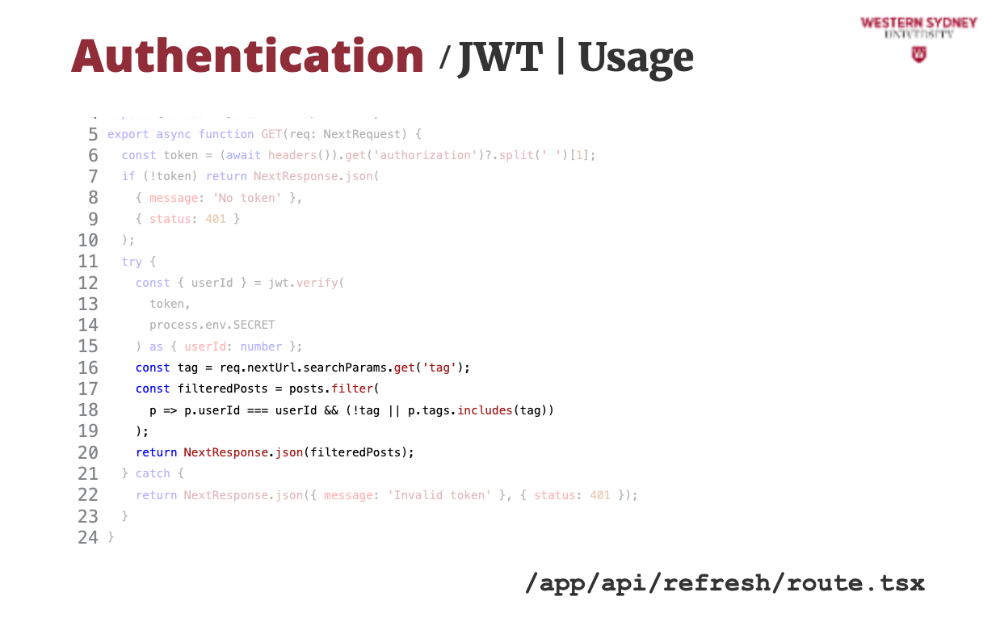
If the verification passed, we return the desired user posts.
If the verification failed, an error is thrown and we issue authentication error, mentioning the incorrect value.
The beauty of tokens is that you can use the same token to access multiple endpoints and services and use only one endpoint to re-issue new session tokens. This is the standard approach to securing API endpoints which we will cover in the near future.

The best approach is to leave authentication and password storage to others to minimise security risks to your application. A popular way of doing this is by using OAUTH and social logins with Github, Google, or others. In NextJS, we use the popular NextAuth package. Let's check it out!
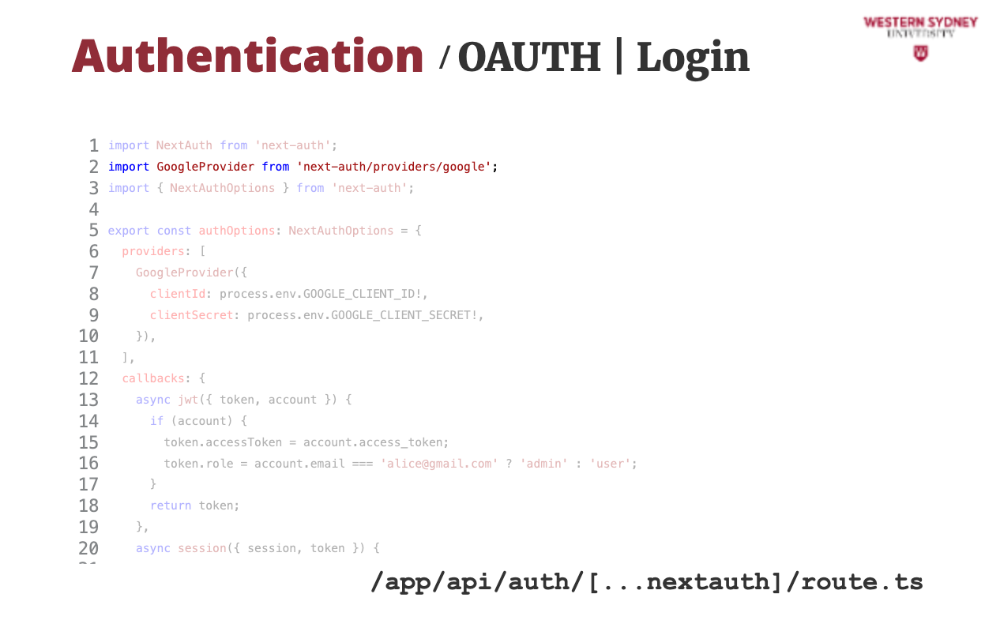
We are going to implement a Google login provider. NextAuth contains over 50 providers, and we must choose the correct one. In our case, we choose Google.
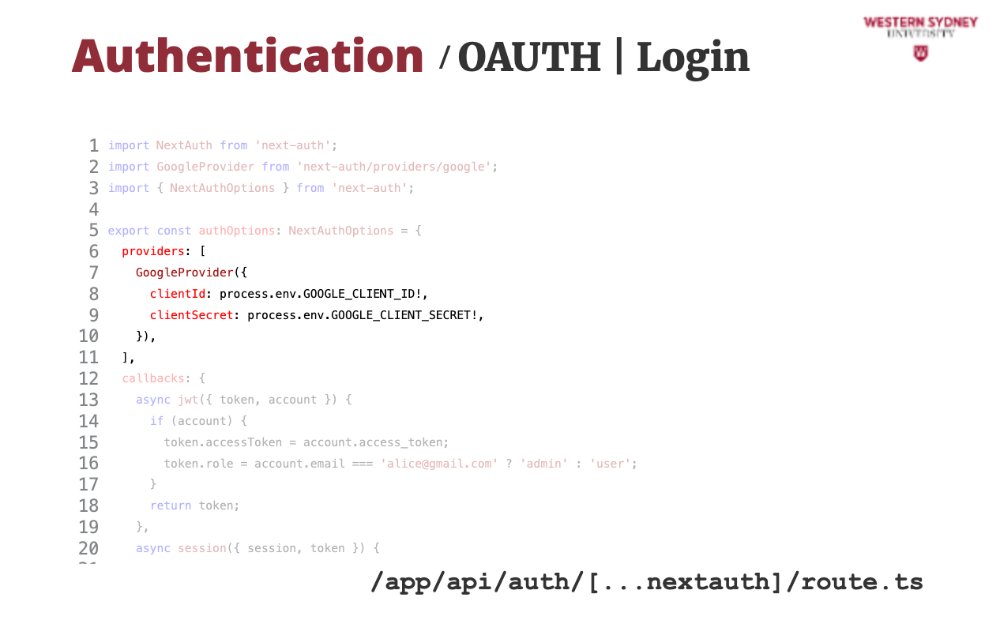
Then ,we configure the provider with the arbitrary secrets, which you can obtain as per documentation in the NextAuth package
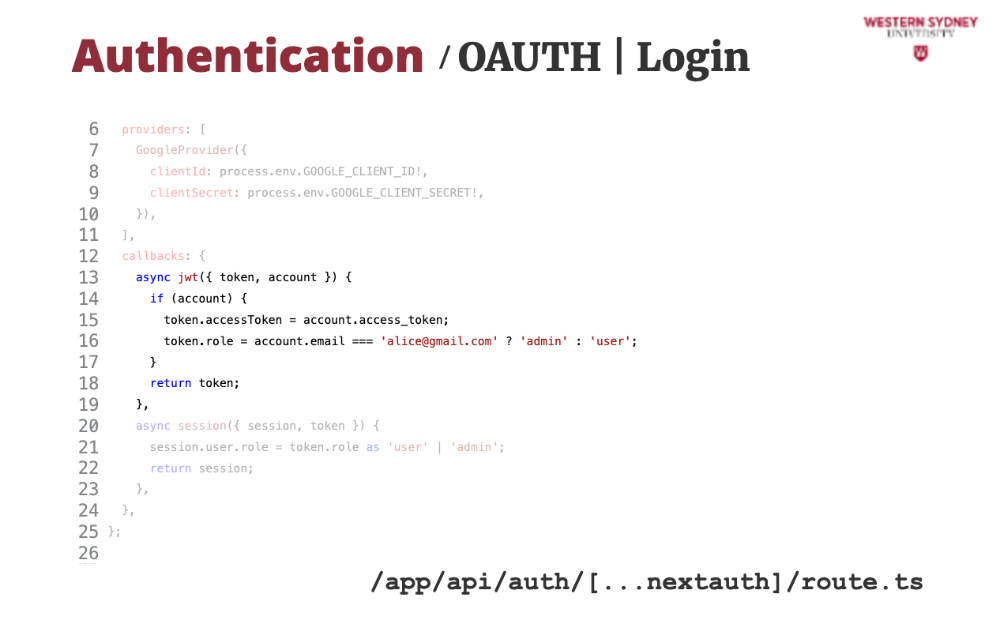
Then, we provide extra values to the token that will be issued to the users based on successful Google login.
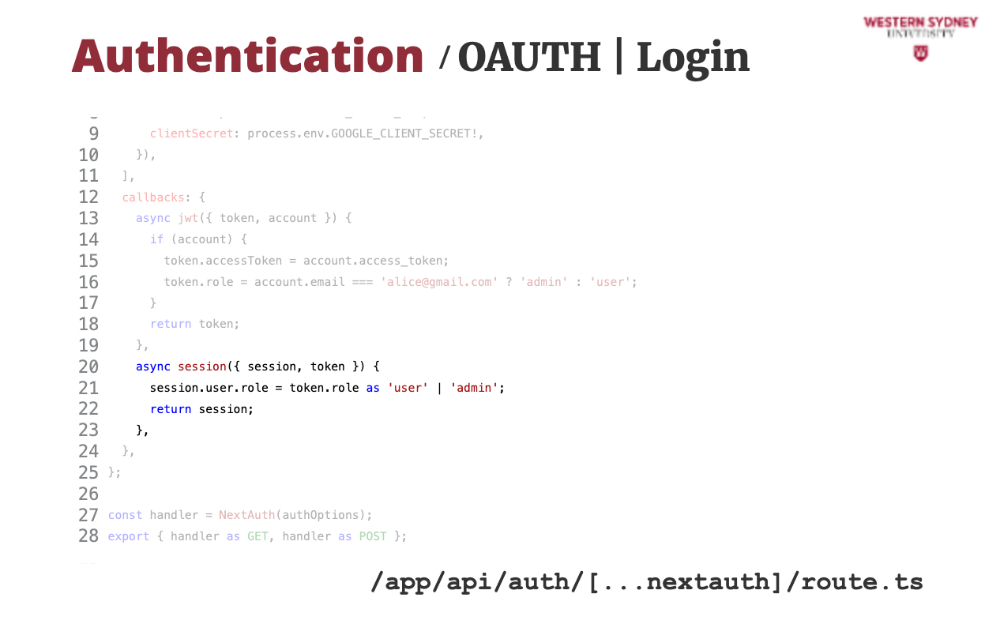
Last, we can modify which information will be accessible in the session object. In our case, we add info about authorisation access of the current user based on their role.
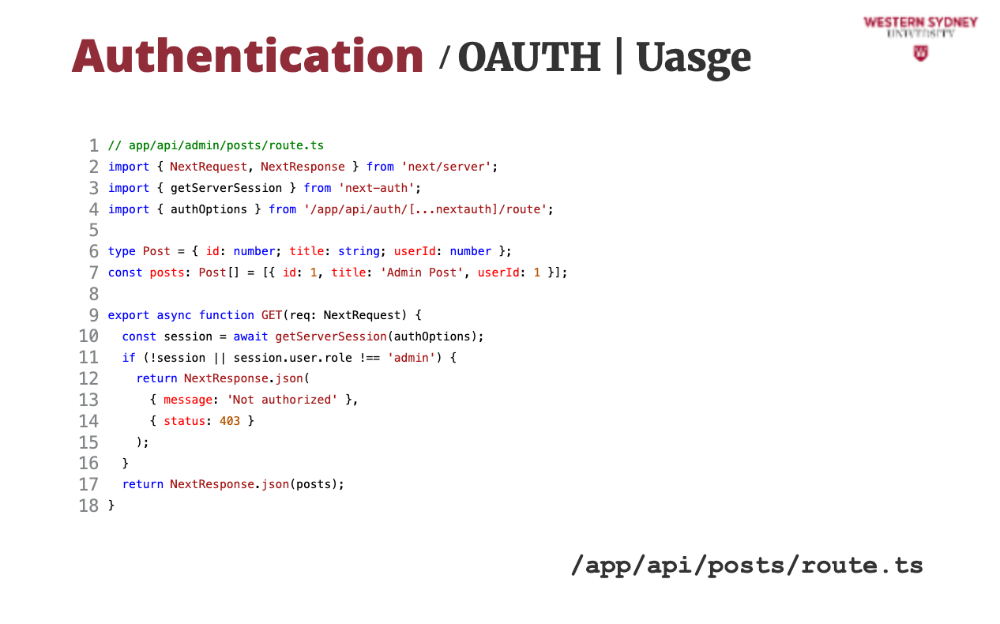
Using NextAuth is very simple!
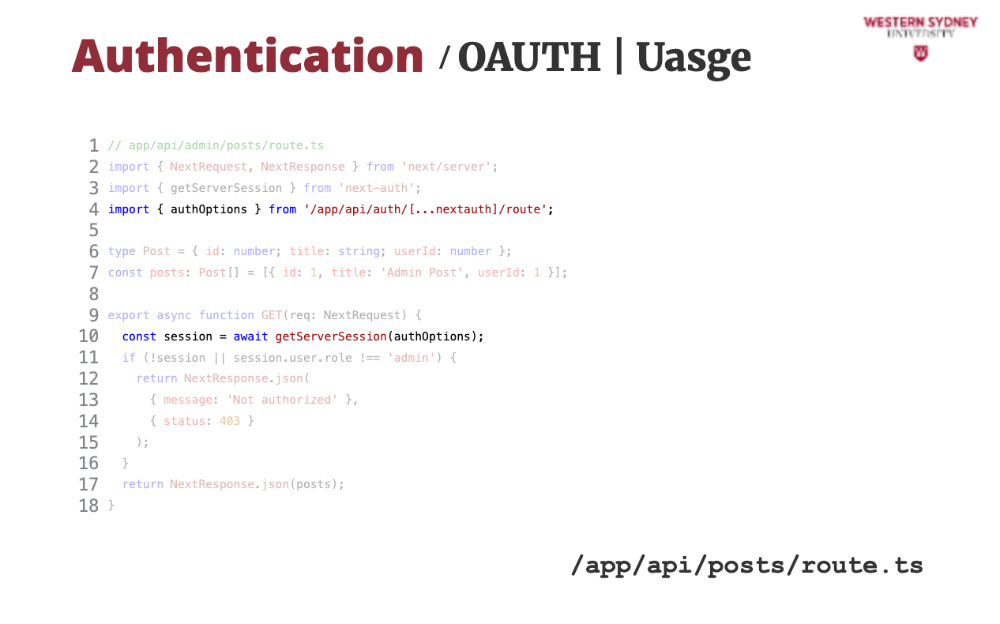
All we need to do is to call the getServerSession method, which returns the session object if user is logged in, or null if the session is anonymous.
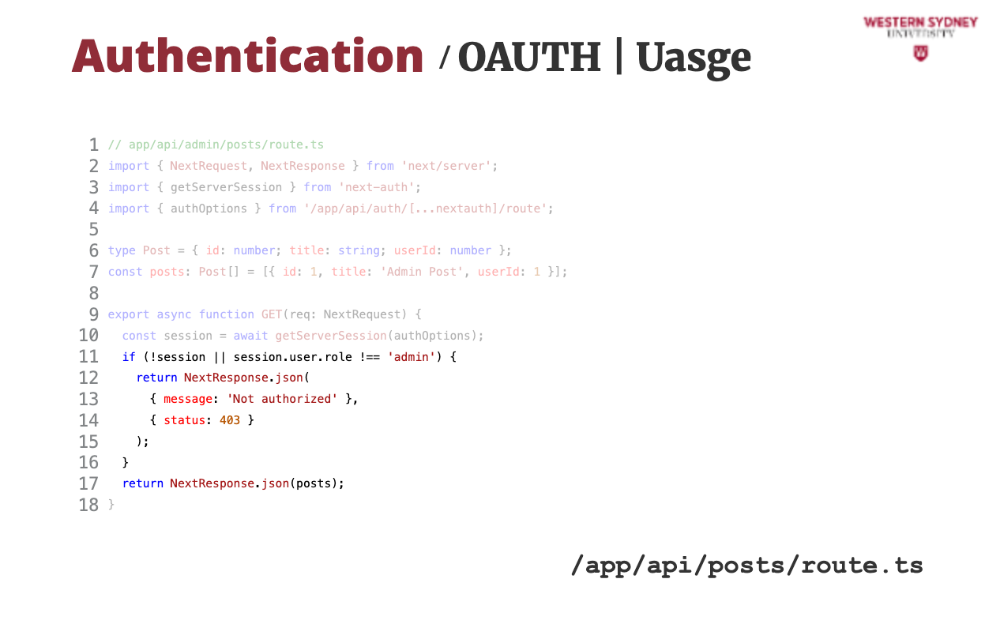
Once we have the session object we can authenticate and authorise the request, returning only desired user's posts.
SAML is there for those who want to use single sign-on, similar to what Western Sydney University uses to log in to many of its applications.
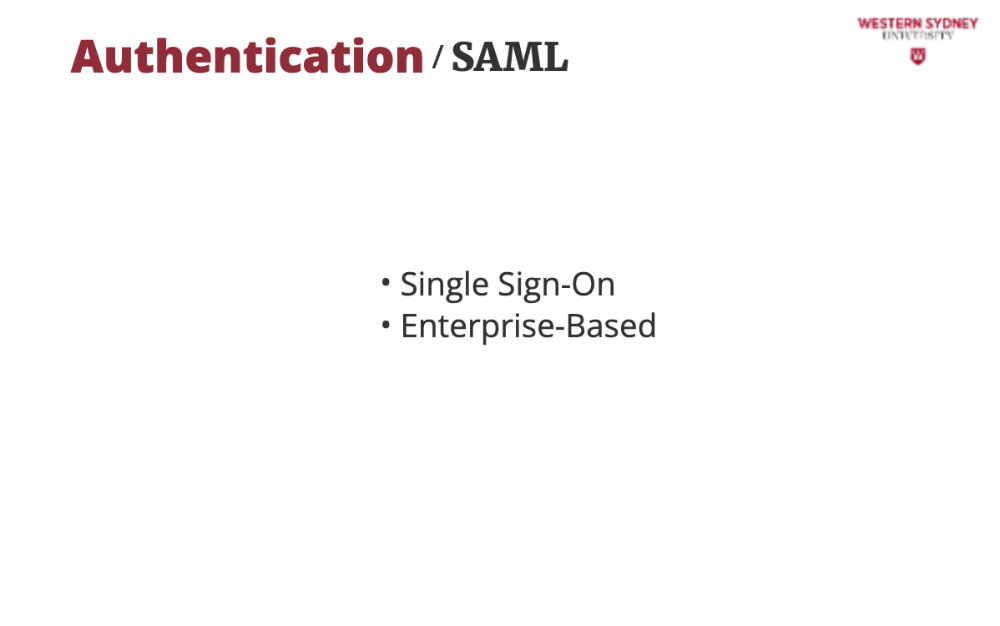
SAML is aimed at large enterprises connecting many endpoints
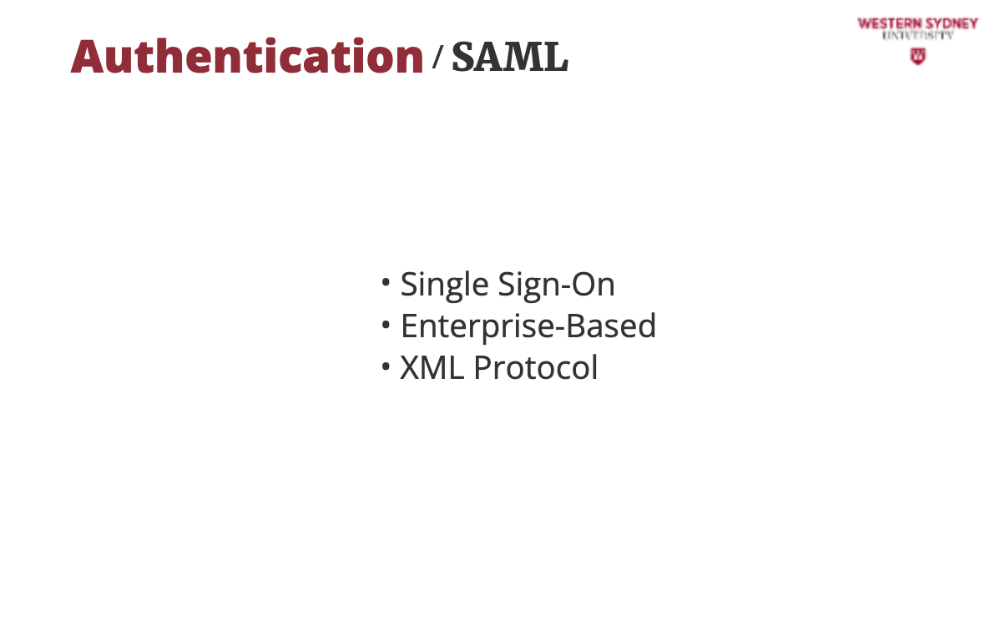
The protocol issues XML with details of the user who logs into the system.
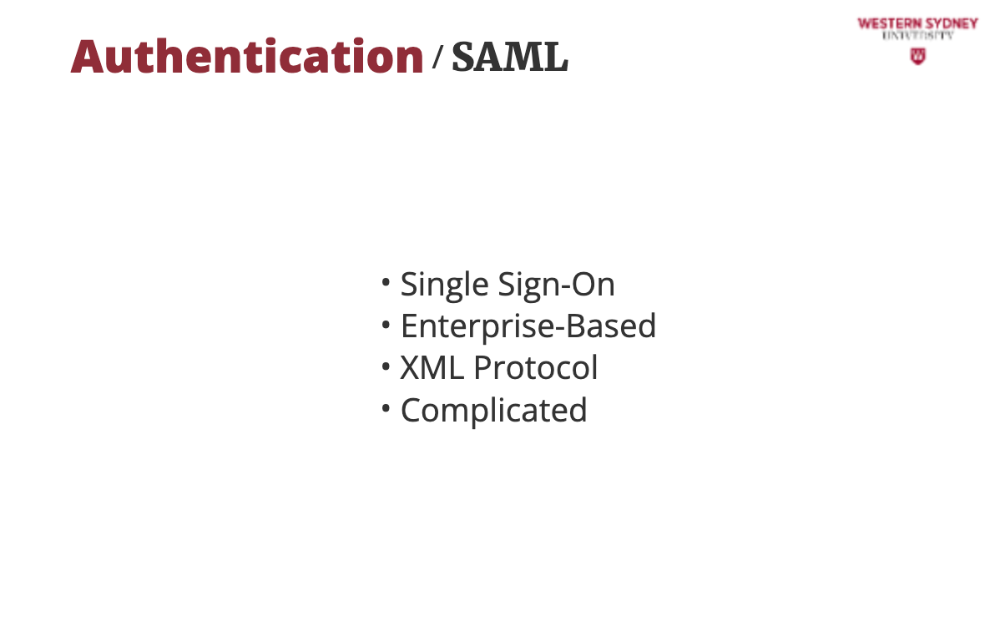
For simple apps, stay out of SAML as its implementation and administration is quite complicated.
We’ve seen cookies, JWTs, OAuth, and SAML in Blogs—now let’s compare them. Each has strengths and quirks, so you can pick the right one for your app!
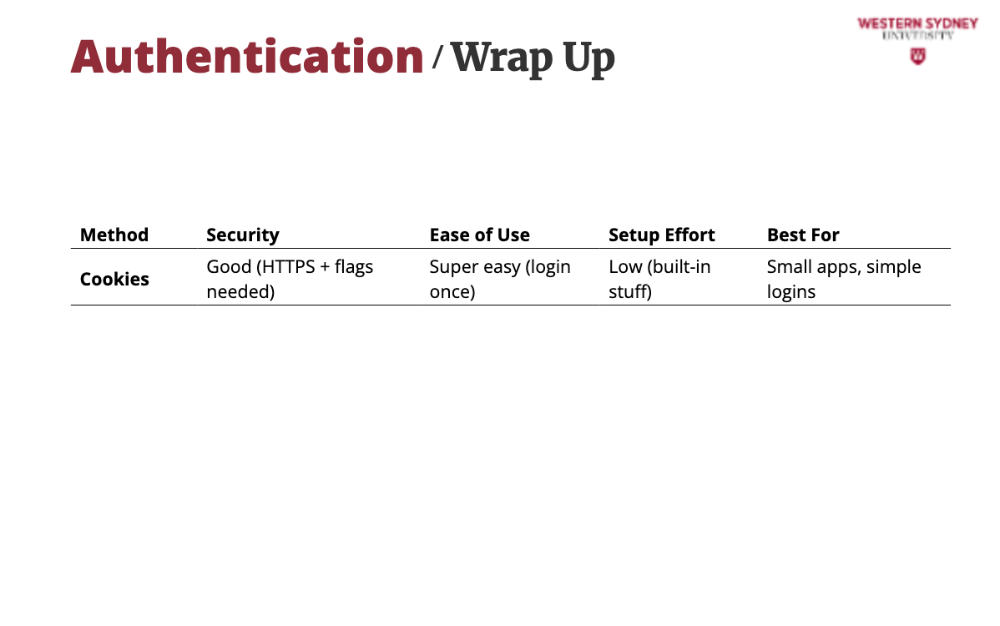
Cookies are simple for Blogs—The user logs in, gets a cookie, and browses. Secure with HTTPS, but a stolen cookie’s trouble.
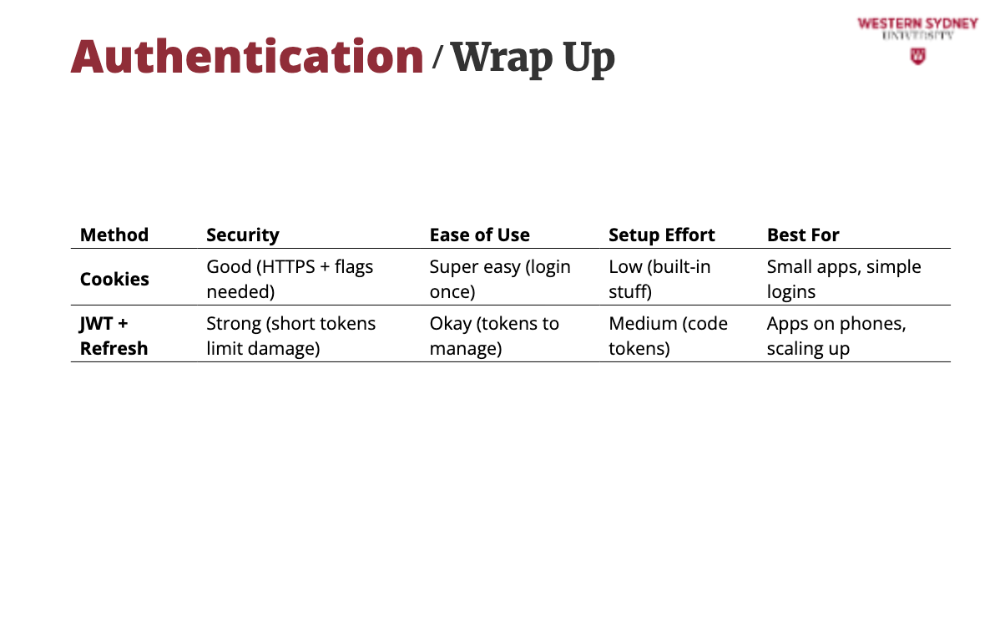
JWTs give users tokens—short ones keep hackers at bay, and refresh keeps her in. Great for their phone!
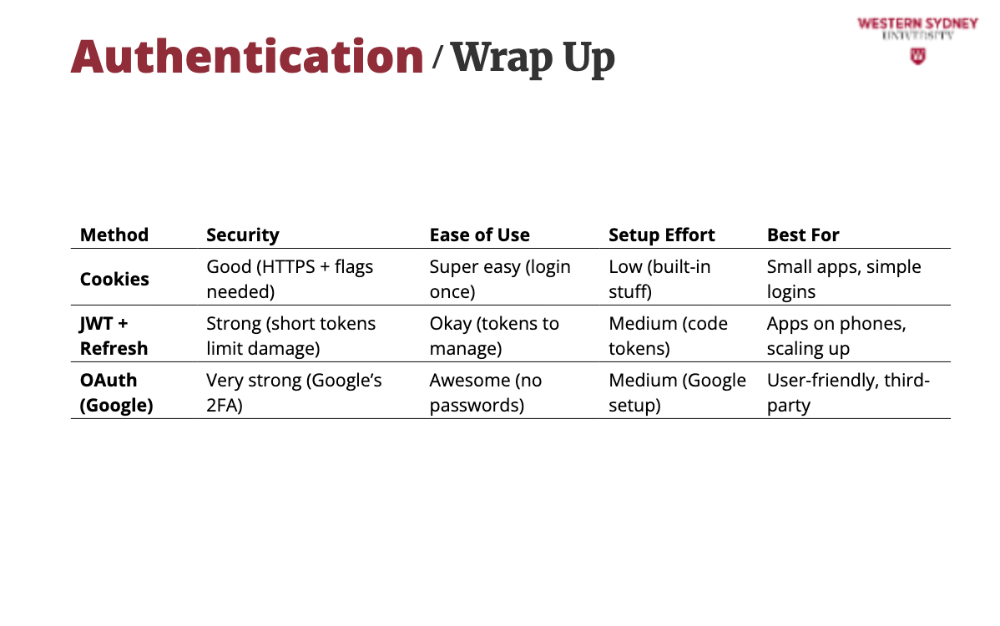
OAuth lets users use social logins—super secure and no password hassles. Perfect if Blogs want happy users.
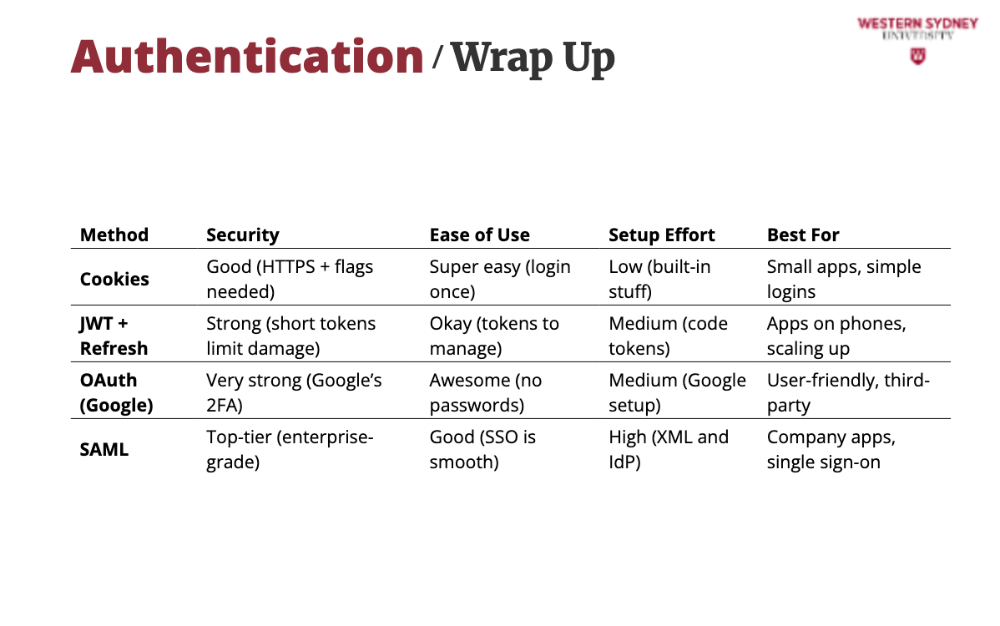
SAML locks Blogs down for a company—Users log in once via Okta. Complex, but awesome for big teams.