Props
Customizing React Components with Props
Alright, everyone, let’s dive deeper into React components today and explore how we can customise them to make them more dynamic and reusable. So far, we’ve covered the basics of components, but now we’re going to level up by focusing on something called props—short for "properties." Props are the key to passing data into components, and they’re what make React components so flexible. Let’s get started by looking at how we can create reusable components using props, and I’ll walk you through it step-by-step with some examples.
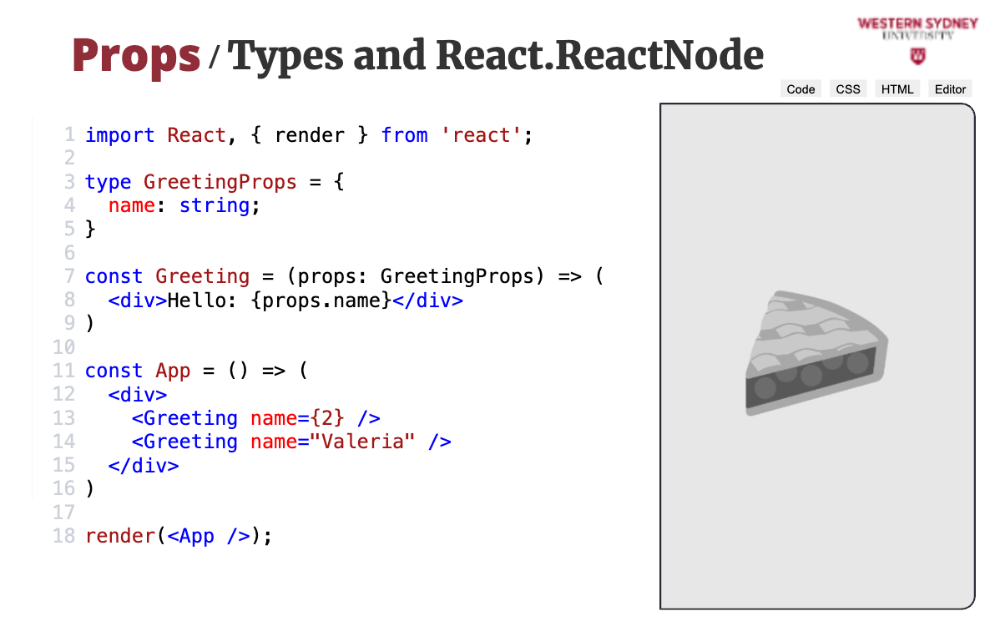
Imagine we’re building a simple Greeting component that displays a personalised hello message for a logged-in user. We want this component to be reusable, so we’ll pass in the user’s name as a prop. Here’s what that looks like in code:
import { render } from 'react';
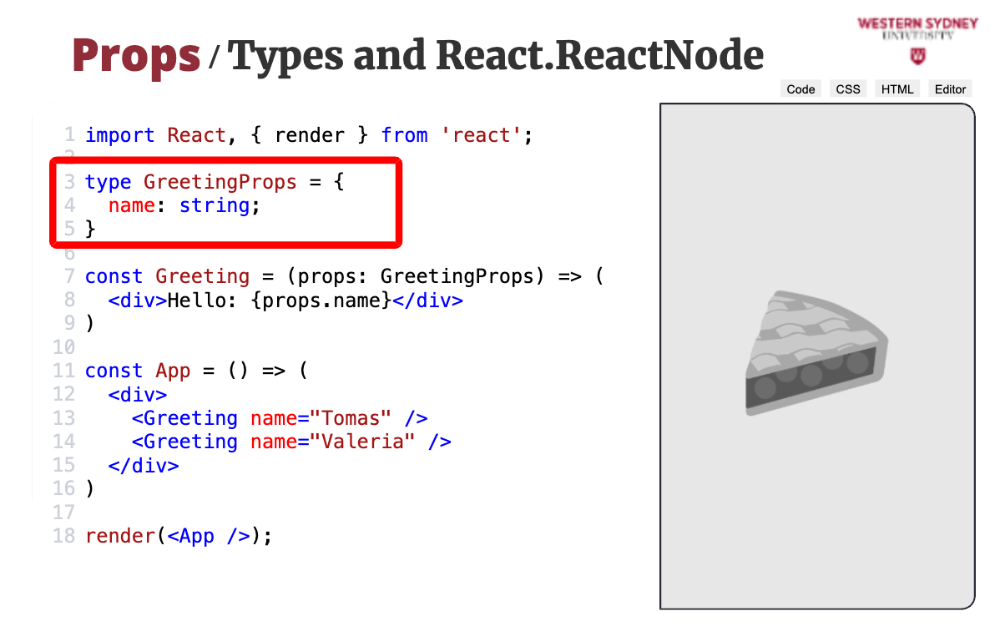
type GreetingProps = {
name: string;
};
const Greeting = (props: GreetingProps) => (
<div>Hello: {props.name}</div>
);
const App = () => (
<div>
<Greeting name="Tomas" />
<Greeting name="Valeria" />
</div>
);
render(<App />);Let’s break this down. First, we define a TypeScript type called GreetingProps—it’s a convention to name it after the component with a Props suffix. Here, it has just one property, name, which is a string. The Greeting component takes props as its parameter, and inside the JSX, we use {props.name} to interpolate the value of the name prop. Then, in the App component, we use Greeting twice, passing different names—"Tomas" and "Valeria"—as the name prop. When this renders, we’ll see "Hello: Tomas" and "Hello: Valeria" on the screen. Pretty easy, right? You can already see how props let us reuse the same component with different data.
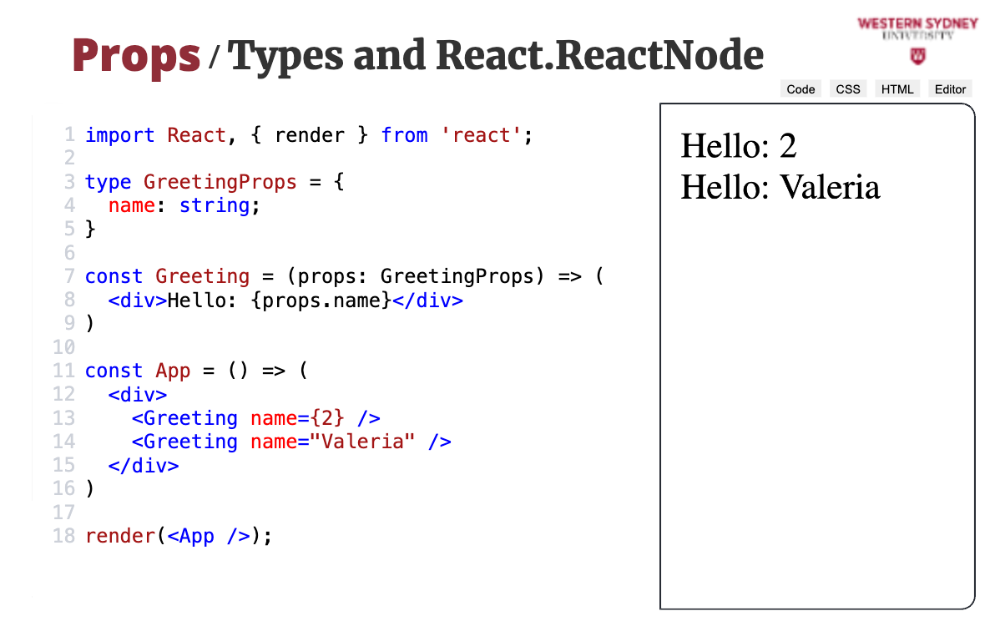
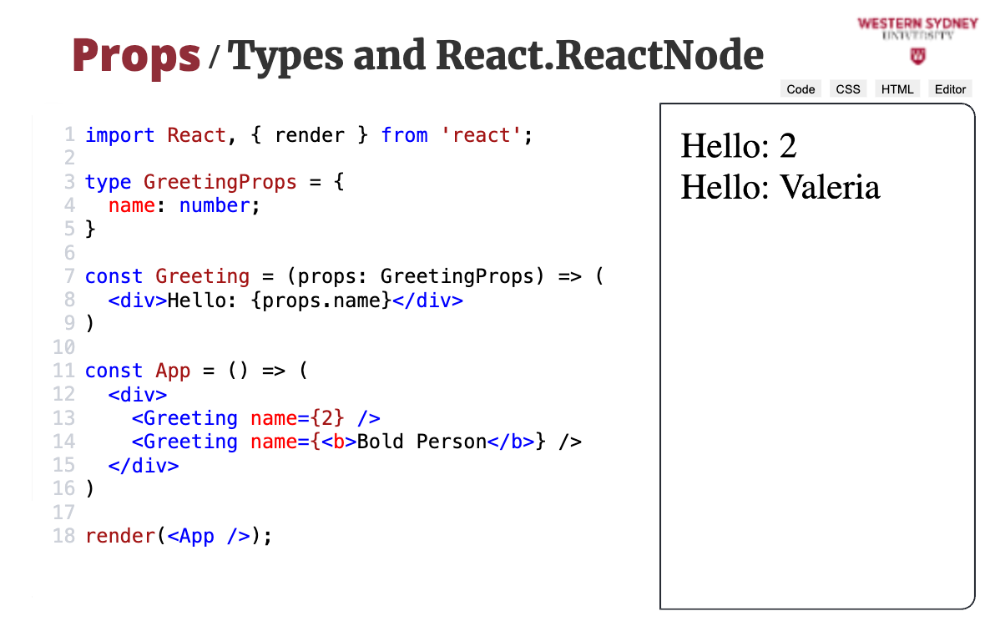
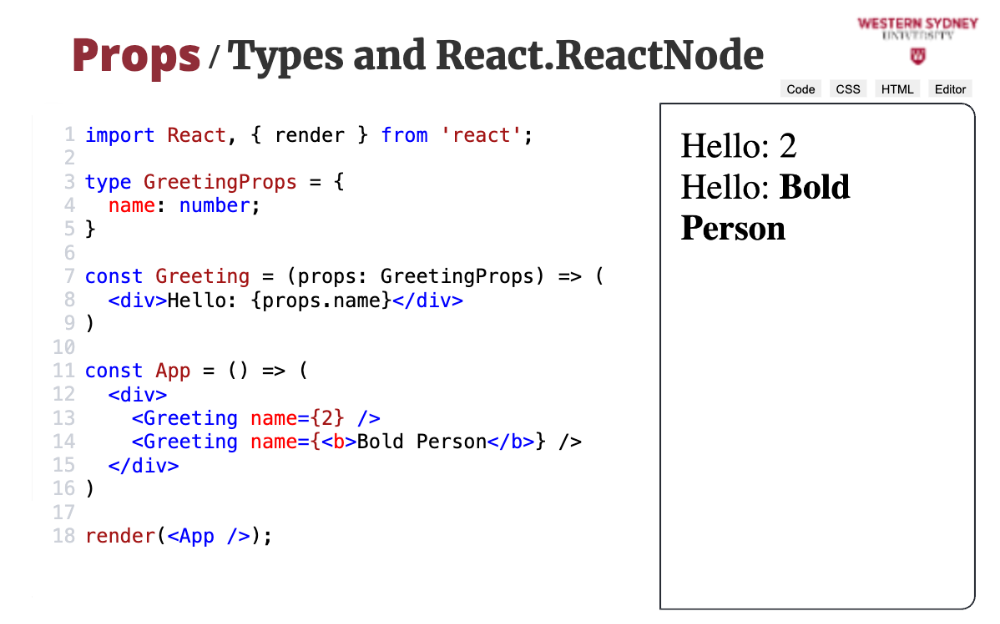
Now, let’s talk about how we control and check the types of props we pass in. Since we’re using TypeScript, we get static, compile-time checking, which is great because it catches errors early—unlike vanilla JavaScript, where you’d rely on runtime checks. Let’s stick with our Greeting example for a moment. The name prop is typed as a string. But what happens if we try to pass something else, like a number? Say we write <Greeting name={42} />. If you’re using a TypeScript-enabled editor like Visual Studio Code, you’ll see an error pop up right away: “Type ‘number’ is not assignable to type ‘string’.” That’s TypeScript doing its job.
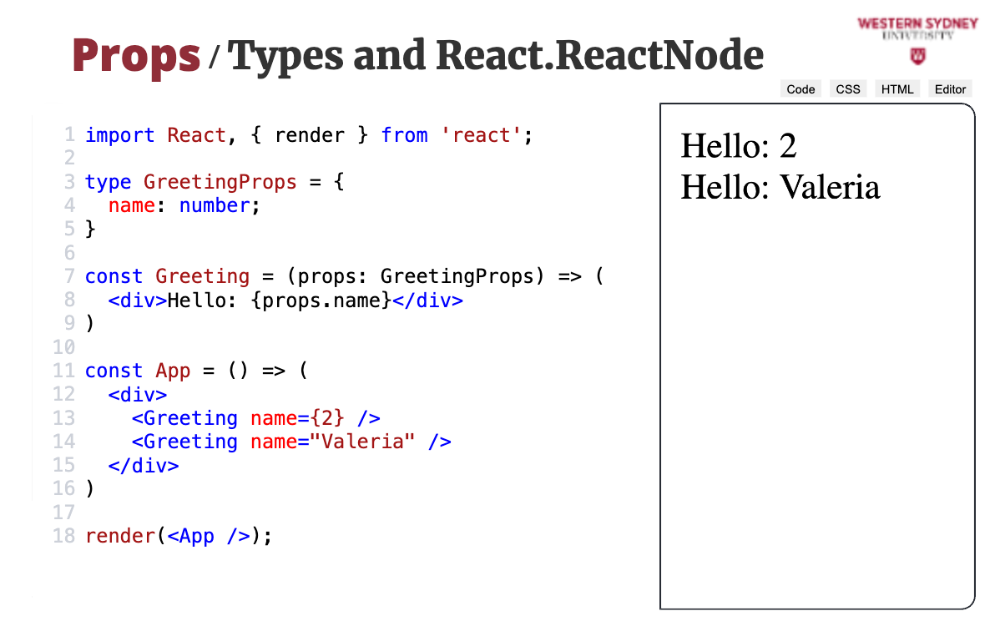
But here’s the interesting part: if you run this code, it’ll still work! Why? Because TypeScript’s type checking disappears when your code gets compiled to JavaScript—it’s purely a development-time tool. That said, if you’re using a framework like Next.js, it’ll catch these type errors during the production build process and flag them for you. To fix this in our example, we could change the type of name to number:
type GreetingProps = {
name: number;
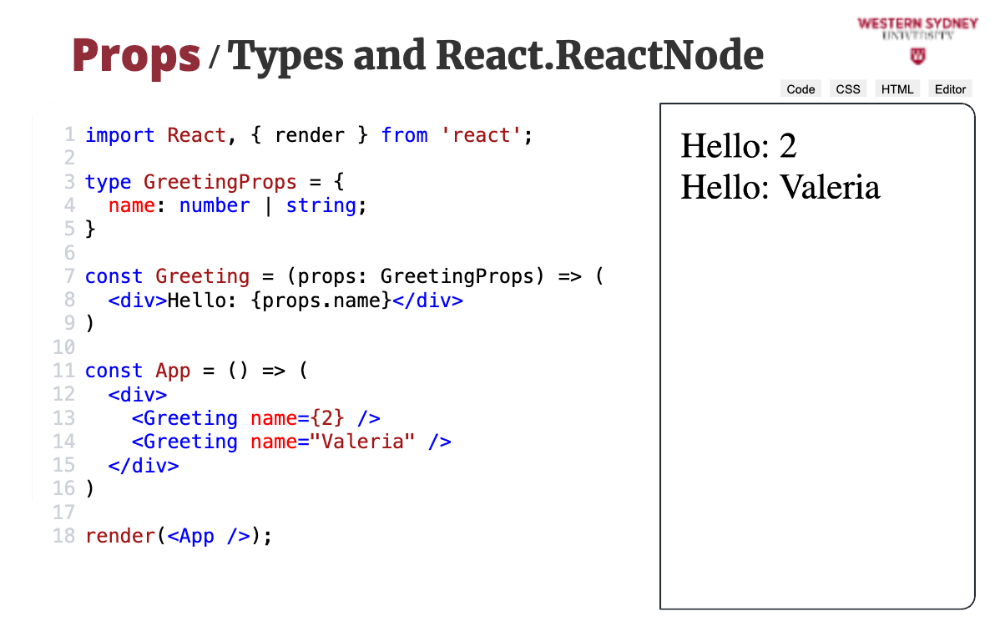
};And the error goes away—or we could use a union type, like string | number, if we want to allow both. This flexibility is one of TypeScript’s strengths.
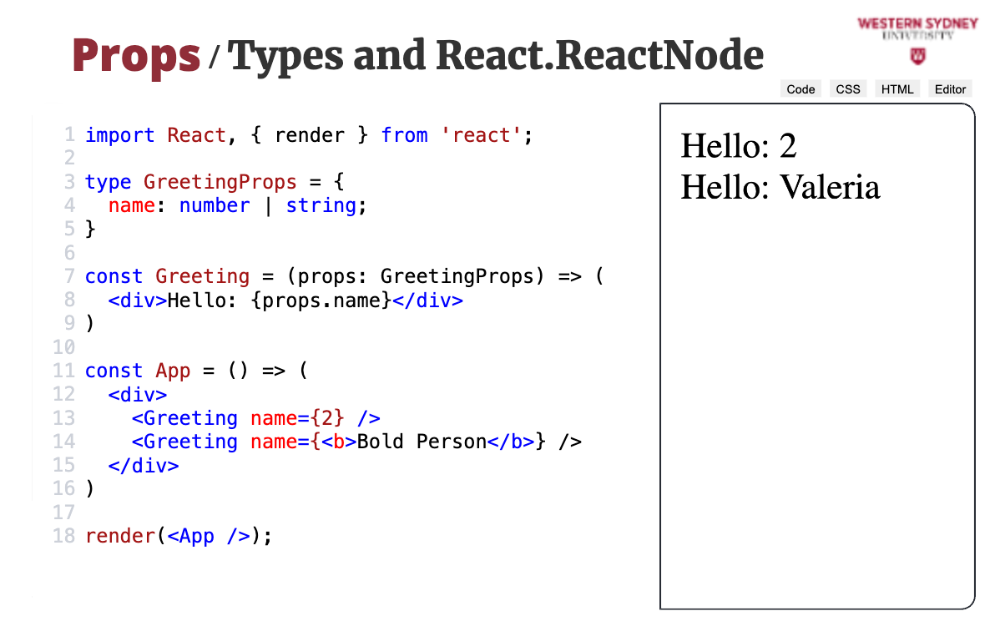
Next, let’s explore a scenario where we want a prop to accept arbitrary JSX or other renderable content. For this, React gives us a special type called ReactNode. It’s super powerful because it covers everything you can render in React—strings, numbers, JSX elements, you name it. Let’s extend our Greeting component to accept a content prop of type ReactNode:
import React, { render } from 'react';

type GreetingProps = {
  name: string;
  content: React.ReactNode;
};

const Greeting = (props: GreetingProps) => (
  <div>
    Hello: {props.name}
    <div>{props.content}</div>
  </div>
);

const App = () => (
  <div>
    <Greeting name="Tomas" content={<b>Welcome back!</b>} />
    <Greeting name="Valeria" content={42} />
  </div>
);

render(<App />);
Here, we pass JSX (<b>Welcome back!</b>) to the first Greeting and a number (42) to the second. Both render perfectly because ReactNode handles it all. This is really useful when you want a component to be flexible about what it displays.
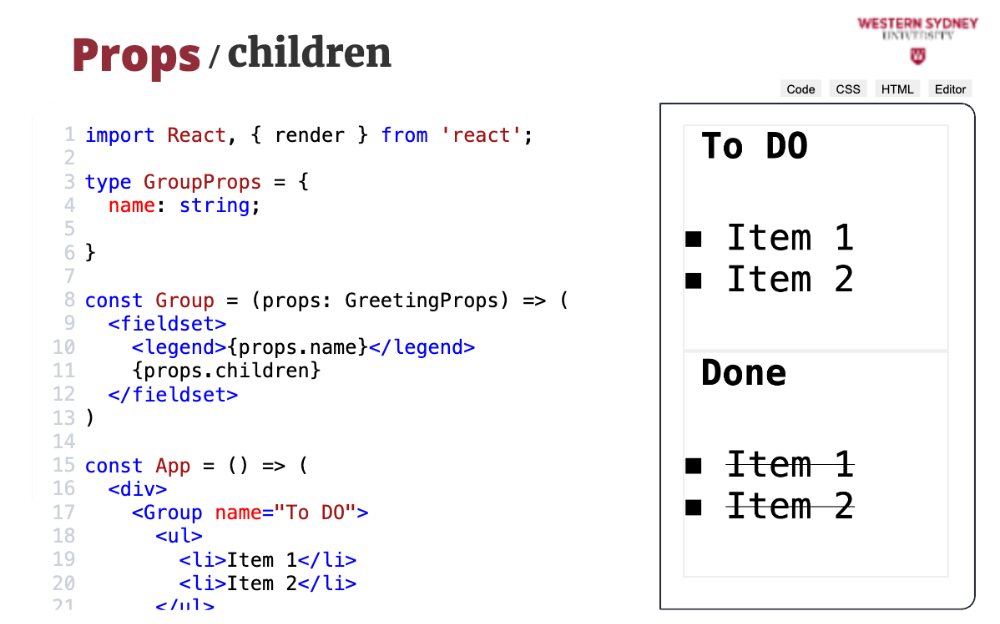
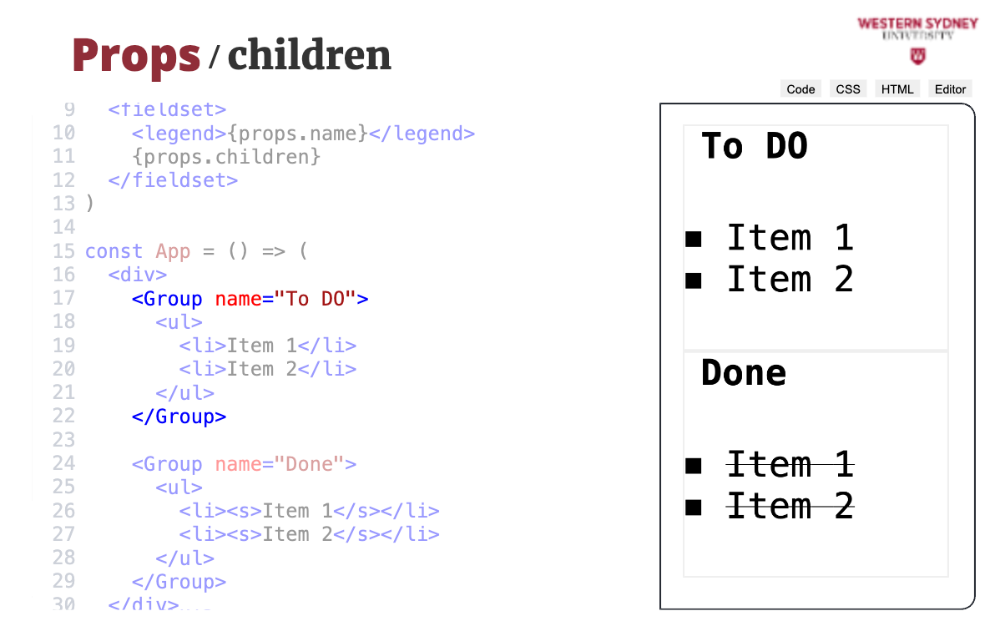
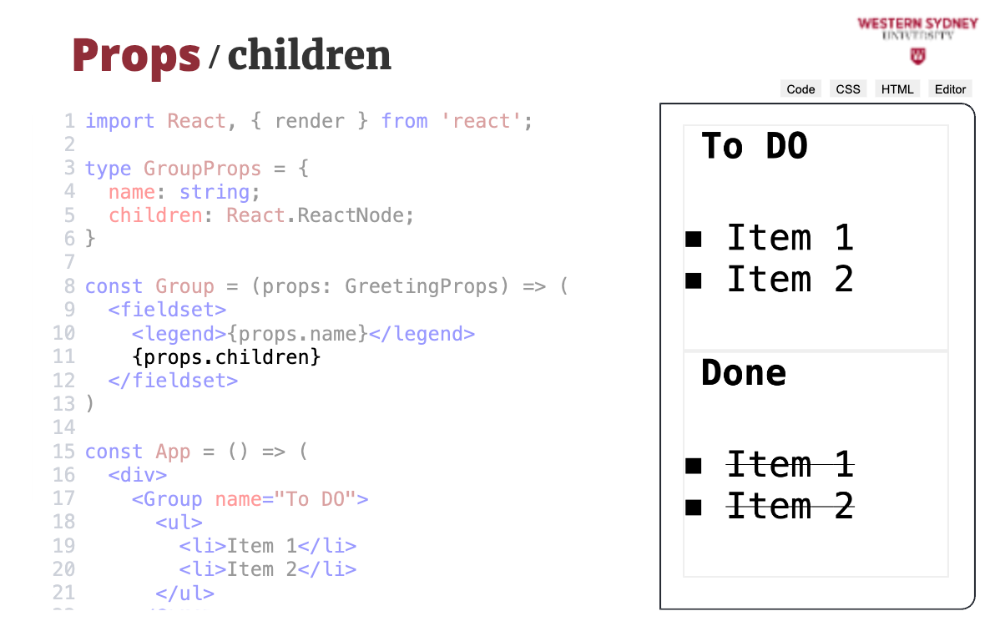
So far, we’ve been passing props as attributes, but what if we want to create components with nested, hierarchical structures—like HTML elements inside other elements? That’s where the <strong>children</strong> prop comes in. Let’s build a Group component that renders a fieldset with a title and some nested content, like a to-do list. Here’s the code:
import React, { render } from 'react';

type GroupProps = {
  name: string;
  children: React.ReactNode;
};

const Group = (props: GroupProps) => (
  <fieldset>
    <legend>{props.name}</legend>
    {props.children}
  </fieldset>
);

const App = () => (
  <div>
    <Group name="To Do">
      <ul>
        <li>Item 1</li>
        <li>Item 2</li>
      </ul>
    </Group>
    <Group name="Done">
      <ul>
        <li><s>Item 1</s></li>
        <li><s>Item 2</s></li>
      </ul>
    </Group>
  </div>
);

render(<App />);
In this example, the Group component has two props: name for the title and children for the nested content. We use <legend>{props.name}</legend> to display the title, and {props.children} to render whatever’s nested inside the component tags. When we use it in App, we pass a list of to-do items for one group and a list of completed items (with strikethroughs) for the other. This setup lets us reuse the Group component with different titles and content—pretty cool, huh?
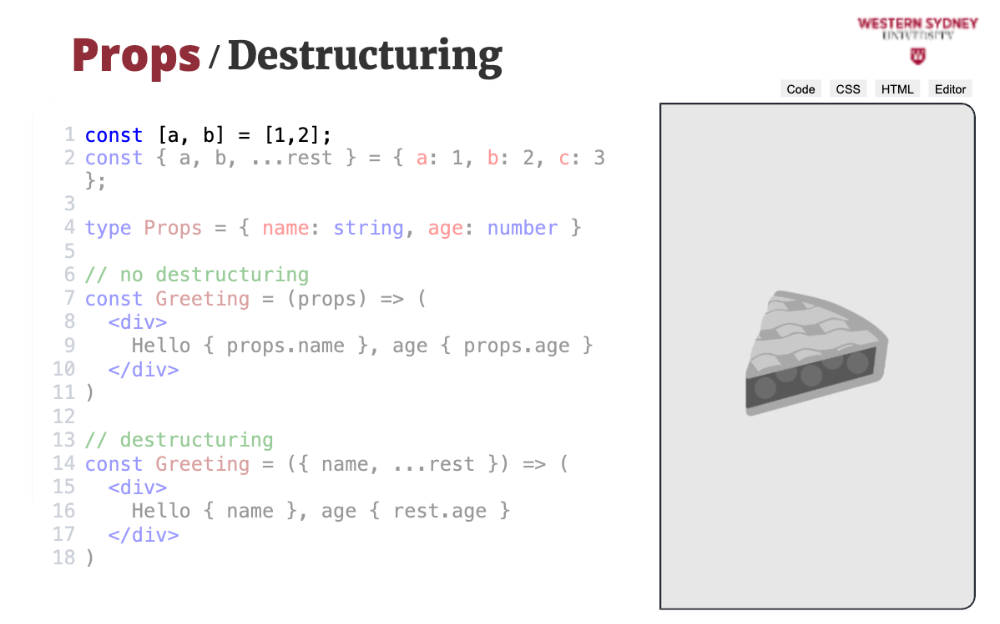
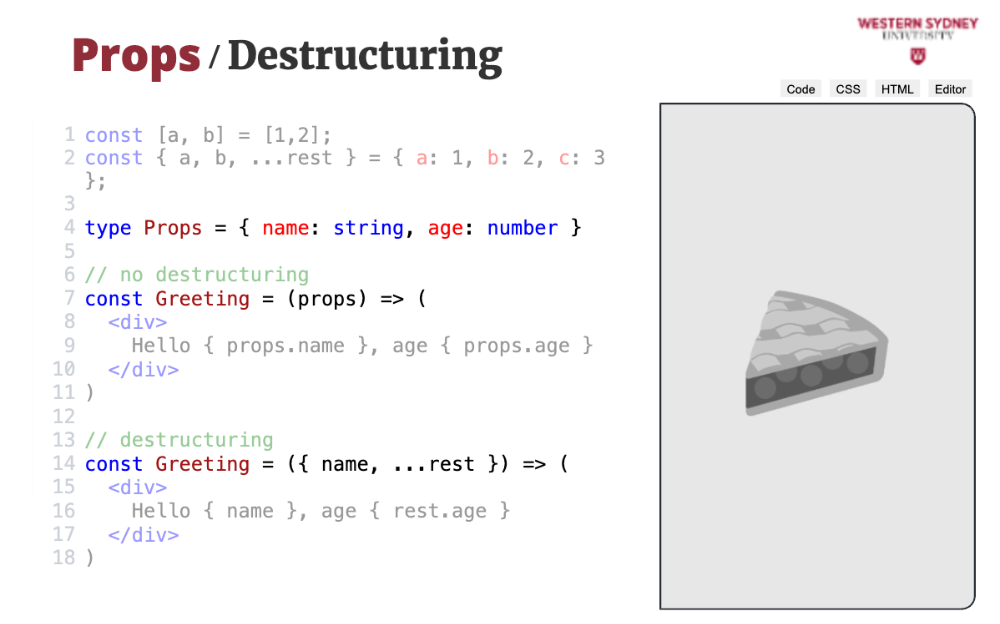
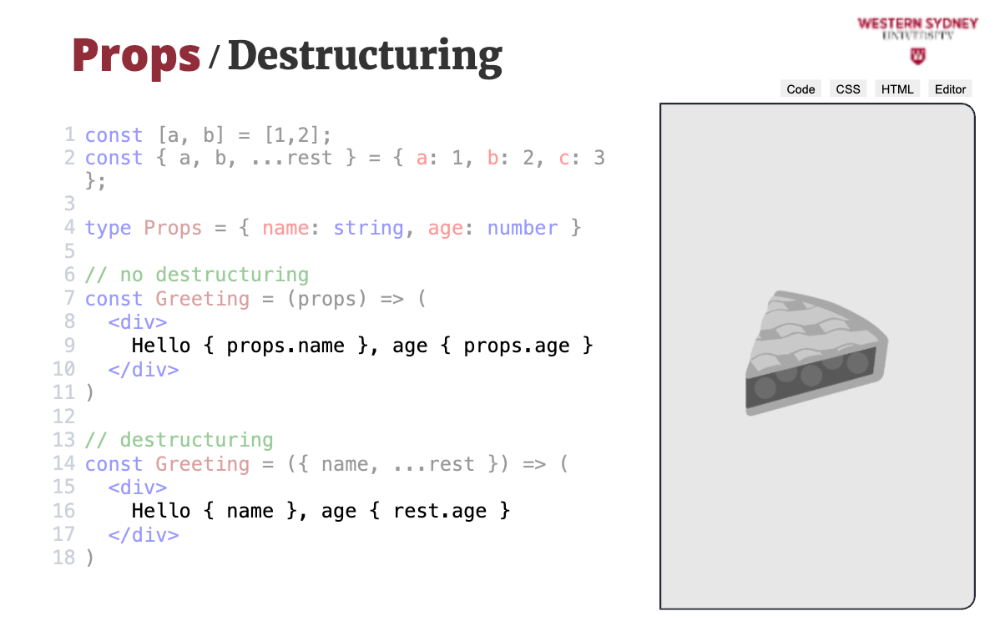
Now, let’s switch gears a bit and talk about destructuring props, which is a handy JavaScript feature we can use in React. In JavaScript, destructuring lets you pull individual values out of objects or arrays. For example:
const [a, b] = [1, 2]; // a = 1, b = 2
const { a, b, ...rest } = { a: 1, b: 2, c: 3 }; // a = 1, b = 2, rest = { c: 3 }
In React, we can destructure props to make our code cleaner. Compare these two versions of a Greeting component:
type Props = { name: string; age: number };

// Without destructuring
const Greeting = (props) => (
  <div>Hello {props.name}, age {props.age}</div>
);

// With destructuring
const Greeting = ({ name, ...rest }) => (
  <div>Hello {name}, age {rest.age}</div>
);
In the second version, we destructure name directly and use the spread operator (...rest) to capture the remaining props. It’s more concise and easier to read.
Destructuring also helps us handle optional props and default values. Let’s make age optional by adding a question mark in the type definition:
type Props = {
  name: string;
  age?: number;
};

const Greeting = ({ name, age = 44 }) => (
  <div>Hello {name}, your age {age}</div>
);

const App = () => (
  <>
    <Greeting name="Tomas" />
    <Greeting name="Valeria" age={30} />
  </>
);

render(<App />);
Here, age defaults to 44 if it’s not provided. When we render <Greeting name="Tomas" />, it shows "Hello Tomas, your age 44," but <Greeting name="Valeria" age={30} /> shows "Hello Valeria, your age 30." This is standard JavaScript destructuring at work, and it’s super useful in React.
What about boolean props? There’s a shorthand for those. Check this out:
type Props = {
  name: string;
  age: number;
  showAge: boolean;
};

const Greeting = ({ name, age, showAge }) => (
  <div>
    Hello {name}, {showAge ? `age ${age}` : 'age hidden'}
  </div>
);

const App = () => (
  <>
    <Greeting name="Tomas" age={60} showAge />
    <Greeting name="Valeria" age={30} showAge={false} />
  </>
);

render(<App />);
If showAge is true, you just write showAge without a value—it’s implied. If it’s false, you explicitly write showAge={false}. This shorthand keeps your JSX clean.
Sometimes, components share props with their children. Instead of passing each prop individually, you can use the spread operator:
const Greeting = (props) => (
  <div>
    <h1>Greeting</h1>
    <InnerGreeting showAge {...props} />
  </div>
);
Here, ...props passes all the props from Greeting to InnerGreeting in one go. It’s a quick way to share data down the component tree.
One last thing: props are read-only. You should never try to modify them directly inside a component. For example:
import { render } from 'react';

const Greeting1 = (props) => {
  props.name = "Tomas"; // Don’t do this!
  return <div>{props.name}</div>;
};

const Greeting2 = ({ name }) => {
  let newName = name; // Do this instead
  newName = "Tomas";
  return <div>{newName}</div>;
};

render(<Greeting1 />);
render(<Greeting2 />);
In Greeting1, trying to change props.name will throw an error in development mode because props are immutable. In Greeting2, we destructure name and assign it to a new variable, which we can modify safely. That said, modifying props-like data isn’t usually the best approach—we’ll talk more about state management later.
That’s it for today! We’ve covered how to use props to customize components, handle types with TypeScript, work with children and ReactNode, and use destructuring for cleaner code. Next time, we’ll build on this with component state. Any questions?
👾 Exercise
Slides

Let's now dive deeper into components and look at how we can customise them!

Let's take a look at how can we create reusable Components through props, which is a short name for properties.
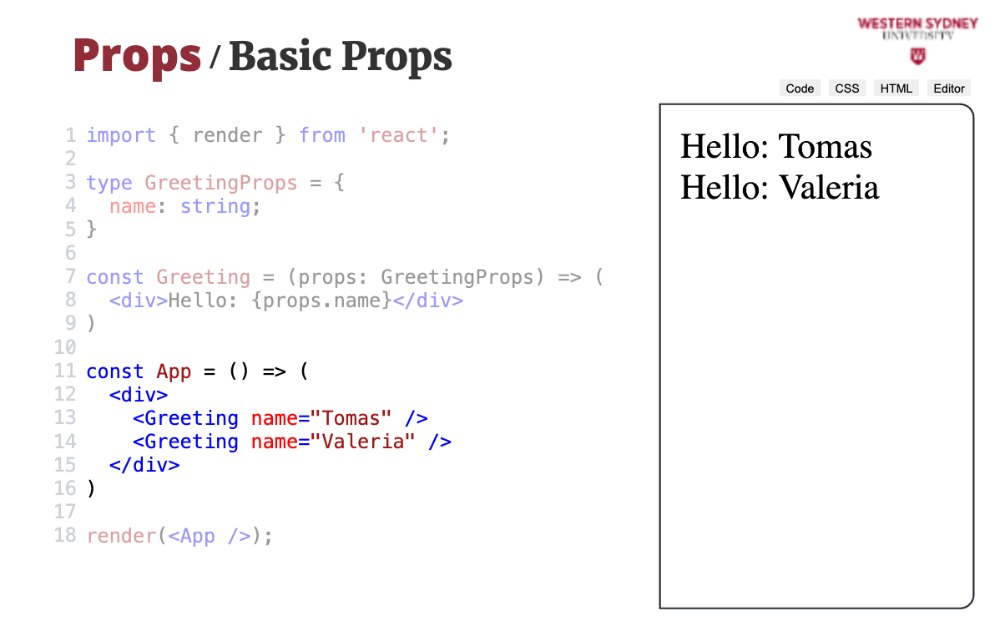
The best way to explore props, is through an example! Imagine we are creating a component, that should display a greeting to a currently logged in user. Therefore, we create a new Greeting component with one prop, called name.
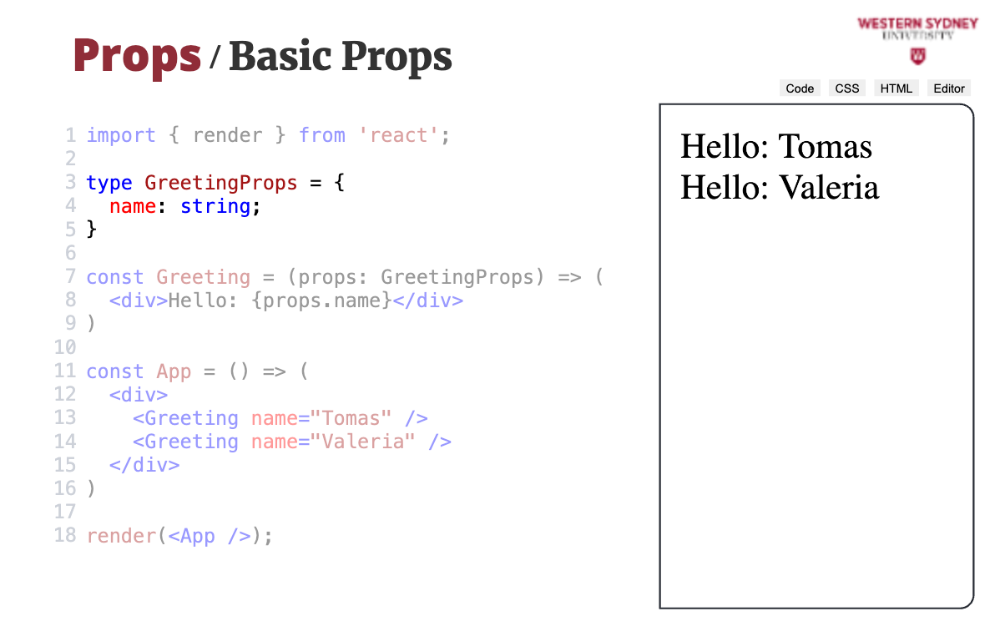
First, we define a type of the Props, in our case with only one prop called name and string type. The general convention for the name of this type is the name of the component with a Prop suffix.
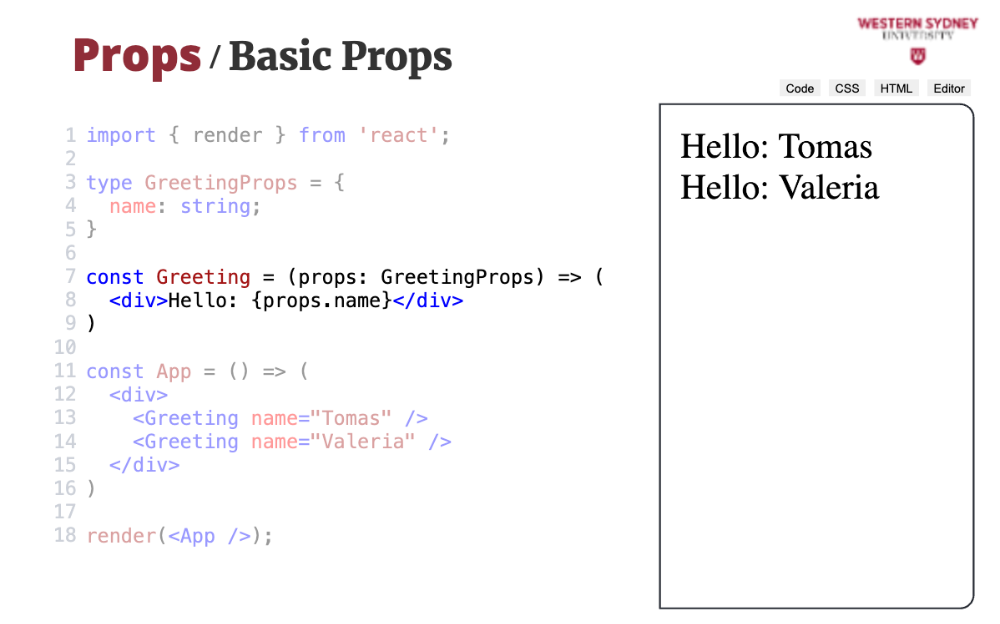
This component should display Hello, with a value of name prop next to it. Therefore, we include props as a single parameter of the React component, and use the value of the name prop through interpolation. Pretty easy huh? You can easily imagine how you can introduce, use and interpolate all kinds of props.

Let's talk shortly about how we control and check for types of props passed to React components. For this purpose we will use typescript, which allows for static, compile-time checking. In javascript, you employ a different strategy using run time checking. We prefer the static method as your errors are caught very early.
Currently, the type of the name prop is set to "string".

But what will happen if you try to pass a different type to the component? In our case, we will pass a number.
If you are using a typescript enabled editor such as Visual Studio Code, it will pick up the errors immediately as you type. In this case, it informs you that you are trying to pass a number where string was expected. But, what will happen if you try to execute your code?
Absolutely nothing! The code will still executes, as static typing of typescript is removed when transforming your code to javascript. But, many front end frameworks, such as NextJS inform of compilation when building the production version of your application.
To get rid of this pesky error, let's change the type of the property to number and the error will immediately disappear.
Of course, you can use union types to allow for multiple prop types.
But, what if you want to allow for a prop that takes arbitrary JSX?
For such purpose there is a special type in React, called ReactNode. This type envelops all the possible types you can render in react, including JSX. Therefore, if you want to allow for anything that can be rendered in React, you use the ReactNode type.
When you execute this code, you will find that both the number parameter and the JSX parameter correctly rendered.
So far we have been passing props only through element attributes. But how can we create a Ract component, that supports nested, hierarchical structures of html elements?
Let's consider a Group component, that will render a box with a title and some nested children ui, such as these lists of items to do.
Just like in standard HTML we want to be able to specify what elements will be rendered inside the component. Creating such a reusable component, we can create group boxes with different titles and content, such as the top one with a list of to do tasks.
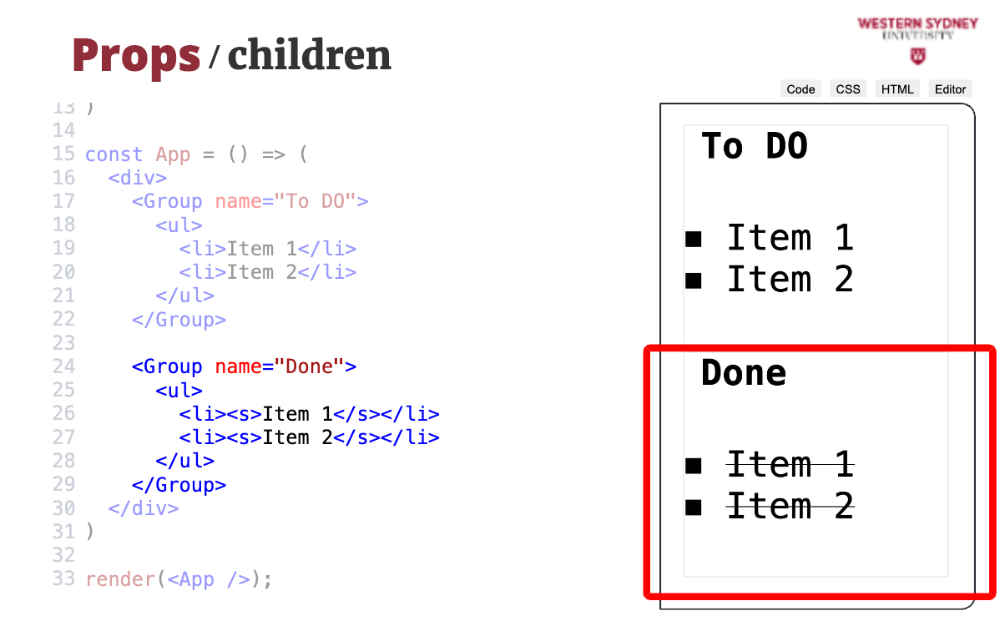
Or the bottom one with a list of done tasks. So, how can we do this?
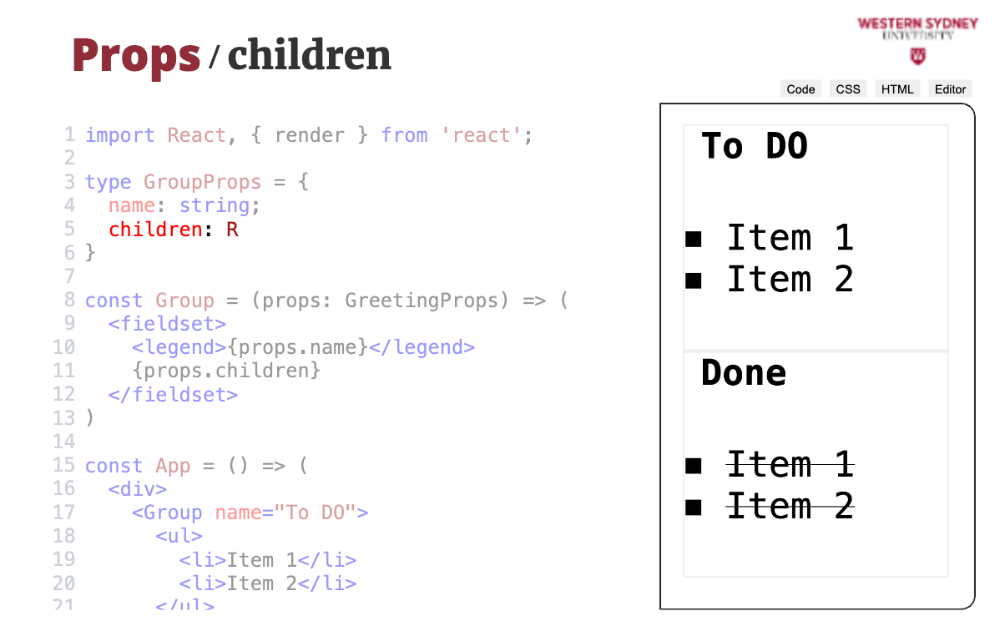
Enter the children prop.

First, we specify the structure of the Group component, rendering the fieldset and the title based on the prop name.
Then, we use the child prop to render the child component exactly where we want them to render, inside the fieldset, just after the header. Pretty cool huh?
In javascript, you can use destructuring to access individual members of an array or object. In this example, variable a will have value of 1 and b value of two.

In this example, we destructured an object, where variable a will have the same value as property a of a destructured object, that is one. Variable b will have value 2? Can you guess what value will have variable rest?
In React, we can destructure the props of the component to access individual values. In this case, we extract the value of the name and use the spread operator to keep the rest of the values in the variable rest.
We can now render the value of the "name" variable and access the rest of the props using the "rest "variable.
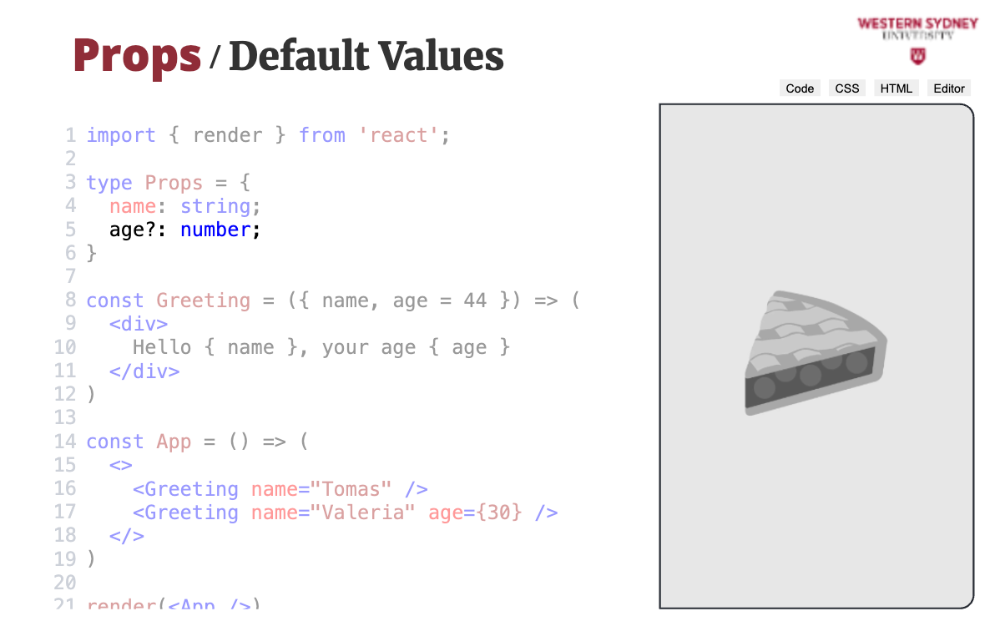
Using destructuring, it is easy to model optional properties and their default values. In our case, let's make age optional, marking it with a question mark in the Prop type definition.

Now, when destructuring the prop, you can provide the default value for the age prop. This is a standard functionality of javascript destructuring.

As expected, when you render this component without specifying age, React will show the defined default value, but when age is specified, React shows a correct value.
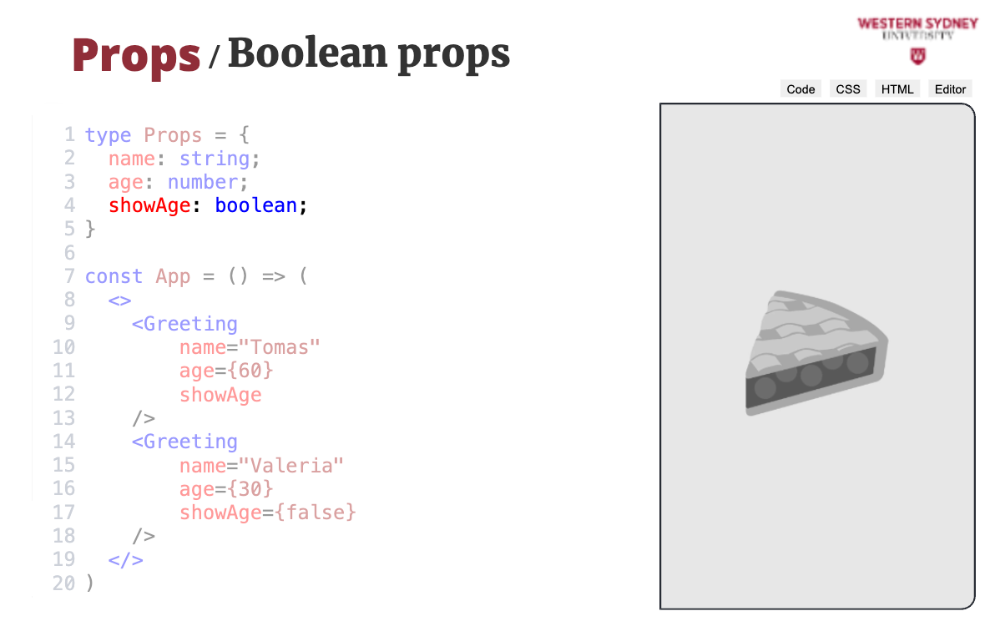
If you have a boolean prop, you can use a short notation when passing values to the prop.
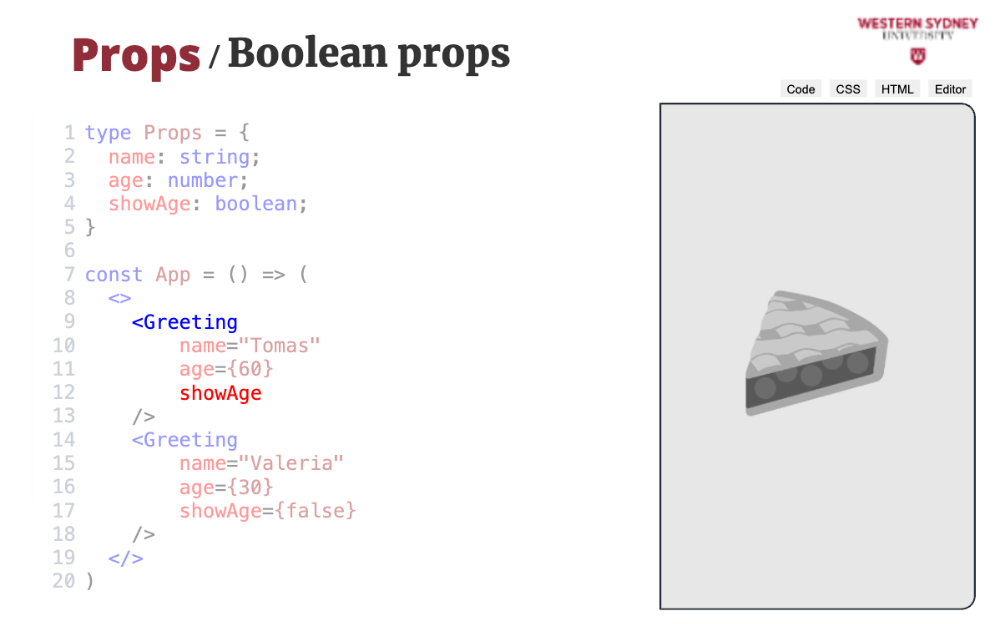
If you want to specify that the value is true, you do not have to specify the value, just the prop's name.
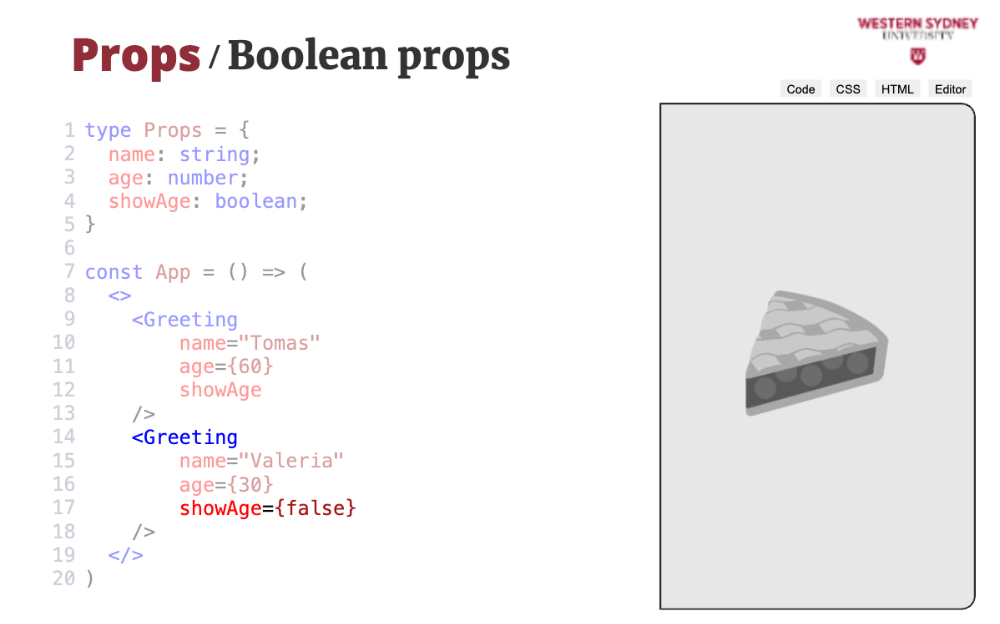
But, if you want to specify that the value is false, you have to provide the false value.
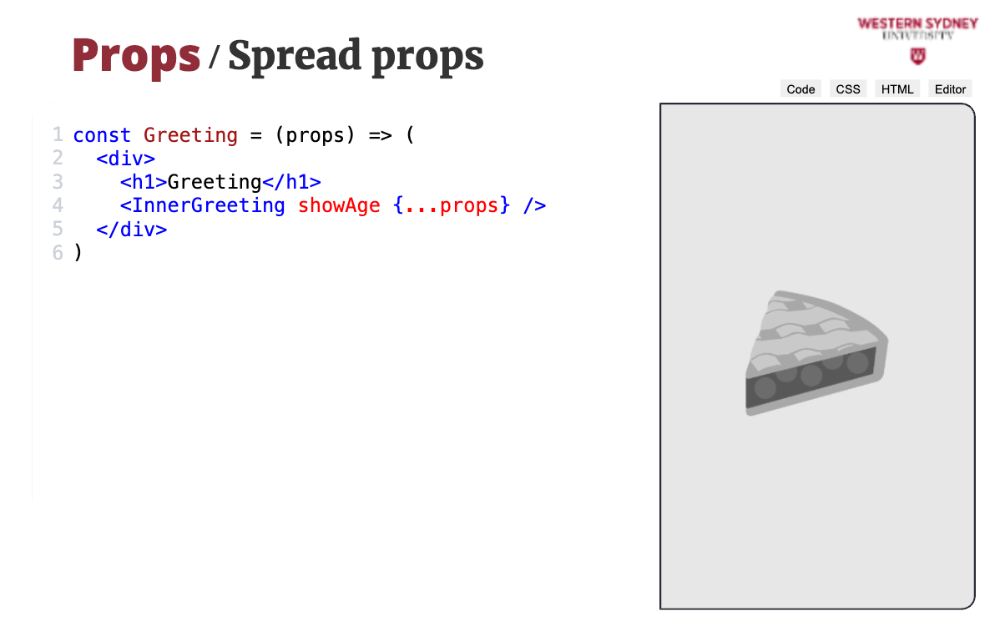
Often, you encounter that your components share the same set of props.
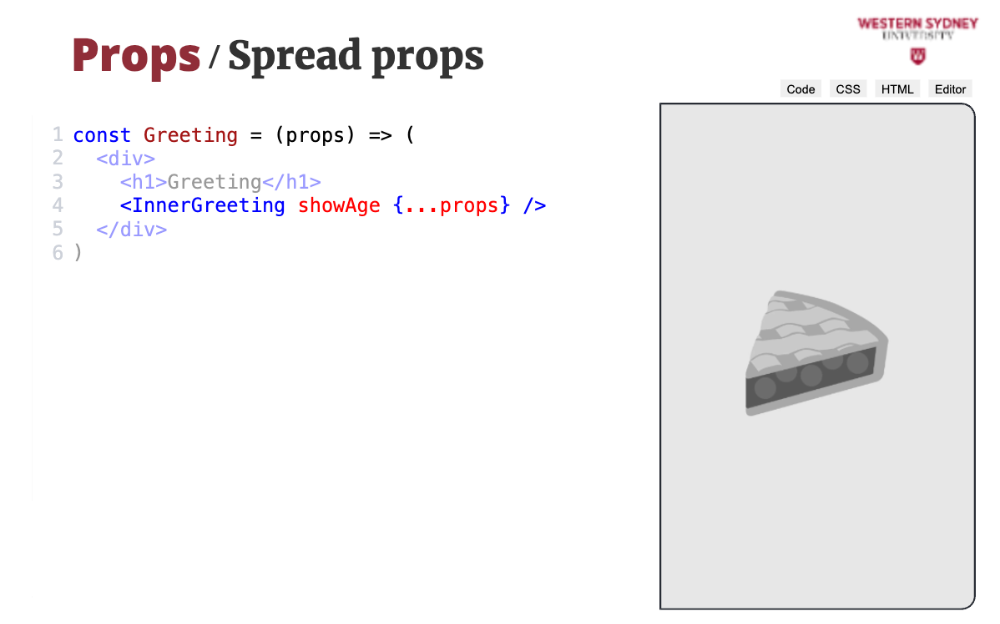
In this case, you can use the spread operator to pass all the props stored in the object prop instead of manually listing their values.
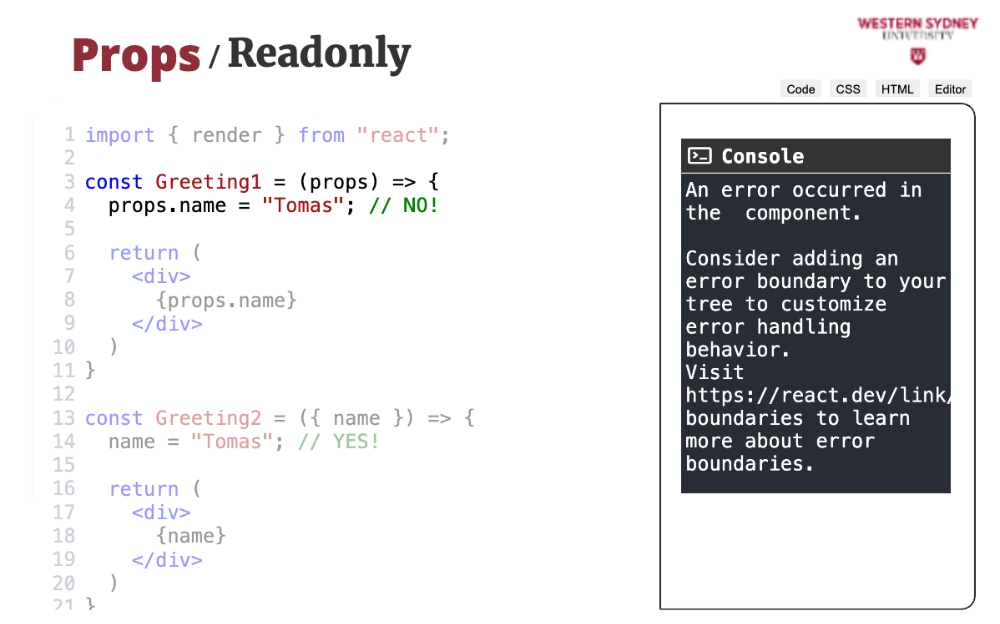
Props are considered read-only, you should never change their value directly. Doing so will produce an error during development.
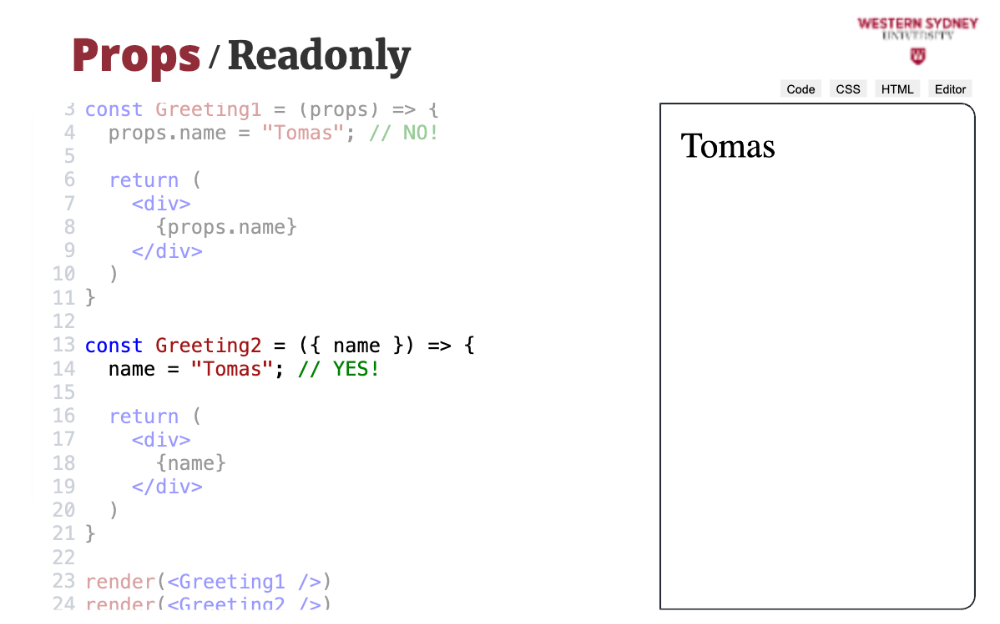
If you want to modify your props inside the component, it is best to destructure them first. But, this is usually not the best idea!